The Build Conference is now behind us where lots of exciting things were announced, among them the release of Visual Studio 2015 RC1. This blog post discusses the changes to the .NET framework, the solution layout / configuration and serves as an introduction to the recommended programming style encouraged by Microsoft going forwards. If you haven’t downloaded Visual Studio 2015, grab it now!
Framework changes
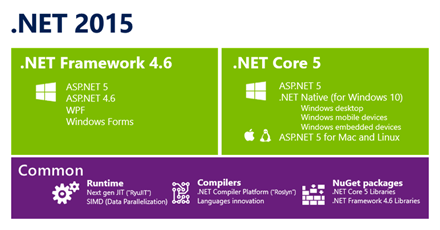
Due to the rise of cloud hosting and the demand to host in any platform, not just Windows servers where you need to install the framework in order for your applications to work, ASP.NET 5 now supports two runtimes:
- Full .NET: This is what was being shipped until now. It’s the version that gets installed on your machine.
- CoreCLR: It’s the shiny new, cloud-optimized runtime that can run on any machine (Windows, Mac, Linux). To achieve this, the framework has been broken down into NuGet packages and applications only need to reference those packages that are needed. In fact only the primary dependencies, any inner dependencies are downloaded automatically. When you deploy your application to the host, it’s bundled up into a NuGet package itself including all the dependencies. This results in the bundle being larger than previously where only the files belonging to your application were included, but it means that the server doesn’t need to have the .NET framework installed.

Note: Older applications (ones built with 4.5.1 or previous) will only work with the full .NET runtime as will any new Windows Forms and WPF applications. These will not be supported by the CoreCLR.
Run side-by-side
As a result of having everything that your application needs bundled and contained into a NuGet package, it is possible to run applications targeting different runtimes side-by-side. This eliminates the problem of having to update the runtime installed on the server in order to support new applications and ‘fearing’ that your older ones will break.
DNVM
When you install Visual Studio 2015, DNVM also gets installed and added to your PATH. DNVM is the dotnet version manager and will manage the different runtimes for you.
Dnvm list shows you all the installed runtimes. The active one is denoted with a * in the first column. You can change which is the active one by running: dnvm use <version number> -r <runtime> -arch <architecture> as you can see in the following image.
You will notice that the message printed after dnvm use says that the selected runtime has been added to the process PATH. This means that it has only changed in the current cmd window. You can make it persist if you append -p in the dnvm use command and this will also add to the user PATH. You could also set aliases for the runtimes using the dnvm alias command. A default alias already exists and you could use this instead of referring to the full version number.
DNX
Another command that also gets installed is the dnx command. This is used to execute your application. You can see the options just by typing dnx but typically it would have the format dnx <path to your project> <command>. We will see in action further down.
DNU
Finally, dnu, which stands for dotnet utilities, is what you need to build, package, deploy etc.
Just to clarify, you don’t have to use these commands to do things with your application. These are used behind the scenes by Visual Studio to perform the various tasks. It’s just important to know they are there if you need them.
Note: In the beta and CTP versions of Visual Studio 2015, these commands were kvm, k and kpm respectively so you might see these used in older posts. These were renamed in the RC1 release.
Solution layout
The first thing you will notice when you create your first project in VS 2015, is that the solution structure has changed and matches (almost) exactly what you see if you open the file explorer to your application’s source code. At the top level, there is the solution file (.sln) and a global.json file, then under the src folder there is a separate folder for each project and within each are the files and folders of your application.
The root of the website is now wwwroot and not the root of the project. This is where all the static assets such as images should go to as well as downloaded JavaScript libraries, CSS etc. Adding a file from the file explorer will immediately add it to your solution, there is no need to include it in your project manually. The .csproj file has been replaced with a much simpler .xproj file and the project.json file. All the references to the files included in the project that used to be in the .csproj file have been completely removed.
Project.json
Most of the application configuration now lives in this file. Within it you can add all your NuGet dependencies, the frameworks that you want to support, any commands that you wish to run using dnx as well as more advanced things such as compilation settings, excluded files and folders, scripts you wish to execute during different stages (prebuild, postbuild, prepack, postpack etc) and many more. Let’s have a closer look at the dependencies, frameworks and commands sections.
Dependencies
This is the place to include any references to ASP.NET NuGet packages as well as project references (for example Class libraries in the same solution). Once you start typing a dependency, IntelliSense is provided to assist you and once you pick the package you want, it will indicate which the latest version available (although it is possible to specify a different version or just use empty quotes (“”) to always reference the latest).

You can still access the NuGet package manager window and install dependencies using the GUI. Once you have saved the project.json file, you will notice that the References node in your solution explorer is restoring the appropriate packages. Only the primary dependencies need to be added in the project.json and are also listed under the References node but you can click on the arrows on the left to drill deeper.
Frameworks
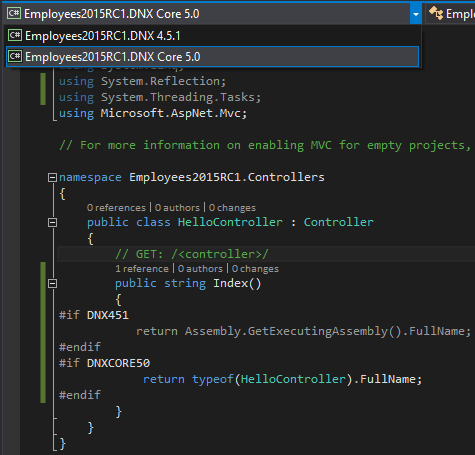
In the References image above, you will notice that the top-level nodes are named DNX 4.5.1 and DNX Core 5.0. These are the two frameworks targeted in my project.json file. It is also possible to have different dependencies for each framework - in fact, for the CoreCLR, you will need to add any packages that make up the Base Class Library (BCL) as they need to be referenced.
When the application is built, the compiler will ensure that it runs against all the defined frameworks. In fact, IntelliSense will let you know if a method is available in all the targeted frameworks while you type.

As before, you can add framework specific code if you wrap it in #if #endif as shown in the image below. The framework names DNX451 and DNXCORE50 are well known symbols actually referred to as target framework monikers (TFMs) and are the same throughout the project.json file, folder names, NuGet packages etc.

You can also change the targeted framework when you edit a file from the dropdown list at the top. This will grey out any code that will not run with the selected framework which makes it easier to read.
Commands
You can setup various commands in the project.json file under the “commands” section. Common examples are the web command which will self-host your application as well as the ef command which enables the use of entity framework commands such as migrations. Any NuGet package can include commands and you can also create your own. The command names could be anything, they don’t have to be web and ef but that’s how these two are typically named.
We can run the web command from a cmd using dnx: dnx <path to where the project.json lives> web. If we then open our browser and navigate to http://localhost:5000 (or the URL specified in the web command), we should see our application running. The ef command has further options but the help will be displayed if more commands need to be provided.
Dynamic compilation
The new compiler (Roslyn) supports dynamic compilation and as a result every time you make a change to any file (controllers, classes, views etc) and save it, the compiler will automatically build your application. This enables you to run (Ctrl + F5) your application, make a change to a file and save it, hit refresh and see your changes immediately. This will not only work if you use Visual Studio but any code editor - even notepad!
Client-side libraries
As I mentioned previously, only NuGet packages should be added in the project.json. You could still add your client-side libraries in your project.json but the latest NuGet package might not correspond to the latest version of the library released. Microsoft encourage developers to use Bower instead which is a package manager for the web. The bower configuration file, bower.json, is very similar to project.json and also provides IntelliSense while you type a dependency. Once you save the file, Bower will restore the packages which you can see under the Dependencies/Bower folder in your solution explorer.
The files are automatically downloaded and placed under the bower_components folder. This folder is automatically excluded from the project so if you want to see it in your solution explorer you will need to enable the Show All Files button. You can change which folders are excluded from your project.json file under the “exclude” section. Once the libraries are downloaded, they should be copied under wwwroot. To learn how to do this automatically, read the following section.
Task runners
When building a website there are some common tasks, such as bundling and minification, which you do every time. In older versions of ASP.NET, Microsoft provided their own tools to automate that but just as they did with Bower, they now encourage developers to use established tools called task runners to do that. Visual Studio 2015 ships with a version of npm (node package manager) which allows you to download popular task runners such as Grunt or Gulp. Once again the configuration file for npm, package.json, is very similar to project.json. The packages get restored under the Dependencies/NPM folder and the files are under node_modules (also excluded from project.json).
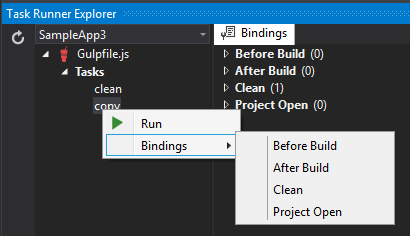
Once you have a task runner installed, you need to configure which tasks it should run and when. For example, in the following gulpfile.js there is a copy task configured which will copy the needed JS libraries from bower_components and place them under a lib folder in your wwwroot. There is also a clean task which will delete the files under lib.
To run those tasks, there is a new window called Task Runner Explorer. You will find it under Tools or just right-click on the gulpfile.js and you will see it as an option. From there, you can right click on one of the tasks and run it or bind it to some specific action. For example, the clean task is bound to the Clean action.

Unified MVC 6
In previous ASP.NET releases, Web Pages, Web API and MVC were implemented separately but because they offered a lot of common functionality, there was some duplication and inconsistencies. They are now all unified under the umbrella of MVC 6. There no longer is a separate ApiController for your services or the need to write slightly different code or reference different libraries to achieve similar results between the three programming models.
Dependency Injection
ASP.NET 5 comes with built-in support for dependency injection. In fact, creating an empty Web Application will not even provide support for MVC. This ‘service’ needs to be added to the dependency injection (DI) container. You can still explicitly instantiate specific services when needed but Microsoft seem to really want to push this style of coding.
All this happens in the Startup.cs file which has replaced the Global.asax file. In the ConfigureServices(IServiceCollection services) method, you need to add (and obviously configure) the services you will need to use and in Configure(IApplicationBuilder app), where the application configuration happens, you need to use those services.
For example, to add support for MVC, we first need to add the dependency to Microsoft.AspNet.Mvc in our project.json file. Then, in the ConfigureServices() method, we need to add Mvc to the services collection passed into the method. This is simply done with the statement services.AddMvc(). Note that if you haven’t added the NuGet package, AddMvc() will not be available. Finally, in the Configure() method, you need to use Mvc in your app. Extra configuration settings such as setting up routing can also be done here as demonstrated.
Open Source
In 2014 Microsoft announced the .NET foundation initiative which will oversee the open sourcing of the .NET platform. Several components have already been made available on GitHub including the Core CLR, Roslyn compiler and ASP.NET. Microsoft seem to have taken this very seriously and even have issues that are Up for Grabs for anyone that would like to contribute.
Conclusion
A lot of big changes were introduced in this release with many ideas coming from the open source development platforms such as NodeJS. It’s a no-brainer that refactoring the web stack and going open source is a step towards the right direction. The new solution structure though and the tools that come with it are more open to different interpretation. Developers who prefer to work outside Visual Studio will certainly welcome these changes. It remains to be seen though if it will be appreciated by the existing .NET developers who admittedly have been spoiled for many years by the tooling that just works out of the box. It certainly is a very exciting time to be a developer!
Summary
In this post, all the major changes and new concepts introduced in ASP.NET 5 were discussed as well as layout changes to the project structure. The following videos and posts are good starting points:

