
Ionic is a framework built on angular-js, targeted at creating mobile applications. However, one component that isn’t part of the standard controls is the master detail layout.
A recent project I worked on required this type of layout, so I spent some time researching and then creating a custom control. This post describes that process, but if you just want to see the end result, check out the demo project.
What is a Master Detail layout?
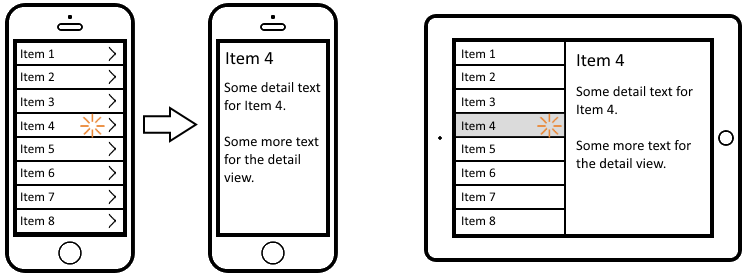
A master detail layout is a responsive layout for tablets and phones, that allows users to view a list of items (the master view), and drill down into each item for more details (the detail view).
On small devices (i.e. phones), the control should behave similar to a navigation control, where the user only sees one screen at a time and has the ability to navigate forwards backwards between the master and detail views. On larger devices (i.e. tablets), the control should be a split-screen view so the user sees the master view down the left edge of the screen with the detail view filling the remaining space.
When writing a native iOS app, this type of view is part of UISplitViewController. For a great write up on this, I’d strongly suggest reading Sam Davies’s write up over on the ShinobiControls blog.
Unfortunately, Ionic does not come with this kind of control out of the box (at least, as of 1.0), so I had to look into alternatives for my project.
Available options
When originally looking into this, I initially looked into the expose-aside directive (as described on the Ionic blog).
However, while this control would be perfect in iPad mode, it unfortunately doesn’t behave as required on iPhone. The control drops down to a hamburger menu when small, which didn’t fit with our design.
Another approach I looked at was to simply use some JS to detect if we are in iPhone or iPad mode and choose the appropriate control to display (either a nav view, or a split view). However, this unfortunately made the code dealing with states much more complicated, and I ideally wanted a solution that would be responsive in the browser as some of our users would occasionally be using Chrome to view our app on desktop.
In the end, I chose to write my own directive that would handle the master detail layout.
I could make some assumptions for my particular use case that made development a bit easier:
- The app will target iPhone 5+ and iPad only (no Android).
- Our navigation stack will be at most 1 deep (there are no detail sub-pages).
- The app already had custom history navigation (i.e. back buttons, for deep-linking reasons).
One feature that did make development a bit more difficult was it needed to have multiple detail states associated with a single master state. This mean the master view could contain multiple lists of data, and it should show a different detail view based on which list the selected item was in.
General concept & Implementation
First, in terms of (ui-router) states, I chose to have the detail view be a child of the master view. On the iPhone the user will navigate from the master view into the detail, then back up again so it made sense to nest our states around this. It additionally had nice URL formats, which simplified deep-linking into either the master or detail states.
For the view, I ended up having a directive that creates two child views. The first view was for the master state, the second for the detail state. On the iPad, these two views sit side-by-side via some CSS.
On iPhone things are a bit more complicated. Both views are the full size of the screen with the detail view sitting on top of the master view (via z-index). When in the detail state, the detail view has content and is rendered on top of the master view, obscuring it. When in the master state, it moves the the detail view off-screen with a little CSS and JavaScript. I used CSS transitions to make the detail view appear/disappear smoothly, similar to the iOS navigation control.
One other feature I added was to force the user into the first detail state when in iPad mode, to prevent displaying a mostly blank screen to the user. This did have the disadvantage that if the first item in the list redirect back to the master view (such as when an error might occur) it would get stuck in an infinite redirect loop between the master and detail states. In the end, I chose not to fix this as it wouldn’t happen in our use case.
One other notable feature I added was to show selection on the list items in the master state. In iPad mode by default there was no indication on the master view what item was being shown in the detail view. Ideally I didn’t want to have to add logic to every controller for the master view to track selection, so instead I added this to a base controller that the master and detail controllers can ‘inherit’. When entering a detail state, it now sets the property ‘selected’ on each item in the master list.
I feel it’s worth mentioning that I only discovered ui-sref-active after writing this control. If you are looking to implement this yourself, I would recommend looking into this to see if it is a better approach to show selection.
Lastly, there was still some set up necessary in the controllers to create the states and associate them with data. So, to make this simpler I pulled most of the logic out into a masterDetailState helper. This meant consumers could set up their master details states very similarly to the default $stateProvider:
masterDetailStateProvider
    .masterState('demo', {
        url: '/',
        view: 'test',
        templateUrl: 'master-template.html',
        controller: 'mastercontroller'
    })
    .detailState('demo.detail', {
        url: ':id',
        templateUrl: 'detail-template.html',
        controller: 'detailcontroller'
    });
And to associate the master state with data, they simply need to call the base master controller inside their controller:
app.controller('mastercontroller', function ($scope, demoItemsService, $controller) {
    $scope.items = [];

    $controller('MasterCtrl', { $scope: $scope }).setupMasterDetail({
        master: 'demo',
        details: [
            { name: 'demo.detail', array: function () { return $scope.items; } }
        ],
        loadData: loadData
    });

    function loadData(refresh) { ... }
});
Limitations
While this control ended up fitting our needs very well, there are some parts of the implementation I am unhappy with. In particular, I dislike how I have ended up having some of the logic for deciding whether to show split-mode being a mix of JS and CSS, especially the magic number for the width to switch layout modes existing in both CSS and JS.
If I was going to write this again, or spend a fair chunk of time re-factoring this, I would probably attempt to pull more logic into JS and simply add/remove CSS classes to do the actual layout and animations.
I also ended up not being very happy with the need to both define the master detail states at config time, and then additionally reference the detail state from within the master controller (in the setupMasterDetail call). This could probably be much simpler if it didn’t need to have multiple detail states associated with a single master state.
Demo
A demo of this control is available. Note, this was designed to work with Chrome/Safari, but it should also work in most other browsers.
