
I recently attended the very first JSConf.IS in Reykjavik. It was a great conference and I can highly recommend it for next year. I’ve already blogged about my highlights so I thought I’d cover some of the other festivities.
Code in the Dark
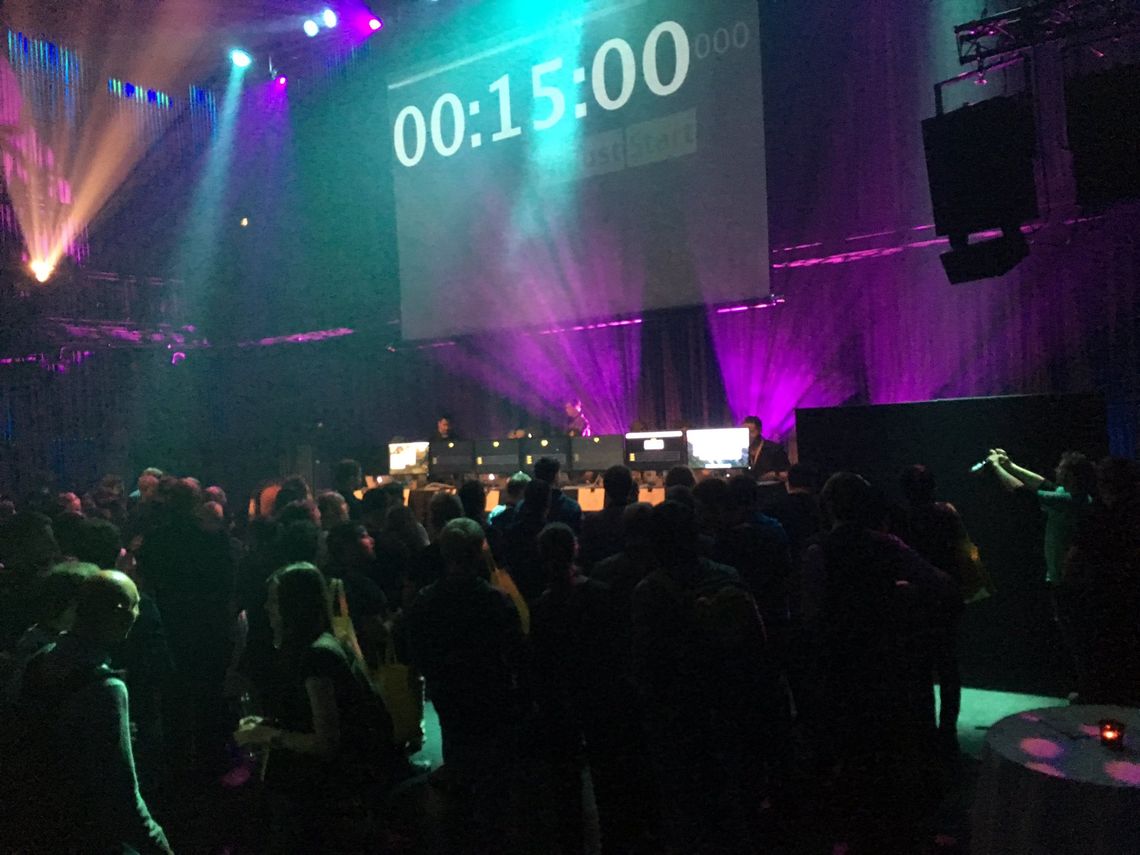
On the Thursday evening the organising team ran two hack events. The first ran across three 15 minute timed heats and its challenge was to use HTML/CSS to produce the closest likeness competitors could to a random website chosen by the judges.
Not that hard you might think. But you’d be wrong! The big twist was for competitors to code up their creations without access to Google… and… Without being able to preview their work until the time was up.
Whilst I’d not heard of this type of event before, it turns out the same concept has been running for a little while under the name Code in the Dark.
As I don’t know my main axis from my cross axis, I bowed out of this event. However, those that did take part produced an impressive mix of results. There were some very close approximations and as you’d expect, there were also a number of blunders. In the end, it was a good spirited competition which provided a nice backdrop for the evening.
Hack the Northern Lights
The venue for both events was the Nordurljos or Northern Lights room inside Harpa. So named because of the custom lighting installation which covers the walls of the room and is normally used to provide a nice backdrop for music recitals. However, for one night only, the organisers created a JavaScript playground which allowed the creation of room-scale visualisations!
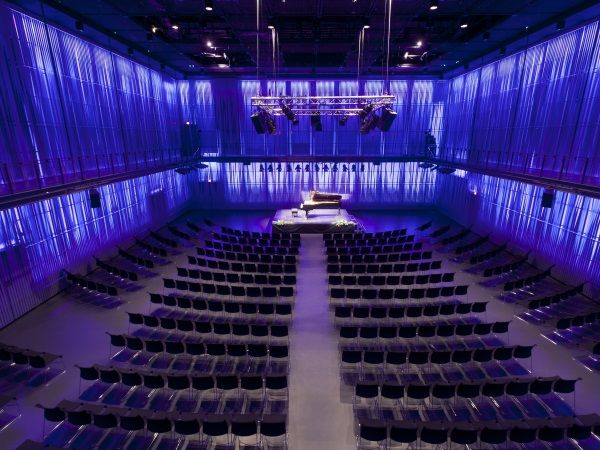
Eypor Arnason - Nordurljos or Northern Lights, Harpa - Meet in Reykjavik
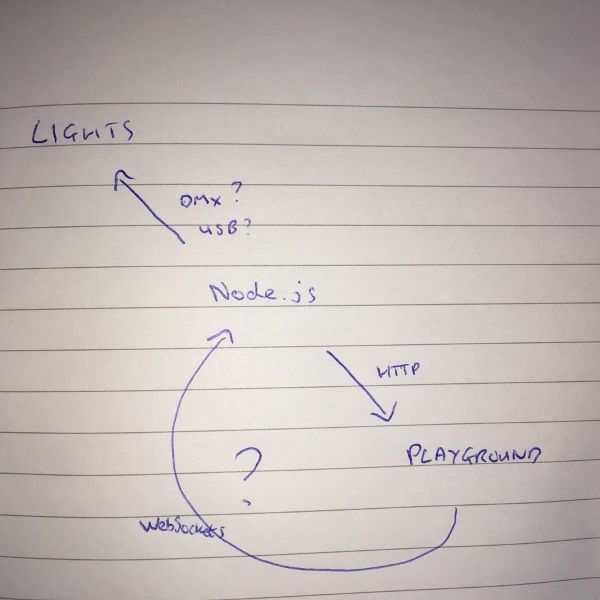
I didn’t find out any of the specifics of how it was all plumbed together but here’s my best guess -
- The playground is served up as an HTML5 app in which you can make local edits and test your creation in a mini-preview screen.
- When the time comes to control the room lighting, your browser pushes a snapshot of the light states down a WebSocket connection to a Node.js app.
- The app takes care of transforming the light data into DMX frames and then pushes it out via a USB adapter.
Here it is again but this time exercising the full gamut of my design skills (which should go some way to explaining why I didn’t create my visualisation from scratch…) -
The outside of Harpa actually has a very similar lighting setup (which looks stunning at night). Now it might just be a vicious rumour but apparently the original intention was to allow for these to be controlled… but this was blocked by the building’s architect.
The Playground
Unfortunately I can’t show you the original playground as it has been taken down1. So instead I’ve created my own vague approximation -
Whilst it’s rough around the edges I think it captures the essence of the original. The framework code takes care of calling the custom update function approximately 16 times per second. The update function receives a lights array representing the light states and the current time in seconds. It’s responsible for setting the color property of each light to the required CSS colour value.
The lights array corresponds to the physical lights as follows -
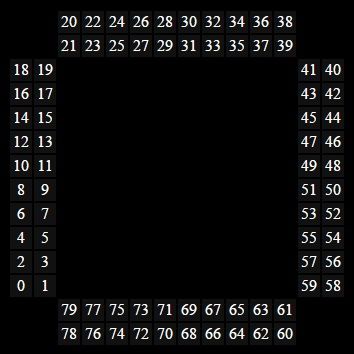
The default implementation of update sets all of the lights to have the same color. The colour is derived from the current time and is defined in HSL notation to allow smooth transitioning through the spectrum.
An Unusual Use for d3-force
For my entry I wanted to do something a little bit different. As I’ve recently spent a lot of time using D3 and burdened with the already mentioned lack of design skills, I thought there must be something in D3 I could use to power my visualisation. I quickly settled on doing something with d3-force which tends to lead to the most exciting looking, if not always the most useful, D3 examples!
At its core is the forceSimulation, which you can consider a multi-purpose physical simulation harness. It takes a collection of nodes and a collection of forces as inputs. It then runs the simulation by tick-ing time: advancing time by a small increment and then applying the forces to the nodes.
In my head I settled on creating a simulation something like -
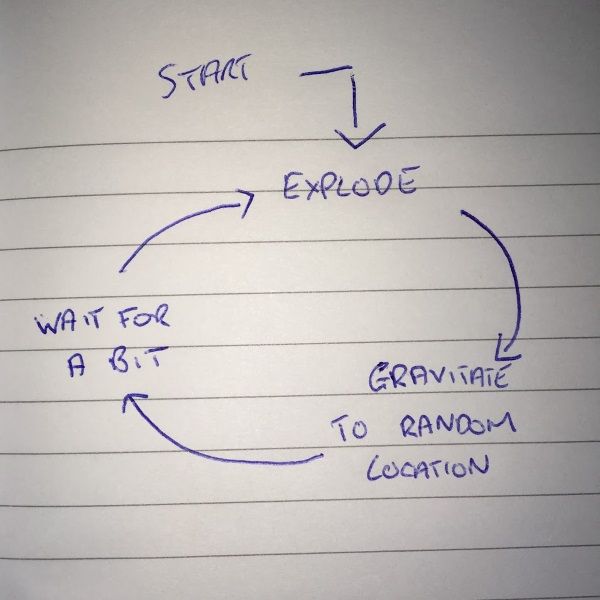
Which conveniently maps onto the following primitives -
- “Explode” - A many-body force will, by default, model electrostatic charge (repulsion) between nodes. If energy is injected into the system (by increasing the simulation’s
alpha) the nodes will rapidly move away from each other giving us an exploding effect. - “Gravitate to random location” - A positioning force will attract the nodes to a given location. Again a bit of energy (
alpha) is required to get the nodes moving. - “Wait for a bit” - A good old
setTimeoutshould cover this.
There’s no force to bring things back into the center vertically. In this case it doesn’t matter too much because of how we map the positions on to the lights. However, if you’re trying to render this to a more traditional display, it’s worth checking out the centring force or using a y-positioning force depending on the look you’re trying to achieve.
Here it is coded up with some judicious use of Math.random and some carefully selected (guess/observe/repeat) constants to make everything look “nice” -
const nodes = [];
for (let i = 0; i < 50; i++) {
    nodes.push({});
}

const forceX = d3.forceX(totalCols / 2, 0);

const simulation = d3.forceSimulation(nodes)
    .force("charge", d3.forceManyBody().strength(1))
    .force("forceX", forceX);

simulation.stop();

const randomise = () => {
  simulation.alpha(Math.random() * 0.3 + 0.7);
  forceX.x(Math.random() * totalCols);
  setTimeout(randomise, Math.random() * 6000)
};
setTimeout(randomise, 3000);
The randomise function follows the flow chart above. First it injects a random amount of alpha into the simulation triggering the explosion effect. Then it sets the positioning force to attract the nodes to a random x location. And finally it calls setTimeout to invoke itself after a random duration.
If you’re looking carefully you’ll probably have spotted that the very first thing we do with the simulation is to stop it. Whilst this might seem rather odd, this is to save us some CPU by only running the simulation when an update is required. Normally the simulation will internally invoke its tick method using its own internal timer. In this case, because the framework will invoke our update method using its own internal timer, we manually invoke tick as part of our update method to align the two.
A massive tiny display
The only missing piece of the puzzle is to render the simulation onto the lights. Currently we have the simulation assigning each node an x/y position, somehow we need to map those positions on to the array of lights detailed above. On reflection, in D3 parlance, we’re actually just creating the xScale and yScale for the visualisation.

I decided to use the top row of lights to represent all positive y values, the bottom row of lights to represent all negative y values and, as I was left with zero, I used both to represent it (why not?!). In the x direction, I simply rounded the number to an integer than wrapped the domain from the last column back to the first column.
function update(lights, time) {
  simulation.tick();

  const color = `hsl(${(time * 200) % 360}, 100%, 50%)`;

  for (const node of nodes) {
      let x = (Math.round(node.x) - (totalCols / 2)) % totalCols;
      x = x >= 0 ? x : (totalCols + x);
      lights[x * 2].color = node.y >= 0 ? color : null;
      lights[x * 2 + 1].color = node.y <= 0 ? color : null;
  }
}
With this update function a given light is illuminated with the colour (stolen from the example code) if there is a node in the corresponding domain segment as described above.
The Result
Here’s the playground updated with the relevant snippets of code -
And without further ado here’s a shaky video of the result rendered onto the walls of the Northern Lights (I’d recommend sound) -
Eagle-eyed observers may have spotted a blunder in the above implementation (life lesson: always write tests even when drinking alcohol). My intention was to colour any given light if there was at least one node in it. However, the code above will clear the top light whilst rendering the light below it or vice versa. I plead artistic license but in case that doesn’t satisfy you, here’s a patched version -
Thanks again to the organisers for the opportunity to play with something on this scale. If you’re looking for a JavaScript conference, I can definitely recommend JSConf.IS for next year.
Also, don’t forget about the talks.
1 There was a lot of last minute coding going on by the organisers to get all of this working. I’d guess that security wasn’t at the front of their minds when creating the setup which is probably one of the reasons it is no longer online. Having said that, I think they did an amazing job to get it running at all, hats off to them it was great fun to play with.
