
Have you ever wanted to write your own compiler? … yes? … of course you have! I’ve always wanted to have a go at writing a compiler, and with the recent release of WebAssembly, I had the perfect excuse to have a go.
My original plan was to invent my own programming language, create a compiler that targets WebAssembly, and share my experiences at FullStackNYC. The first part went to plan, I spent many-an-evening building, tinkering and refining my compiler. Unfortunately the last part of my plan didn’t go quite so well. Long delays, and an eventual cancellation, meant that I wasn’t going to make it to New York after all. 😔😢😭
So, rather than waste all that work - I thought I’d write up my talk as a blog post instead - hence the ‘19 min’ reading time for this article. So sit back, make yourself comfortable, and we’ll begin …
What is WebAssembly? (and why does it exist?)
If you haven’t heard of WebAssembly before, and want a really detailed introduction, I’d thoroughly recommend Lin Clark’s Cartoon Guide.
You’ll learn the ‘what’ of WebAssembly throughout this blog post, but I do want to briefly touch on the ‘why’.
From my perspective, this diagram sums it up quite succinctly:
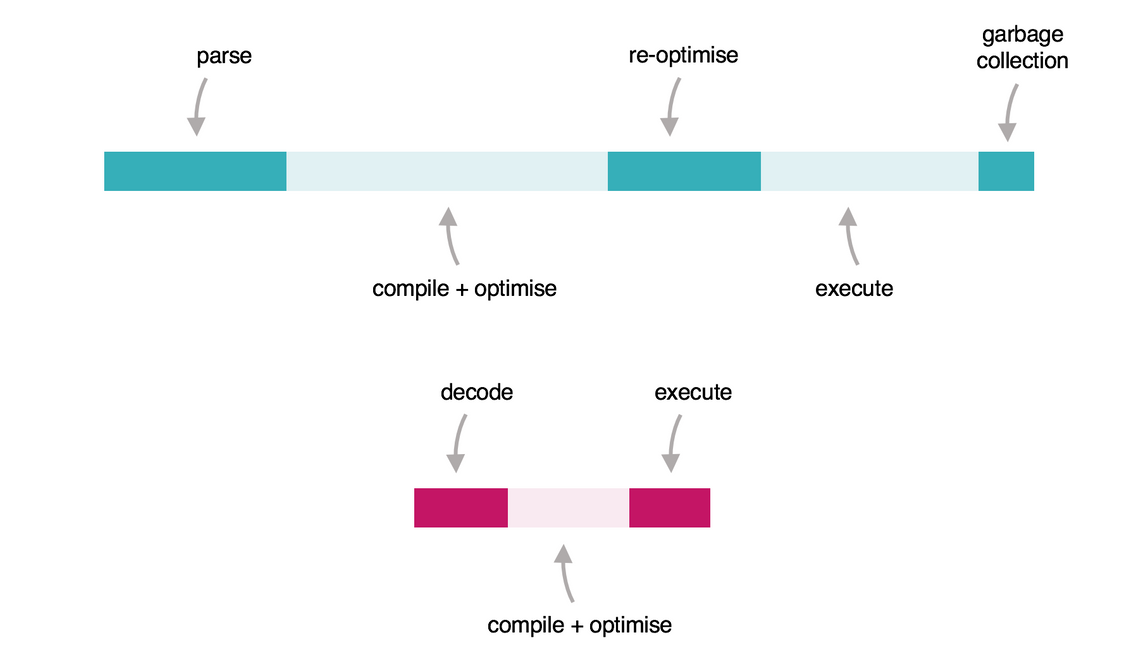
The top diagram shows a simplified timeline for the execution of some JavaScript code within the browser. From left-to-right, the code (typically delivered as a minified mess!) is parsed into an AST, initially executed in an interpreter, then progressively optimised / re-optimised until it eventually runs really quite quickly. These days JavaScript is fast - it just takes a while to get up to speed.
The bottom diagram is the WebAssembly equivalent. Code written in a wide variety of languages (Rust, C, C#, etc …) is compiled to WebAssembly that is delivered in a binary format. This is very easily decoded, compiled and executed - giving fast and predictable performance.
So why write your own compiler?
WebAssembly has been causing quite a stir over the last year. So much so, that it was voted the fifth ‘most loved’ language in Stack Overflow’s developer insights survey.
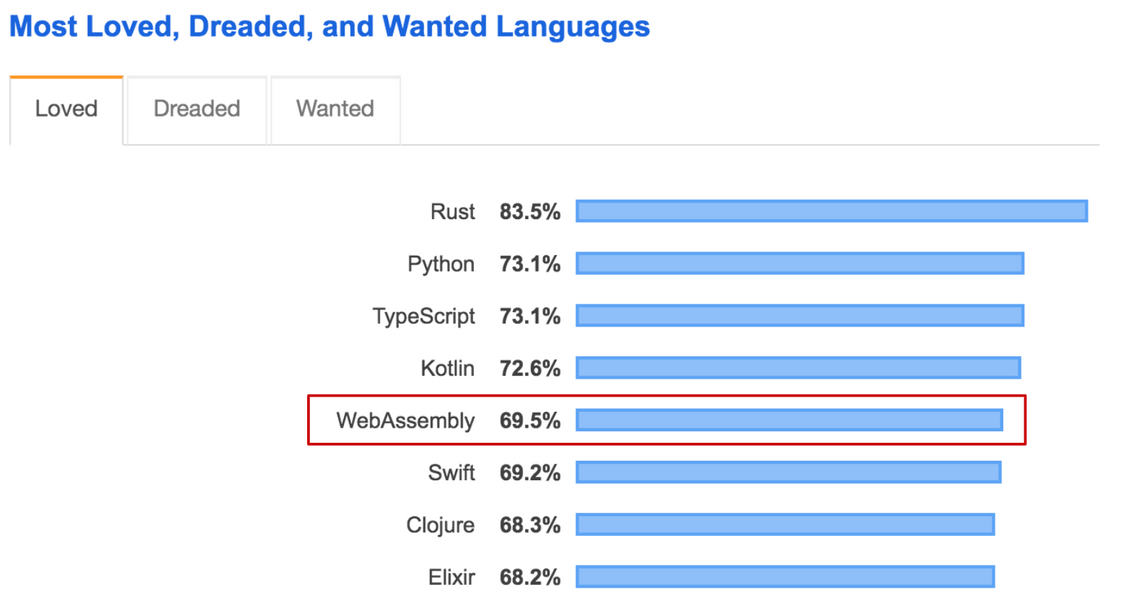
An interesting result, considering that for most people WebAssembly is a compilation target, rather than a language they will use directly.
This was part of my motivation for proposing the FullStackNYC talk in the first place. The technical aspects of WebAssembly are really fascinating (and remind me of 8-bit computers from a few decades back), yet most people will never get the chance to dabble with WebAssembly itself - it will just be a black box that they compile to.
Writing a compiler is a really good opportunity to delve into the details of WebAssembly to find it what it is and how it works. And it’s fun too!
One final point, it was never my aim to create a fully-featured programming language, or one that is actually any good. My goal was to create ‘enough’ of a language to allow me to write a program that renders a mandelbrot set. This language is compiled to WebAssembly using my compiler, which is written in TypeScript and runs in the browser.
Here it is in it’s full glory:
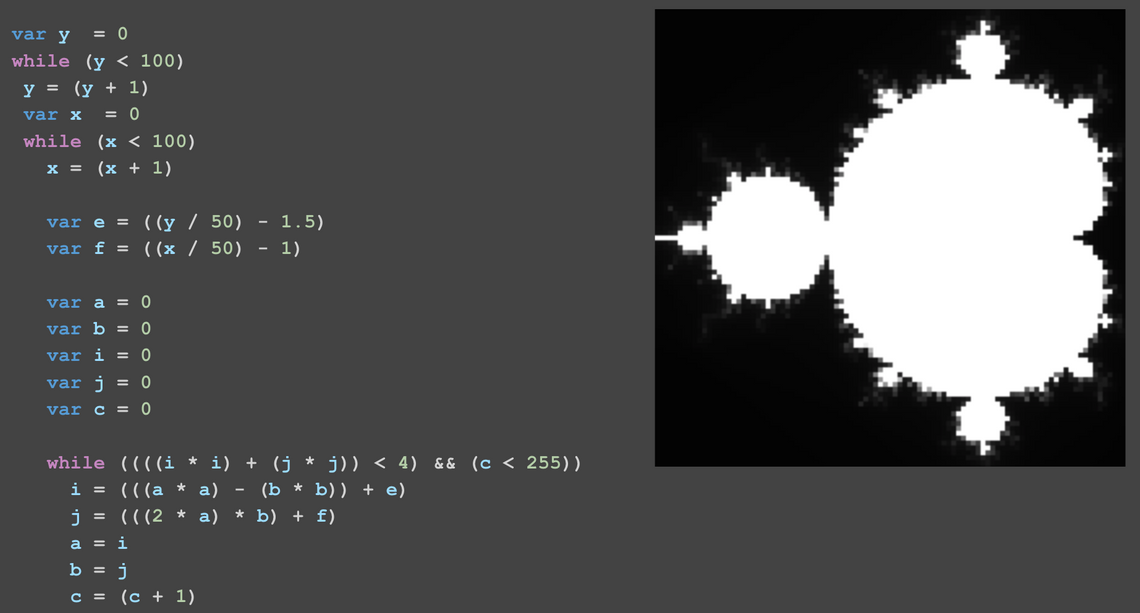
I ended up calling the language chasm and you can play with it online if you like.
Enough rambling - time for some code!
A minimal wasm module
Before tackling the compiler, we’ll start with something simpler, creating a minimal WebAssembly module.
Here is an emitter (the term used for the part of a compiler that outputs instructions for the target system), that creates the smallest valid WebAssembly module:
const magicModuleHeader = [0x00, 0x61, 0x73, 0x6d];
const moduleVersion = [0x01, 0x00, 0x00, 0x00];

export const emitter: Emitter = () =>
  Uint8Array.from([
    ...magicModuleHeader,
    ...moduleVersion
  ]);
It is comprised of two parts, the ‘magic’ header, which is the ASCII string \0asm, and a version number. These eight bytes form valid WebAssembly (or wasm) module. More typically these would be delivered to the browser as a .wasm file.
In order to execute the WebAssembly module it needs to be instantiated as follows:
const wasm = emitter();
const instance = await WebAssembly.instantiate(wasm);
If you run the above you’ll find that instance doesn’t actually do anything because our wasm module doesn’t contain any instructions!
If you’re interested in trying out this code for yourself, it is all on GitHub - with a commit for each step.
An add function
Let’s make the wasm module do something more useful, by implementing a function that adds a couple of floating point numbers together.
WebAssembly is a binary format, which isn’t terribly readable (to humans at least), which is why you’ll more typically see it written in WebAssembly Text Format (WAT). Here’s a module, presented in WAT format, that defines an exported function named $add that takes two floating point parameters, adds them together and returns them:
(module
 (func $add (param f32) (param f32) (result f32)
   get_local 0
   get_local 1
   f32.add)
 (export "add" (func 0))
)
If you just want to experiment with WAT you can use the wat2wasm tool from the WebAssembly Binary Toolkit to compile WAT files into wasm modules.
The above code reveals some interesting details around WebAssembly -
- WebAssembly is a low-level language, with a small (approx 60) instruction set, where many of the instructions map quite closely to CPU instructions. This makes it easy to compile wasm modules to CPU-specific machine code.
- It has no built in I/O. There are no instructions for writing to the terminal, screen or network. In order to wasm modules to interact with the outside world they need to do so via their host environment, which in the case of the browser is JavaScript.
- WebAssembly is a stack machine, in the above example
get_local 0gets the local variable (in this case the function param) at the zeroth index and pushes it onto the stack, as does the subsequent instruction. Thef3.addinstruction pops two values form the stack, adds them together than pushes the value back on the stack. - WebAssembly has just four numeric types, two integer, two floats. More on this later …
Let’s update the emitter to output this ‘hard coded’ WebAssembly module.
WebAssembly modules are composed of a pre-defined set of optional sections, each prefixed with a numeric identifier. These include a type section, which encode type signatures, and function section, which indicates the type of each function. I’ll not cover how these are constructed here - they are quite dull. If you’re interested, look at the next commit in the project.
The interesting part is the code section. Here is how the above add function is created in binary:
const code = [
 Opcodes.get_local /** 0x20 */,
 ...unsignedLEB128(0),
 Opcodes.get_local /** 0x20 */,
 ...unsignedLEB128(1),
 Opcodes.f32_add   /** 0x92 */
];

const functionBody = encodeVector([
 ...encodeVector([]) /** locals */,
 ...code,
 Opcodes.end /** 0x0b */
]);

const codeSection = createSection(Section.code /** 0x0a */,
  encodeVector([functionBody]));
I’ve defined an Opcodes enum (I’m using TypeScript), which contains all of the wasm instructions. The unsignedLEB128 function is a standard variable length encoding which is used for encoding instruction parameters.
The instructions for a function are combined with the function’s local variables (of which there are none in this case), and an end opcode that signals the end of a function. Finally all the functions are encoded into a section. The encodeVector function simply prefixes a collection of byte arrays with the total length.
And there you have it, the complete module, which is about 30 bytes in total.
The JavaScript hosting code can now be updated to involve this exported function:
const { instance } = await WebAssembly.instantiate(wasm);
console.log(instance.exports.add(5, 6));
Interestingly if you inspect the exported add function with the Chrome Dev Tools it identifier it as a ‘native function’.
You can see the complete code for this step (with unit tests - go me!) on GitHub.
Building a compiler
Now that you’ve seen how to dynamically create wasm modules, it’s time to turn our attention to the task of creating a compiler. We’ll start with a bit of terminology.
Here’s some chasm code annotated to show the key components of a language:
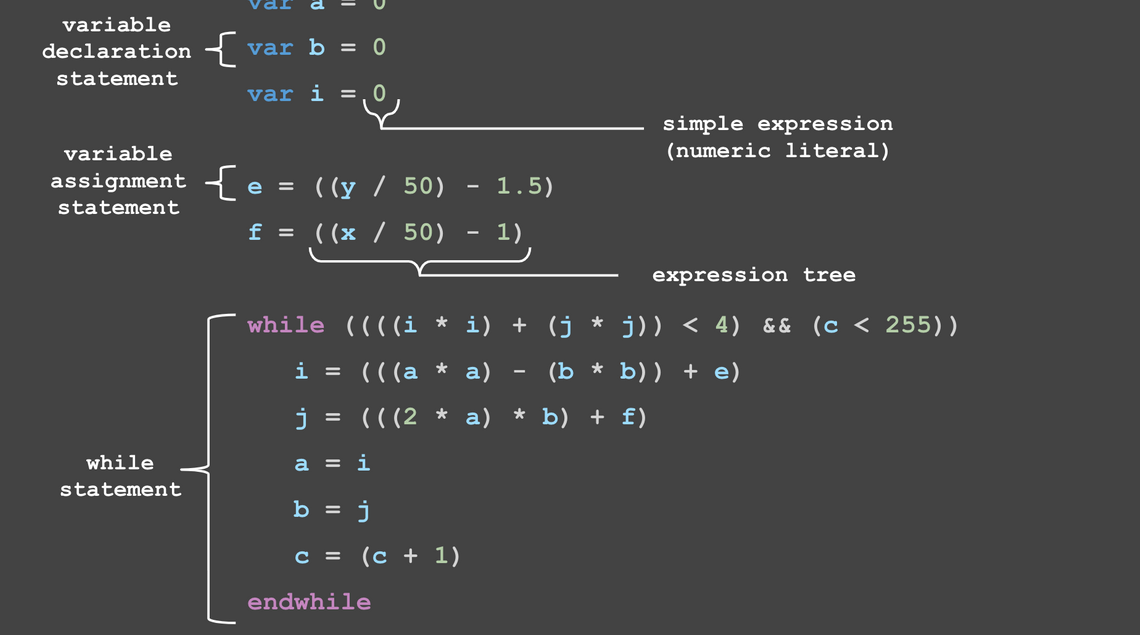
Rather than give a ‘textbook definition’ of each, you’ll become familiar with them as the compiler evolves.
The compiler itself will be formed of three parts, the tokenizer which breaks up the input program (which is a string), into discrete tokens, the parser that takes these tokens and converts them into an Abstract Syntax Tree (AST), and finally the emitter which converts the AST into wasm binary module.
This is a pretty standard compiler architecture:
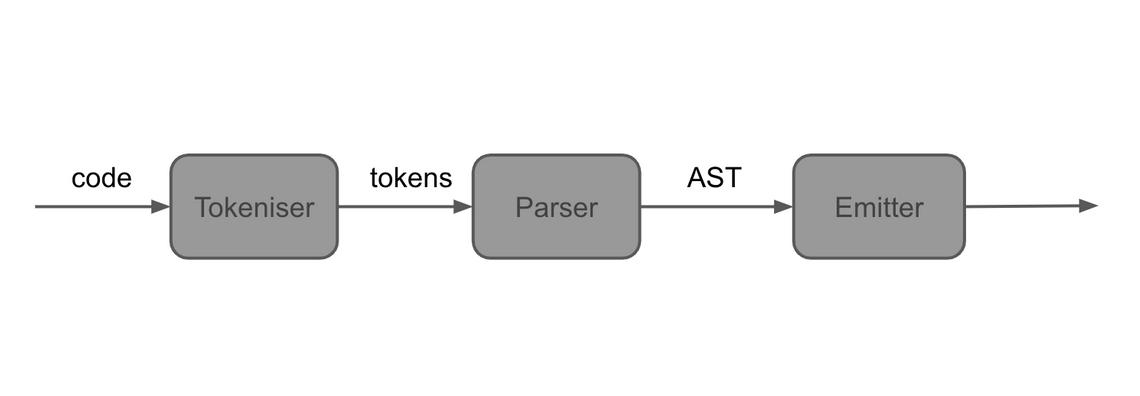
Rather than dive into a complete implementation, we’ll tackle a small subset of the problem. The goal is to create a compiler for a language that just supports print statements which print simple numeric literals …
print 22
print 45
The Tokenizer
The tokenizer works by advancing through the input string, one character at a time, matching patterns that represent specific token types. The following code creates three matches (number, keyword, and whitespace), using simple regular expressions:
const keywords = ["print"];

 // returns a token if the given regex matches at the current index
const regexMatcher = (regex: string, type: TokenType): Matcher =>
  (input: string, index: number) => {
    const match = input.substring(index).match(regex);
    return (
      match && {
        type,
        value: match[0]
      }
    );
  };

const matchers = [
  regexMatcher("^[.0-9]+", "number"),
  regexMatcher(`^(${keywords.join("|")})`, "keyword"),
  regexMatcher("^\\s+", "whitespace")
];
(Note, these regular expressions are not terribly robust!)
The Matcher interface defines a function that given an input string and an index returns a token if a match occurs.
The main body of the parser iterates over the characters of the string, finding the first match, adding the provided token to the output array:
export const tokenize: Tokenizer = input => {
  const tokens: Token[] = [];
  let index = 0;
  while (index < input.length) {
    const matches = matchers.map(m => m(input, index)).filter(f => f)
    const match = matches[0];
    if (match.type !== "whitespace") {
      tokens.push(match);
    }
    index += match.value.length;
  }
  return tokens;
};
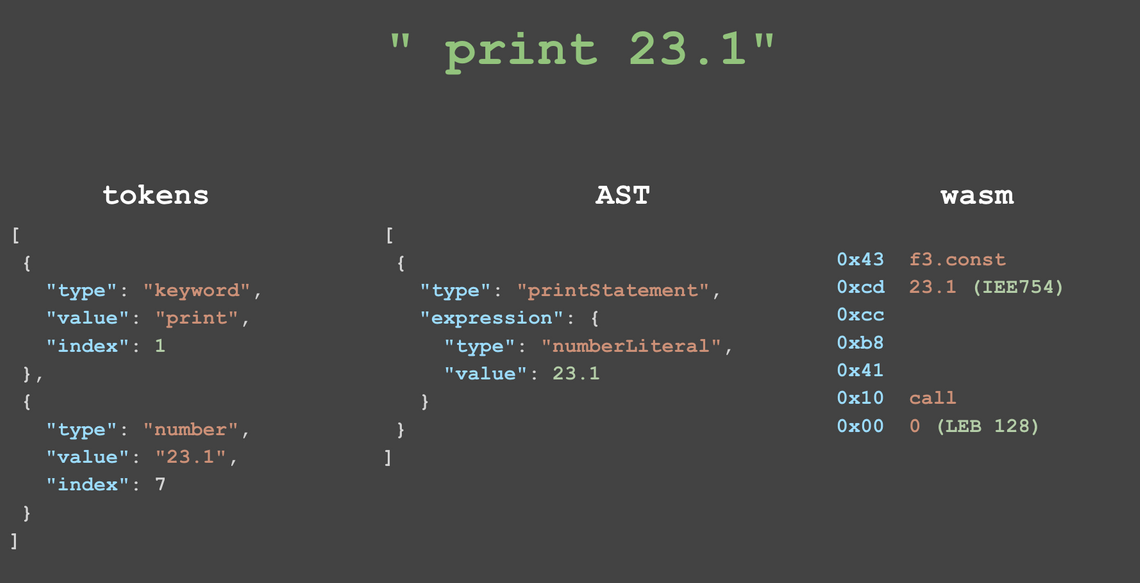
Here is the tokenised output of the program "print 23.1":
[
 {
   "type": "keyword",
   "value": "print",
   "index": 1
 },
 {
   "type": "number",
   "value": "23.1",
   "index": 7
 }
]
As you can see from the above input, the tokeniser removes whitespace as it has no meaning (for this specific language), it also ensures that everything in the input string is a valid token. However, it doesn’t make any guarantees about the input being well-formed, for example the tokeniser will happily handle "print print", which is clearly incorrect.
The array of tokens is next fed into the parser.
The Parser
The goal of the parser is the creation of an Abstract Syntax Tree (AST), a tree structure that encodes the relationship between these tokens, resulting in a form that could potentially be sent to an interpreter for direct execution.
The parser iterates through the supplied tokens, consuming them via an eatToken function.
export const parse: Parser = tokens => {
  const iterator = tokens[Symbol.iterator]();
  let currentToken = iterator.next().value;

  const eatToken = () =>
    (currentToken = iterator.next().value);

  [...]

  const nodes: StatementNode[] = [];
  while (index < tokens.length) {
     nodes.push(parseStatement());
  }

  return nodes;
};
(I’ve no idea where the concept of eating tokens comes from, it appears to be standard parser terminology, they are clearly hungry beasts!)
The goal of the above parser is to turn the token array into an array of statements, which are the core building blocks of this language. It expects the given tokens to conform to this pattern, and will throw an error (not shown above) if it does not.
The parseStatement function expects each statement to start with a keyword - switching on its value:
const parseStatement = () => {
  if (currentToken.type === "keyword") {
  switch (currentToken.value) {
    case "print":
      eatToken();
      return {
        type: "printStatement",
        expression: parseExpression()
      };
    }
  }
};
Currently the only supported keyword is print, in this case it returns an AST node of type printStatement parsing the associated expression.
And here is the expression parser:
const parseExpression = () => {
  let node: ExpressionNode;
  switch (currentToken.type) {
    case "number":
      node = {
        type: "numberLiteral",
        value: Number(currentToken.value)
      };
      eatToken();
      return node;
  }
};
In its present form the language only accepts expressions which are composed of a single number - i.e. a numeric literal. Therefore the above expression parser expects the next token to be a number, and when this matches, it returns a node of type numberLiteral.
Continuing the simple example of the program "print 23.1", the parser outputs the following AST:
[
  {
    "type": "printStatement",
    "expression": {
      "type": "numberLiteral",
      "value": 23.1
    }
  }
]
As you can see the AST for this language is an array of statement nodes. Parsing guarantees that the input program is syntactically correct, i.e. it is properly constructed, but it doesn’t of course guarantee that it will execute successfully, runtime errors might still be present (although for this simple language they are not possible!).
We’re onto the final step now …
The Emitter
Currently the emitter outputs a hard-coded add function. It now needs to take this AST and emit the appropriate instructions, as follows:
const codeFromAst = ast => {
  const code = [];

  const emitExpression = node => {
    switch (node.type) {
      case "numberLiteral":
        code.push(Opcodes.f32_const);
        code.push(...ieee754(node.value));
        break;
    }
  };

  ast.forEach(statement => {
    switch (statement.type) {
      case "printStatement":
        emitExpression(statement.expression);
        code.push(Opcodes.call);
        code.push(...unsignedLEB128(0));
        break;
    }
  });

  return code;
};
The emitter iterates over the statements that form the ‘root’ of the AST, matching our only statement type - print. Notice that the first thing it does is emit the instructions for the statement expressions, recall that WebAssembly is a stack machine, hence the expression instructions must be processed first leaving the result on the stack.
The print function is implemented via a call operation, which invokes the function at index zero.
Previously we’ve seen how wasm modules can export functions (as per the add example above), they can also import functions, which are supplied when you instantiate the module. Here we provide an env.print function that logs to the console:
const instance = await WebAssembly.instantiate(wasm, {
  env: {
    print: console.log
  }
});
This function is addressable by index, i.e. call 0.
You can see the complete code for the compiler at this point on GitHub - you can also have a play with this example via the online chasm compiler playground.
Also, for completeness this is how the program progresses through the various compiler stages:
So far we’ve put quite a lot of structure in place, but not really felt the benefit. A separate tokenizer, parser and emitter is overkill for a language that only prints simple numerics. However, as the language complexity grows, this structure really starts to pay dividends.
Implementing expressions
Next up, we’ll look at implementing binary expressions, allowing the language to perform simple mathematics, for example print ((42 + 10) / 2).
For the tokeniser the changes are quite trivial, involving adding a couple of additional regex matchers for parentheses and operators. I’ll not reproduce them here - instead, just show the resultant output:
[
  { "type": "keyword", "value": "print" },
  { "type": "parens", "value": "(" },
  { "type": "parens", "value": "(" },
  { "type": "number", "value": "42" },
  { "type": "operator", "value": "+" },
  { "type": "number", "value": "10" },
  { "type": "parens", "value": ")" },
  { "type": "operator", "value": "/" },
  { "type": "number", "value": "2" },
  { "type": "parens", "value": ")" }
]
Next up, we’ll look at the changes to the parser - where the expression parser can encounter either number of parens tokens:
const parseExpression = () => {
  let node: ExpressionNode;
  switch (currentToken.type) {
    case "number":
      [...]
    case "parens":
      eatToken();
      const left = parseExpression();
      const operator = currentToken.value;
      eatToken();
      const right = parseExpression();
      eatToken();
      return {
        type: "binaryExpression",
        left, right, operator
      };
  }
};
Notice that parsing of parens expressions is recursive, with the nodes for the left and right invoking the parseExpression function once again.
The AST for the program print ((42 + 10) / 2) is given below:
[{
 type: "printStatement",
 expression: {
   type: "binaryExpression",
   left: {
     type: "binaryExpression",
     left: {
       type: "numberLiteral",
       value: 42
     },
     right: {
       type: "numberLiteral",
       value: 10
     },
     operator: "+"
   },
   right: {
     type: "numberLiteral",
     value: 2
   },
   operator: "/"
 }
}];
The tree structure is becoming more obvious in this example.
Finally, the emitter needs to be updated in order to handle the binaryExpression node type, as follows:
const emitExpression = (node) =>
  traverse(node, (node) => {
    switch (node.type) {
      case "numberLiteral":
        code.push(Opcodes.f32_const);
        code.push(...ieee754(node.value));
        break;
      case "binaryExpression":
        code.push(binaryOpcode[node.operator]);
        break;
   }
});
The traverse function in the above code traverses tree structures invoking the given visitor for each node. While linear structures only have one logical way to traverse them (i.e. in order), trees can be traversed in a number of different ways. The traversal method used by the emitter is a depth-first post-order traversal, in other words as it encounters each node it visits left, right, then root - this order ensures that the wasm instructions are output in the correct order for the stack machine, operands then operator.
And that’s it, all the changes that are required to support expressions. Give it a go online.
The compiler architecture is starting to prove its value!
Variables
Next up, we’ll add variables, allowing for more interesting chasm programs …
var f = 2
print (f + 1)
Variables are declared using the var keyword, and can be used in expressions as identifiers.
We’ll not look at the changes to the tokeniser, it’s just yet more regex! The main loop of the parser, which reads successive statements from the token array, determines the statement type based on the keyword it encounters:
const parseVariableDeclarationStatement = () => {
  eatToken(); // var
  const name = currentToken.value;
  eatToken();
  eatToken(); // =
  return {
    type: "variableDeclaration",
    name,
    initializer: parseExpression()
  };
};

const parseStatement: ParserStep<StatementNode> = () => {
  if (currentToken.type === "keyword") {
    switch (currentToken.value) {
      case "print":
        return parsePrintStatement();
      case "var":
        return parseVariableDeclarationStatement();
    }
  }
};
Variable declaration parsing is quite straight-forwards - notice that the parseVariableDeclarationStatement function also makes use of the expression parser, which ensures that variables can be declared and assigned an initial value from an expression, e.g. var f = (1 + 4).
Next up, the emitter. WebAssembly functions can have local variables, these are declared at the beginning of the function definition, and are accessed via the get_local and set_local functions that also retrieve function parameters.
The variables in our AST are referenced via their identifier name, whereas wasm identifies locals by their index. The emitter needs to maintain this information in a symbol table, which is a simple map from the symbol name to index:
const symbols = new Map<string, number>();

const localIndexForSymbol = (name: string) => {
  if (!symbols.has(name)) {
    symbols.set(name, symbols.size);
  }
  return symbols.get(name);
};
Within the node traversal, when a variable declaration is encountered, the expression is emitted, them set_local used to assign the value to the respective local variable.
  case "variableDeclaration":
    emitExpression(statement.initializer);
    code.push(Opcodes.set_local);
    code.push(...unsignedLEB128(localIndexForSymbol(statement.name)));
    break;
Within expressions, when identifiers are found, the get_local operation is used to retrieve the value:
  case "identifier":
    code.push(Opcodes.get_local);
    code.push(...unsignedLEB128(localIndexForSymbol(node.value)));
    break;
Also, the function encoding we saw right back at the beginning is updated to add the locals for the function that the emitter builds. The chasm language has a single variable type, everything is a float.
Have a go at defining variables and using them within print statements online
while loops
One of the final language constructs we need in order to achieve the goal of rendering a mandelbrot set is some kind of loop. For chasm I opted for a while loop, as show in this simple program that prints the numbers 0 to 9:
var f = 0
while (f < 10)
  print f
  f = (f + 1)
endwhile
WebAssembly has various control flow instructions (branch, if, else, loop, block). The following WAT show how a while loop can be constructed:
(block
 (loop
   [loop condition]
   i32.eqz
   [nested statements]
   br_if 1
   br 0)
 )
Branching within WebAssembly is based on stack depth. The outer block and loop instructions push entries onto the control-flow stack. The br_if 1 instruction performs a conditional branch to a stack depth of one, and br 0 an unconditional branch to a depth of zero, repeating the loop.
Here’s how the emitter produces the same in binary format:
  case "whileStatement":
    // outer block
    code.push(Opcodes.block);
    code.push(Blocktype.void);
    // inner loop
    code.push(Opcodes.loop);
    code.push(Blocktype.void);
    // compute the while expression
    emitExpression(statement.expression);
    code.push(Opcodes.i32_eqz);
    // br_if $label0
    code.push(Opcodes.br_if);
    code.push(...signedLEB128(1));
    // the nested logic
    emitStatements(statement.statements);
    // br $label1
    code.push(Opcodes.br);
    code.push(...signedLEB128(0));
    // end loop
    code.push(Opcodes.end);
    // end block
    code.push(Opcodes.end);
    break;
And here it is running in the online playground.
graphics!
We’re nearly there - up to the very last step now! Currently the only way we’ve been able to see output from our chasm programs is via the print statement, which is wired to the console via a function imported by the WebAssembly module. For the mandelbrot set we somehow need to render graphics to the screen.
To achieve this we’ll make use of another very important component of WebAssembly modules, linear memory:
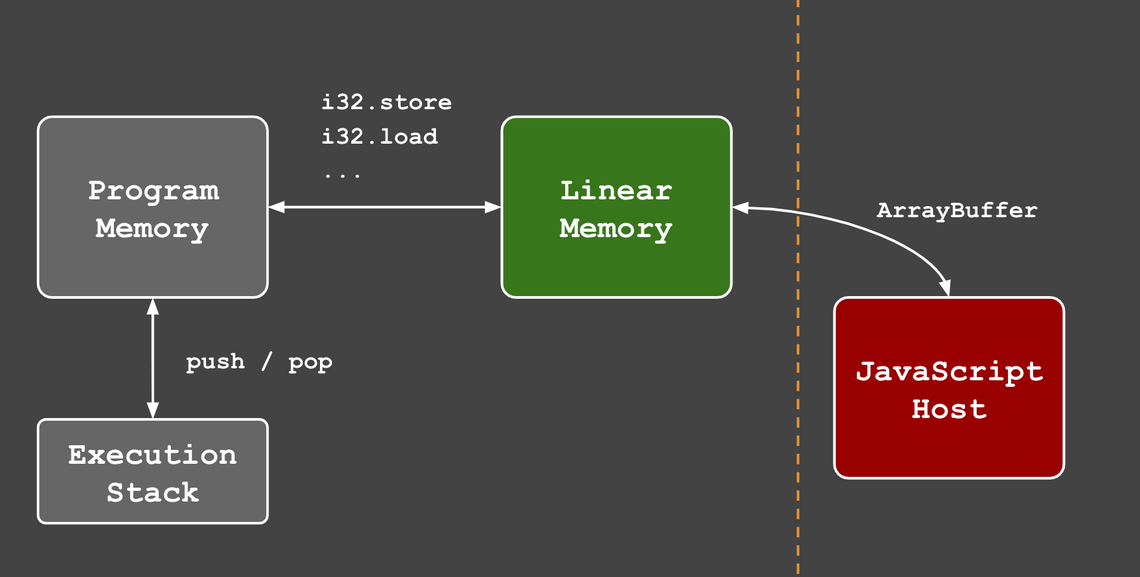
As I mentioned previously, WebAssembly only has 4 numeric data types. You might be wondering how languages with richer type systems (string, structs, arrays) can compile to WebAssembly?
WebAssembly modules can optionally define (or import) a block of linear memory, this is a contiguous block of memory that is shared by the wasm module and its host - in other words both can read and write to this memory. Therefore, if you want to pass a string to your WebAssembly module, you do this by writing it to linear memory.
For chasm we just want some sort of display, so will use linear memory as a form of Video RAM.
The chasm languages supports a simple set-pixel command which takes three expressions, the x location, y location and colour. For example, the following program fill the screen with a horizontal gradient:
var y  = 0
while (y < 100)
  var x  = 0
  while (x < 100)
    setpixel x y (x * 2)
    x = (x + 1)
  endwhile
  y = (y + 1)
endwhile
(Try it online)
The setpixel command is implemented using the wasm store instruction that writes to linear memory. On the JavaScript ‘hosting’ side, this same linear memory is read and copied to a HTML canvas. I’ll not reproduce the changes to the code here, you can see them on GitHub
And with that - the chasm language is complete, and able to render the mandelbrot set:
(Try it online)
Conclusions
I hope you enjoyed this journey and have either learnt a bit more about WebAssembly or how compilers work? For me, this project was a lot of fun - I’ve never written a compiler before, but have always wanted to.
As you can probably imagine, I’ve not stopped there, the temptation was too great to keep going - I’ve already implemented if / else, and functions / procedures are in the pipeline. I’d also really like to explore some of the more involved topics like memory management, for example introduce string, arrays and a memory allocator for storage within linear memory.
All topics for a future post!