
Back in January, I blogged about using the Web Audio API with D3, creating an app using Knockout and RequireJS. I’ve since expanded on that application, migrating it to Electron and adding new functionality along the way – like MP3 tag extraction and recursive folder searching.
Migrating to Electron
In order to start using Electron, a node script must be used to set up the window. Rather handily, Electron have a quick start project to get you going. The key part of the script is creating the window with a given configuration, and loading it:
function createWindow () {
  // Create the browser window.
  mainWindow = new BrowserWindow({width: 800, height: 600});

  // and load the index.html of the app.
  mainWindow.loadURL('file://' + __dirname + '/build/index.html');

  // Open the DevTools.
  mainWindow.webContents.openDevTools();

  // Emitted when the window is closed.
  mainWindow.on('closed', function() {
    mainWindow = null;
  });
}
Migrating to Electron was surprisingly easy. The vast majority of the work was reorganising the project to use NodeJS libraries. For example, I migrated to the CommonJS module format used by Node, instead of RequireJS which is intended for browser use. This let me gain access to some lower level APIs (for example Electron’s interprocess communicator). The changes were largely trivial, moving from:
require(["knockout", "viewModel", "audio", "files", "visualiser"], function(ko, viewModel, audio, files, visualiser) {
    ...
});
…to a more explicit:
let ko = require('knockout');
let viewModel = require('./viewModel');
let audio = require('./audio');
let visualiser = require('./visualiser')(audio);
let files = require('./files')(viewModel, audio, visualiser);
One of the bonuses of using Electron exclusively is not needing to use polyfills or transpilation to ensure browser compatibility with IE or older browsers. This is purely a desktop application now, so the code can be tailored to it. I’ve started using lets, consts, () => {} and classes in my new features to celebrate this!
Of course, to make it look a little bit more fancy, I decided to remove the native title bar, which was a simple case of creating an element with the style of -webkit-app-region: drag;, and adding the frame: false flag when constructing the BrowserWindow. Along with this, window controls were added, because it’s generally a good idea to let someone close the window. It’s a small thing, but worth mentioning, as it’s breaking out of the browser sandbox when doing minimisation and maximisation. So, in order to implement it:
let visualiserWindow = require('Electron').remote.getCurrentWindow();

// And adding this to the ViewModel
ViewModel.prototype.close = function() {
    visualiserWindow.close();
};
Extending Drag & Drop
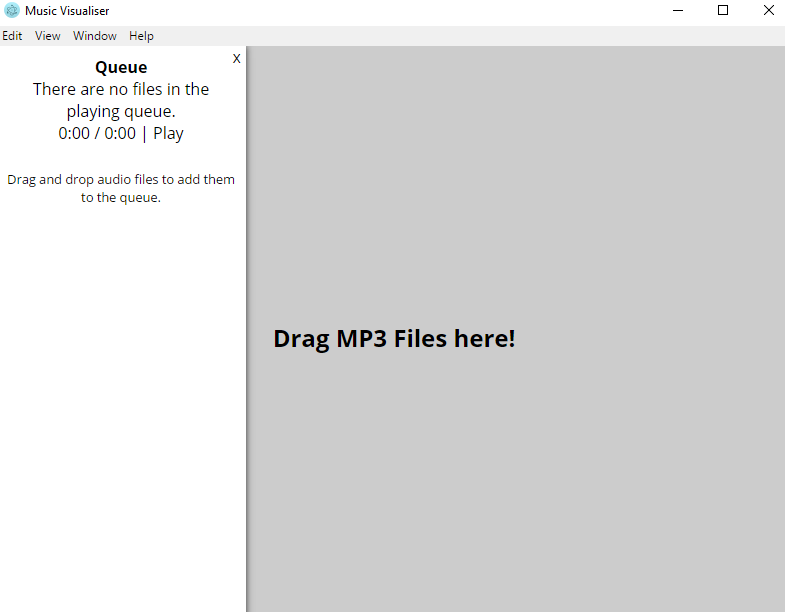
In the web-constrained application, you could drag and drop MP3 files onto the page to have them play. It’s not that convenient if you had a few folders’ worth of music to import. Since Electron is out of the browser sandbox, there’s more control over system access, which helps when dragging and dropping. In the old application, just the file name was provided. In the Electron application, the absolute path is provided.
It makes sense to extend this to being able to recursively search folders for audio files. To start off with, the window dispatches an event on the Interprocess Communicator, like so:
ViewModel.prototype.fileSearch = function(file) {
    return new Promise((resolve, reject) => {
        ipc.send('file-search', file.path);
        ipc.once('file-search-results', () => resolve());
    });
};
This is using the ES6 Promises, further using what’s available without polyfills or extra third party modules. The window doesn’t need to perform the processing of files, so that’s why it’s being passed to the parent node thread to do, as that’s largely idle.
Now that the window’s dispatched an event, something has to listen to it! I relish a challenge and decided to not use any third party modules for this, and the code’s not particularly self documenting (and there’s probably a simpler way, but it was a challenge more so than anything else). The overall approach was to do an asynchronous depth-first search, collecting any audio files on the way.
scanForFiles(pathToFolder, type) {
    return new Promise((resolve, reject) => {
        let promise = this.scan(pathToFolder, type);
        let files = [];

        let folderPromises = [];
        promise.then((results) => {
            results.folders.forEach(folder => {
                let folderPromise = this.scanForFiles(folder, type).then(expandedFiles => {
                    files = files.concat(expandedFiles);
                });
                folderPromises.push(folderPromise)
            });

            Promise.all(folderPromises).then(expandedFiles => {
                resolve(this.results);
            });
        });
    });
}
There’s a quick shallow scan for MP3 files and folders. Then each folder and all its subfolders are searched and the MP3 files are collected in one array. After all the folders have been fully expanded, the promise resolves and the search is completed. Then the results are output to the BrowserWindow to place into the queue and eventually play!
Tag extraction
MP3s have ID3 tags embedded in them, which specifies information about the song: the artist, title, album, album image, etc. I used the id3js package for this, for convenience. ID3 extraction isn’t something that’s Electron specific, as the library also can parse File objects, but it’s nice to have the extra context in the title of the window. The code to do this is pretty straightforward.
ipcMain.on('id3-parse', (event, path) => {

    id3({ file: path, type: id3.OPEN_LOCAL }, (err, tags) => {
        if (tags) {
            event.sender.send('id3-result', tags);
        } else {
            event.sender.send('id3-error', err);
        }
    });

});
The OPEN_LOCAL flag tells id3js to use the Node APIs instead of trying to fetch it via XHR. The window can then set that as its title with very little complication. Indeed, using libraries as a whole is nice, as it’s just a case of npm install and require, instead of having to also needing to set up require configurations or extra libraries to load modules in.
Tuning Performance
So all of this is great, but running the application (even on the web) froze every minute or so. Using the incredibly helpful Chrome dev tools, I determined that the cause of the problem was a major garbage collection event firing.
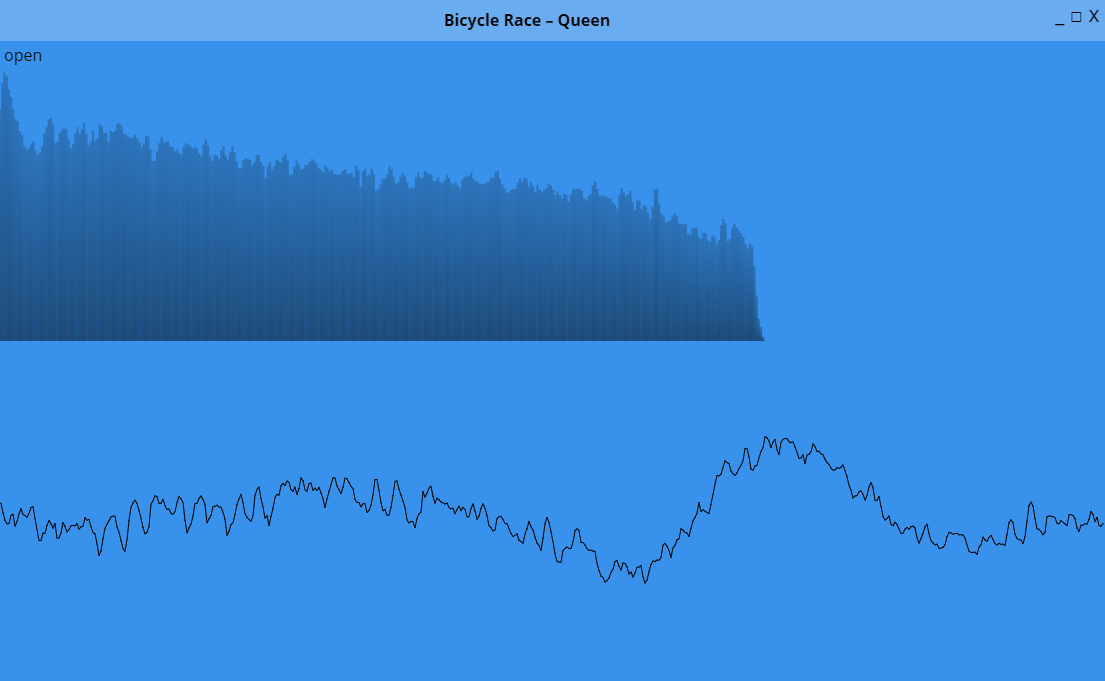
Opening up the memory profiler, it became quickly apparent that the problem was a result of using SVG to render the visualisations. There was a large amount of data flowing into the DOM and it couldn’t clean it quick enough, causing garbage collection events every minute that blocked all scripting and media playback. This was namely a result of the waveform visualiser, because its element had a path of about 1,000 points which changed every frame. Over a minute, at 60 frames per second, that’s over 3.5 million points being rendered on the waveform alone, so it’s understandable as to why it kept freezing. What I needed was something that didn’t hold onto the state of the visualisation after each frame (as it’s likely changed a great deal), and did as little DOM manipulation as possible.
From SVG to Canvas
Canvas was the perfect next step. My visualisations were relatively simple, so should be easy to port over. The advantage of canvas is that there’s no changing state in the DOM, so I could avoid the garbage collection events. Canvas also allows access to lower-level drawing APIs, meaning only certain parts of the canvas can be invalidated and redrawn. Let’s have a look at the old code for rendering the waveform in SVG:
var numberOfPoints = Math.ceil(width / 2);

var xScale = d3.scale.linear()
    .range([0, width])
    .domain([0, numberOfPoints]);

var yScale = d3.scale.linear()
    .range([height, 0])
    .domain([-1, 1]);

var line = d3.svg.line()
    .x(function(d, i) { return xScale(i); })
    .y(function(d, i) { return yScale(d); });

return function(data) { // each render
    selector.select("path")
        .datum(subsample(data))
        .attr("d", line);
};
Fairly standard D3 line usage. It’s important to note that I subsampled the data to make the draw cheaper. It did that quite well, but increasing the subsampling made little difference to the garbage collection incidents in my experimentation. Now, let’s see the waveform visualisation in canvas:
let context = selector.node().getContext('2d');
let lastMax;

return function(data) { // each render
    context.clearRect(0, yScale(lastMax) - 1, width, yScale(-lastMax) + 1);
    lastMax = null;
    context.moveTo(width / 2, yScale(0));
    context.beginPath();
    context.strokeStyle = 'black';
    subsample(data).forEach((d, i) => {
        context.lineTo(xScale(i), yScale(d));

        if (!lastMax || lastMax < d) {
            lastMax = d;
        }
    });
    context.stroke();
};
It’s a little longer, but not greatly complicated. I’ve added a little bit of state here to mean that only the drawn area from the previous frame is invalidated. I’m still using D3’s scales, but I’ve replaced the line component, which generates SVG path strings, with a call to context.lineTo, which generates Canvas paths. Also, rather importantly, I’m no longer subsampling the waveform – it’s rendered in its complete glory. Moving on, let’s have a quick look at the frequency visualisation using SVG:
// each render
var aggregatedData = aggregate(data);

selector.attr("style", "transform-origin: " + (width / 2) + "px " + (height / 2) + "px; transform: scaleY(-1);");

var rect = selector.selectAll("rect.frequency-bar")
    .data(aggregatedData);

rect.enter()
    .append("rect")
    .attr("x", function(d, i) {
        return xScale(i);
    })
    .attr("width", function() {
        return selector.attr("width") / numberOfBars;
    })
    .attr("y", 0)
    .attr("class", "frequency-bar");

rect.attr("height", yScale);
The SVG tree a little more complicated in order to get some extra performance out of it. The container is inverted via CSS’s transform: scaleY(-1); in order to let the rectangles render from bottom-up instead of top-down. This meant that the attribute y = 0 on the rectangles wouldn’t need to change, and so would reduce the work done in the DOM per frame draw. Here’s the same functionality in canvas:
// each render
var aggregatedData = aggregate(data);

context.clearRect(0, 0, width, height);

const barWidth = width / numberOfBars;
aggregatedData.forEach((d, i) => {
    const barHeight = yScale(d);
    const gradient = context.createLinearGradient(0, height - barHeight, 0, height);
    gradient.addColorStop(0, 'rgba(0, 0, 0, 0.2)');
    gradient.addColorStop(1, 'rgba(0, 0, 0, 0.5)');
    context.fillStyle = gradient;
    context.fillRect(xScale(i), height - barHeight, barWidth, barHeight);
});
context.fillStyle = null;
It’s not too dissimilar to the waveform’s code – the data’s still being iterated upon, and a visualisation is produced. The bars are rendered relative to the top-left of the canvas, there’s no fancy CSS transforms going on any more. You might have spotted that I’ve created a gradient for each frequency bar to make it look a little fancier, and having a gradient for each bar makes it a lot easier to pick out peaks in the frequency data:

Changes in Performance
In order to get a rough idea of how different it was, I played the same song at the same window size in both SVG and canvas versions. Here’s what the Dev Tools says about SVG:
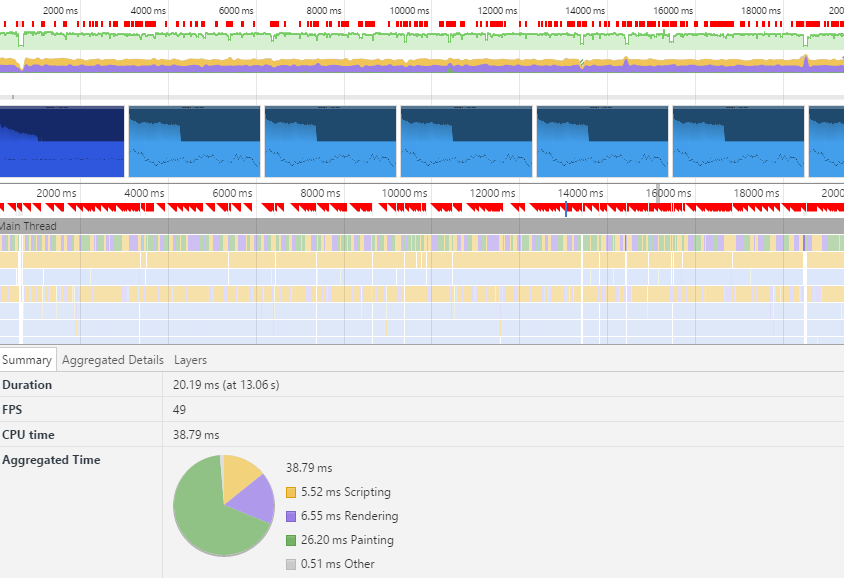
That’s a lot of red triangles, indicating framerate drops and some jank. I was getting about 50 frames per second on my machine, with subsampled waveform data. And now with canvas…
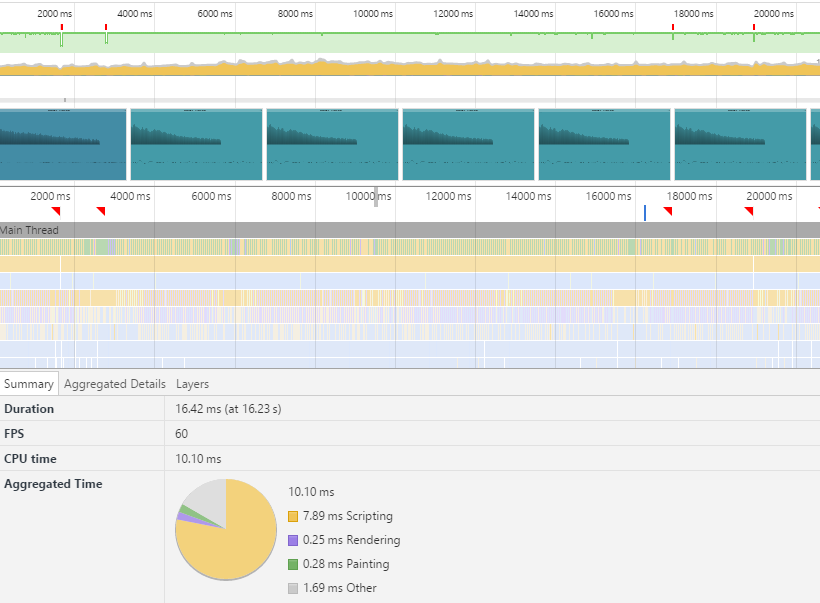
That’s much better! Only a few red triangles. The vast majority of the time, I was getting 60 frames per second with no subsampled waveform data. As an added bonus, there are now no garbage collection incidents, meaning the songs can play uninterrupted with smooth visualisations.
End of the Road
I think I’ve hit the limit with what I can do with this application, but it serves as a nice proof-of-concept for the power of the Web Audio API, real-time visualisation, and desktop wrappers like Electron. In future, I might recreate this to be a more complete application, with some library management, more desktop integration (setting as a default music player), and possibly some more exciting visualisations.
Using Electron isn’t without its risks, however. My colleague Dean wrote some great posts about where Electron security stood a few months ago, and relatively recently. There’s no server use whatsoever, so the potential for XSS vulnerabilities is none (and you’d only be targeting yourself). The application also uses the fact that there’s no sandbox, much in a similar way that Atom does – folder searching and file reading.
As always, the code for this is available on GitHub.
