
When Apple announced iOS 7 back in June at WWDC, they also announced a number of exciting new APIs for developers. The API that caught my attention the most was SpriteKit. This is a new 2D rendering engine built primarily for game development. It allows you to compile the same code for iOS and OSX, meaning with just a few tweaks you can build a game that is available on Mac, iPad, iPod and iPhone! Combine this with the new GameController API, the rumours of a new Apple TV and the rapid level of iOS 7 adoption and you have something pretty exciting!
As soon as the developer preview SDK and documentation were released I started exploring the new API. I found the API very easy to get to grips with, especially after watching the WWDC videos and reading through the documentation. I’d never done any game development before, so this blog explains the very basics of getting a simple game up and running with SpriteKit.
1st Squadron
![]()
1st Squadron Logo
The game built is a top down WWII fighter plane game, set over the English Channel. Enemy planes are launched from the top of the screen and it is your job, as the hero, to destroy these planes before they reach the bottom! You win points by destroying enemy planes, but lose health if an enemy plane hits you with a bullet or crashes into you!
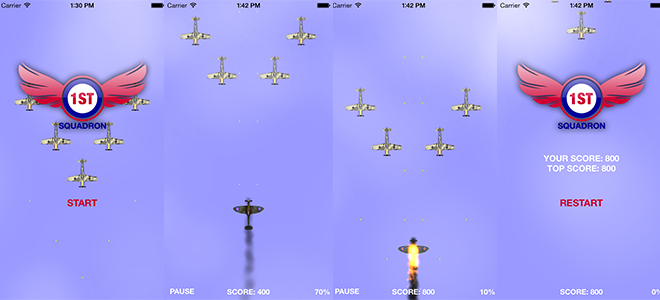
Screenshots from the game
Building the Game
The following will walk you through how the game was built. It’s not a complete explanation of every line of code, but it will give you a good idea of how to set up a similar game for yourself. It would be useful to have a copy of the code when reading this article however. To download the code for yourself and see how it’s done, head over to GitHub.
Application Structure
The structure of the app is relatively simple. We have a single UIViewController named ViewController which is created by the AppDelegate and added to the key window. I won’t be going into any detail about the View Controller in this post. All it does is create and add the FighterGameScene as a subview, add a few labels, logos and buttons, and controls the interaction between these buttons and labels and the scene.
Setting up the Scene
Configuration
‘A scene is the root node of your content. It is used to display SpriteKit content on an SKView.’ - SKScene Docs
Our SKScene subclass is called FighterGameScene. This is where we define the behaviour of our game. The first step when creating the scene is to configure the physics world. This is done in the constructor of the FighterGameScene. The first thing we do is to set the scene as the contactDelegate of it’s physics world. This allows us to detect collisions in the scene, which is something we will discuss later. We also define the gravity of our physics world here. As this is a top down, 2D game, gravity is defined with CGVectorMake(0,0). This means that gravity will not effect our scene at all.
After the world is configured the physics body must be set up. The physics body in this case is a simple SKPhysicsBody defined with bodyWithEdgeLoopFromRect. We need a physics body with an edge loop because it means that nodes outside of the visible area can be removed. We need to keep removing nodes that will never appear again to keep the memory footprint of the application as low as possible. Due to the nature of the game, it knows that if something collides with the physics body’s edge loop, it can be removed.
However, we don’t want the nodes to be removed as soon as they collide with the edge of the scene. It would look strange if an enemy fighter plane’s nose touched the bottom of the view and then the rest of it suddenly vanished before the tail had a chance to reach the bottom! Therefore, the size of physics loop must be bigger than the size of the visible area.
CGRect bodyRect = CGRectMake(-size.width, -size.height, size.width * 3, size.height * 3);
self.physicsBody = [SKPhysicsBody bodyWithEdgeLoopFromRect:bodyRect];
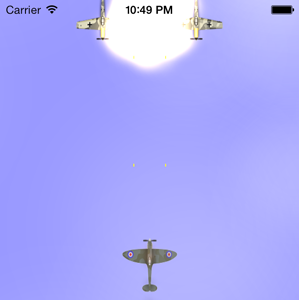
The illustration below gives an idea of how this effects the scene. The planes will continue to animate until they reach the very bottom of the physics body, rather than vanishing as soon as they reach the edge. The same applies for missiles.
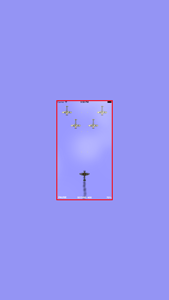
An illustration of the physics body from the game. The red box indicates the visible area, and the region outside indicates the full size of the physics body.
The next step is to keep the hero fighter inside of the visible area. If it leaves the visible area then the user will be disoriented and not know how to tilt their device! We do this with another physics body created with an edge loop. We add a clear SKSpriteNode called heroBox with a size slightly smaller than the visible screen area. When setting the box’s physicsBody, we use the SKPhysicsBody bodyWithEdgeLoopFromRect. This creates a rectangular loop which will mean the hero can not move outside of that area. To ensure this only effects the hero fighter and nothing else in the physics world, we set the physicsBody’s contactTestBitMask to heroFighterCategory.
SKSpriteNode *heroBox = [SKSpriteNode spriteNodeWithColor:[SKColor clearColor] size:CGSizeMake(size.width - 5, size.height - 5)];
heroBox.physicsBody = [SKPhysicsBody bodyWithEdgeLoopFromRect:CGRectMake(-(size.width / 2), -(size.height / 2), size.width - 5, size.height - 5)];
heroBox.physicsBody.categoryBitMask = heroBoundingBoxCategory;
heroBox.physicsBody.contactTestBitMask = heroFighterCategory;
heroBox.position = CGPointMake(self.frame.size.width / 2, self.frame.size.height / 2);
[_fighterLayer addChild:heroBox];
This will give us the “red box” shown in the illustration above.
Adding the visual Layers
To add some depth the scene there are multiple SKSpriteNodes in the scene’s hierarchy. The ground represents the sea - it’s just a blue SKSpriteNode. The first Cloud layer is placed on top of the ground layer. The next layer added to the scene is the Fighter layer. This is where all of the fighters will be placed and will interact with each other. Finally, we add another Cloud layer to the scene. This results in the following hierarchy:
- FighterGameScene
- Ground
- Clouds
- Fighters
- Clouds
By having two cloud layers, we add some depth to the scene as the fighter appears to fly through the clouds. Sometimes it will appear above clouds, sometimes below clouds, and sometimes both. The cloud layers are SKEmitterNode instances, and they are configured in .sks files.
That’s it! The scene is set up and ready to add fighters, missiles and explosions to!
Adding the Fighters
The Fighter base class defines the common properties and behaviour of a fighter. This makes creating new fighters in future and adding theme to the scene simple. Every fighter fires missiles and has a health. There are currently two subclasses. HeroFighter and EnemyFighter. Each subclass specifies various properties such as categoryBitMask, collisionBitMask, contactTestBitMask and mass. The HeroFighter class also sets allowsRotation to NO. This is how we ensure the fighter always faces the top of the scene.
The fighters themselves are simply sprite images:
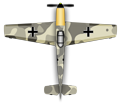
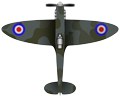
These were created in Photoshop and based on blueprints of the Messerschmitt Bf 109 and the Supermarine Spitfire.
Launching Enemy Fighters
The enemy fighters are launched every 5 seconds using an NSTimer.
NSTimer *timer = [NSTimer timerWithTimeInterval:5.0 target:self selector:@selector(launchEnemyFighters) userInfo:nil repeats:YES];
[[NSRunLoop currentRunLoop] addTimer:timer forMode:NSRunLoopCommonModes];
This calls the launchEnemyFighters method, which instantiates and five EnemyFighter instances, rotates them 180 degrees, places them in different locations and then applies an impulse to all of them so they move downwards towards the bottom of the scene.
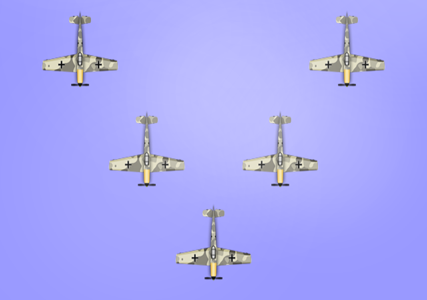
5 enemy planes flying in formation
Launching the Hero
The hero is added to center of the scene immediately after the user hits the START or RESTART buttons.
Controlling the Hero Plane
To control the hero plane, we instantiate a CMMotionManager object in the constructor. On the first update, we want to store a reference to current motion’s attitude. By doing so, we can multiply future updates by this reference attitude and use the result as the relative attitude:
[attitude multiplyByInverseOfAttitude:_referenceAttitude];
By doing so, the user can hold the device at any angle and all future motion updates will be relative to that.
Once we have calculated the relative attitude, we move the plane by applying an impulse:
[_heroFighter.physicsBody applyImpulse:CGVectorMake(attitude.roll * 250, -attitude.pitch * 200)];
This simple block of code gives the user the ability to move the hero around the scene!
Collision Handling
By setting the contactDelegate of the physicsBody to self, this allows us to detect collisions. Implementing the following method will give us access to these collisions.
-(void)didBeginContact:(SKPhysicsContact*)contact
Hero Collision
The only collisions we are interested in with the hero are with enemy missiles and enemy planes. We check the enemy plane collision in the enemy plane category, so the only scenario we need to cater for in the first if statement is if the hero hits an enemy missile and vice-versa. This leads to a rather convoluted if statement!
if((contact.bodyA.categoryBitMask == heroFighterCategory || contact.bodyB.categoryBitMask == heroFighterCategory) &&
   (contact.bodyA.categoryBitMask == enemyMissleCategory || contact.bodyB.categoryBitMask == enemyMissleCategory)) {
If the hero does collide with an enemy missile and we do enter this if statement, we immediately remove the missile and decrement the hero’s health by 0.05.
Enemy Collision
Whenever an enemy fighter collides with something we want to remove it. However, we want to do different things depending on what the enemy collided with.
If the enemy collides with the hero, we want to reduce the hero’s health by 0.15 and we want the enemy to explode. If the enemy collides with a hero missile, we increment the score by 100 and again we want the enemy to explode.
If the enemy collides with anything else (usually the bounding box for the physics world), we just want to remove it without an explosion.
To add an explosion we use the following code:
SKEmitterNode *emitter = [SKEmitterNode emitterNamed:@"Explosion"];
emitter.position = enemyBody.position;
emitter.particleAlpha = 0.5;
[self addChild:emitter];
[emitter runAction:[SKAction sequence:@[[SKAction fadeAlphaTo:0 duration:0.3], [SKAction removeFromParent]]]];
This just adds an explosion particle emitter where the collision occurred, fades it out over the course of 0.3 seconds and then removes it from the parent.
An enemy plane exploding
Missile Collision
If a missile collides with anything, we want to remove it, regardless of what it was. We do this last as if it collides with a plane, we want to check that above.
Hints and Tips
-
Keep it simple
I originally had the vast majority of my code in
FighterGameScenewhen I started out. I was creating sprites and managing them from inside of this class. It’s easier at first but as soon as you start adding any complexity it becomes un-manageable. So make sure that your code belongs in the scene and that it has to be there. -
Debugging Collisions
One of the most time consuming things when creating the game was debugging collisions between
SKPhysicsBodyobjects. The first step is ensuring you have set the correctcategoryBitMaskon the objects when you create them, and that they have the correctcontactTestBitMasktoo. ASKPhysicsBodywon’t collide with any object that isn’t specified in it’scontactTestBitMask. Also be sure to check both bodies of aSKPhysicsContact. They aren’t guaranteed to be in any particular order.
If you have noticed any issues with the app or want to help develop it further, please raise an issue or create a pull request over at GitHub.
.jpg)
