
This blog post presents a simple utility class for binding ReactiveCocoa ViewModels to UITableViews without the need for the usual datasource / delegate boiler-plate. Here’s an example of how to use this binding helper:
// create a cell template
UINib *nib = [UINib nibWithNibName:@"CETweetTableViewCell" bundle:nil];

// bind the ViewModels 'searchResults' property to a table view
[CETableViewBindingHelper bindingHelperForTableView:self.searchResultsTable
                        sourceSignal:RACObserve(self.viewModel, searchResults)
                        templateCell:nib];
Introduction
I am always programming; at work, on the train, at home (while the kids what X-Factor and Britain’s Got Talent) … if I day goes by where I haven’t written any code, I am not a happy guy!
For the past few months my side-projects have increasingly involved the use of ReactiveCocoa. This framework can be used to create some really elegant solutions, yet at the same time it can be quite challenging, with so many potential solutions for any one problem. The perfect combination for a programming addict like me!
A few months ago I published a couple of introductory ReactiveCocoa articles on Ray Wenderlich’s site (see part one and part two), and also presented a Tech Talk. These cover the basics of ReactiveCocoa and are hopefully accessible to a wide audience. However I have had numerous requests to cover the more advanced topic of using ReactiveCocoa to implement the Model-View-ViewModel (MVVM) pattern.
As promised, I am in the process of writing this article. However, before I publish it, I want to share this brief blog post to which tackles an issue that has been bugging me for a while now …
How do you bind a UITableView to a ReactiveCocoa ViewModel?
The View Model
I’ll start with a simple example, a ViewModel which allows you to search Twitter:
/// A view model which provides a mechanism for searching twitter
@interface CETwitterSearchViewModel : NSObject

/// The current search text
@property NSString *searchText;

/// An array of CETweetViewModel instances which indicate
/// the current search results
@property NSArray *searchResults;

/// A command which when executed searches twitter using the current searchText
@property RACCommand *searchCommand;

@end
(Followers of my articles are probably thinking “not again …”, yes I know that most of my programming examples include searching Twitter - I guess I need some new ideas!)
The implementation of this ViewModel re-uses the signals I created in my second ReactiveCocoa tutorial, so I will not cover the implementation in this blog post. The code is all on GitHub if you want to take a look at the details.
Binding this ViewModel to a simple UI with a UITextField and UIButton is a trivial exercise with ReactiveCocoa:
// bind the UITextField text updates to the view model
RAC(self.viewModel, searchText) = self.searchTextField.rac_textSignal;

// bind a button to the search command
self.searchButton.rac_command = self.viewModel.searchCommand;

// when the search executes hide the keyboard
[self.viewModel.searchCommand.executing subscribeNext:^(id x) {
  [self.searchTextField resignFirstResponder];
}];

// show a network activity indicator when the search is being executed
RAC([UIApplication sharedApplication], networkActivityIndicatorVisible) =
  self.viewModel.searchCommand.executing;
I’ve even thrown in a few little extras like hiding the keyboard when the ‘go’ button is pressed, and binding the network activity indicator to the searchCommand.executing signal.
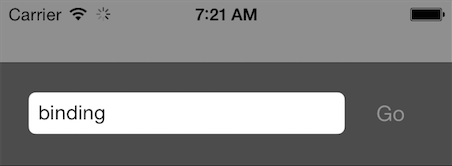
That’s two of the three ViewModel properties bound to the UI … so far, so good!
The remaining property is searchResults; an NSArray which is updated to contain the search results when the search completes. We can observe changes to this property via RACObserve, which creates a signal that emits next events for each update, but unfortunately you cannot just give a UITableView an array of objects and ask it to render them.
From searching StackOverflow and looking at other people’s ReactiveCocoa examples, conventional wisdom seems to be that you have to implement the table view datasource and delegate methods yourself. In other words, my elegant view which currently has just a few lines of binding code is going to get a lot uglier as it fills up with boiler-plate table view logic.
There has to be a better way!
A Table View Binding Helper
With the MVVM pattern each View is backed by a ViewModel. A View might occupy the entire screen, as is the case when we bind a View Controller to a ViewModel, or it might occupy just part of the screen.
The searchResults property of our top-level ViewModel contains an array of objects, each of which is a ViewModel. What we need in order to solve this problem is a generic mechanism for creating Views for each ViewModel and mechanism for binding the two together.
Nibs provide a convenient mechanism for defining re-useable views. It is quite easy to define the layout for a table view cell using a nib (for an excellent step-by-step example, see this blog post).
The interface for a suitable table view binding helper is as follows:
/// A helper class for binding view models with NSArray properties
/// to a UITableView.
@interface CETableViewBindingHelper : NSObject

- (instancetype) initWithTableView:(UITableView *)tableView
                      sourceSignal:(RACSignal *)source
                      templateCell:(UINib *)templateCellNib;

@end
This binding helper uses the supplied table view to render the view models supplied by the source signal, with the template cell defining the view. Let’s take a look at how this helper is implemented:
@@interface CETableViewBindingHelper () <UITableViewDataSource>

@end

@implementation CETableViewBindingHelper {
  UITableView *_tableView;
  NSArray *_data;
  UITableViewCell *_templateCell;
}

- (instancetype)initWithTableView:(UITableView *)tableView
                     sourceSignal:(RACSignal *)source
                     templateCell:(UINib *)templateCellNib {

  if (self = [super init]) {
    _tableView = tableView;
    _data = [NSArray array];

    // each time the view model updates the array property, store the latest
    // value and reload the table view
    [source subscribeNext:^(id x) {
      _data = x;
      [_tableView reloadData];
    }];

    // create an instance of the template cell and register
    // with the table view
    _templateCell = [[templateCellNib instantiateWithOwner:nil
                                          options:nil] firstObject];
    [_tableView registerNib:templateCellNib
              forCellReuseIdentifier:_templateCell.reuseIdentifier];

    // use the template cell to set the row height
    _tableView.rowHeight = _templateCell.bounds.size.height;

    _tableView.dataSource = self;
  }
  return self;
}

#pragma mark - UITableViewDataSource implementation

- (NSInteger)tableView:(UITableView *)tableView
                       numberOfRowsInSection:(NSInteger)section {
  return _data.count;
}

- (UITableViewCell *)tableView:(UITableView *)tableView
                        cellForRowAtIndexPath:(NSIndexPath *)indexPath {
  id<CEReactiveView> cell = [tableView
      dequeueReusableCellWithIdentifier:_templateCell.reuseIdentifier];
  [cell bindViewModel:_data[indexPath.row]];
  return (UITableViewCell *)cell;
}

@end
The init method is where the interesting logic resides. Here the a subscriber is added to the source signal so that each time the array property on the ViewModel is updated, a reference to the current property value is saved and the table view is reloaded. Also, an instance of the template cell is created in order to determine the cell height.
Finally, this class implements the table view datasource methods using the array which is obtained via the signal.
The cell views must implement the following protocol which provides a single method for binding the cell to the ViewModel which ‘backs’ it:
/// A protocol which is adopted by views which are backed by view models.
@protocol CEReactiveView <NSObject>

/// Binds the given view model to the view
- (void)bindViewModel:(id)viewModel;

@end
Putting this into practice, an array property can now be bound to a table view with just a couple of lines of code:
// create a cell template
UINib *nib = [UINib nibWithNibName:@"CETweetTableViewCell" bundle:nil];

// bind the view models 'searchResults' property to a table view
[[CETableViewBindingHelper alloc]
      initWithTableView:self.searchResultsTable
           sourceSignal:RACObserve(self.viewModel, searchResults)
           templateCell:nib];
Note that the source signal is created using the RACObserve macro which creates a signal using key value observing of the given property. This signal sends a next event each time the property is updated via its setter.
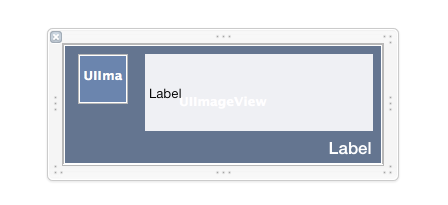
The cells are implemented much like the view controllers; their UI controls are defined within the nib and wired to outlet properties. Here’s what the nib that defines the cells in this simple application looks like:
The ViewModel binding, as defined by the CEReactiveView protocol, is implemented as follows:
- (void)bindViewModel:(id)viewModel {

  CETweetViewModel *tweet = (CETweetViewModel *)viewModel;

  // set the tweet 'status' label, sizing it to fit the text
  self.titleTextField.frame =
                 CGRectInset(self.titleBackgroundView.frame, 5.0f, 5.0f) ;
  self.titleTextField.text = tweet.status;
  [self.titleTextField sizeToFit];

  // set the username
  self.usernameTextField.text = tweet.username;

  // use signals to fetch the images for each image view
  self.profileImage.image = nil;
  [[self signalForImage:[NSURL URLWithString:tweet.profileBannerUrl]]
    subscribeNext:^(id x) {
      self.ghostImageView.image = x;
    }];

  self.ghostImageView.image = nil;
  [[self signalForImage:[NSURL URLWithString:tweet.profileImageUrl]]
    subscribeNext:^(id x) {
      self.profileImage.image = x;
    }];
}
Note that because the properties of the CETweetViewModel do not change, their values are copied directly to the corresponding UI control. Although, there is of course nothing stopping you from using ReactiveCocoa to bind the two together if the values change.
The cell implementation also makes use of a bit of ReactiveCocoa for loading images in the background:
// creates a signal that fetches an image in the background, delivering
// it on the UI thread. This signal 'cancels' itself if the cell is re-used before the
// image is downloaded.
-(RACSignal *)signalForImage:(NSURL *)imageUrl {

  RACScheduler *scheduler = [RACScheduler
                 schedulerWithPriority:RACSchedulerPriorityBackground];

  RACSignal *imageDownloadSignal = [[RACSignal
    createSignal:^RACDisposable *(id<RACSubscriber> subscriber) {
      NSData *data = [NSData dataWithContentsOfURL:imageUrl];
      UIImage *image = [UIImage imageWithData:data];
      [subscriber sendNext:image];
      [subscriber sendCompleted];
      return nil;
    }] subscribeOn:scheduler];

  return [[imageDownloadSignal
          takeUntil:self.rac_prepareForReuseSignal]
          deliverOn:[RACScheduler mainThreadScheduler]];

}
With this in place we retain the elegance of binding the top-level view model to the view controller in just a few lines of code.
… which is pretty neat!
Here’s what the complete application looks like:

Handling Selection
The current binding helper allows you to render an array of ViewModels within a table view, but what if you need to handle selection? Again, the typical approach would be to perform this manually within the view controller, implementing the table view delegate and executing the required ViewModel command in response.
This is generic code that can also be moved into the binding helper.
Firstly, the init method is expanded to add a selection command:
- (instancetype) initWithTableView:(UITableView *)tableView
                      sourceSignal:(RACSignal *)source
                  selectionCommand:(RACCommand *)selection
                      templateCell:(UINib *)templateCellNib;
The implementation of this init method now stores a reference to this command. The helper also implements the table view delegate, with the tableView:didSelectRowAtIndexPath: method being implemented as follows:
- (void)tableView:(UITableView *)tableView
               didSelectRowAtIndexPath:(NSIndexPath *)indexPath {
  [_selection execute:_data[indexPath.row]];
}
i.e. the selection command is invoked, with the selected ViewModel passed as the execution argument.
I’ve added a command to the top-level ViewModel which simply logs when a tweet is selected:
 // create the tweet selected command, that simply logs
 self.tweetSelectedCommand = [[RACCommand alloc]
             initWithSignalBlock:^RACSignal *(CETweetViewModel *selected) {
   NSLog(selected.status);
   return [RACSignal empty];
 }];
(mostly because I couldn’t think of anything useful to do with selection in this context. I really need to think up some better examples!).
Conclusions
Hopefully this table view binding helper will be useful to people who are using ReactiveCocoa as a mechanism for implementing iOS apps using the MVVM pattern. All the code is on GitHub. If you have any ideas, thoughts or comments - please let me know.
Regards, Colin E.