
How to use a long-press to trigger re-ordering a list in Ionic Framework, instead of Ionic’s default implementation, which requires a button to switch modes.
Ionic Framework is a great framework for building cross-platform mobile applications. It ships with a number of user interface tools for building a native-like, touch-friendly experience. One of those is ion-list, which supports re-ordering. The users clicks a button to enter re-order mode, and can move items up and down before clicking the button again to finish.
The default re-ordering experience is pretty good, but it doesn’t match the experience we were looking for, and is different from the re-ordering experience in the native iOS app that we were trying to port to HTML5. In the iOS version, there is no button to enter re-order mode - instead the user simply long-presses an item to move it. The item then appears to raise up from the list, and can be dragged up and down to reposition it. It also provides feedback by dynamically moving the other list items as you drag up and down.
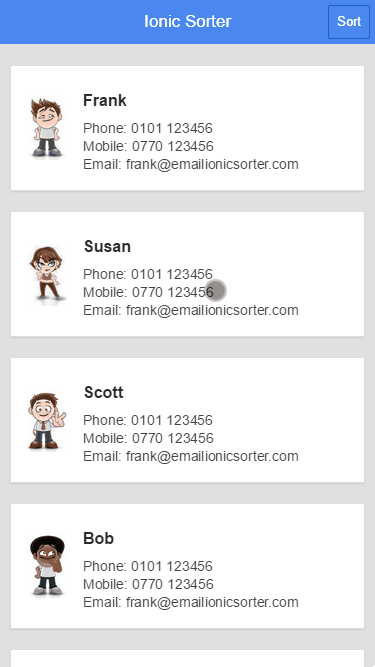
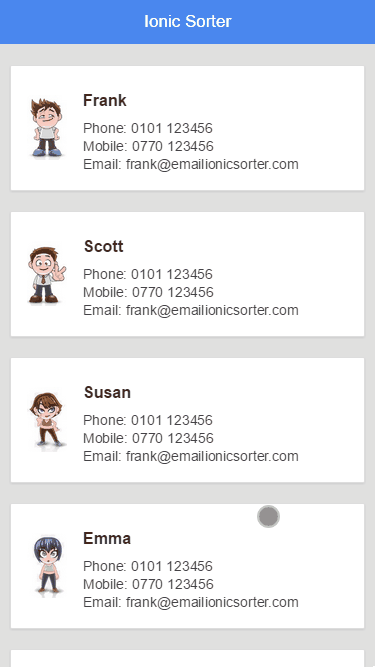
To illustrate the difference, here are a couple of screen-captures of the two approaches:
|
|
|
You can also try both versions for yourself here (looks best in a narrow window like a phone):
| Click button to reorder | Long-press to Reorder |
I spent some time searching for other options for re-ordering lists - there a few that support touch. However, they all start the re-order operation on a touch-down event, rather than a long press. That wouldn’t work in this case, because the list also needs to scroll using touch.
Creating a sortable directive
For the purpose of this blog article, I’ve built a simple Ionic application with a sortable list. The full project is available on GitHub. Note that this project also uses jQuery to make a few things a bit easier, but it should be possible to eliminate jQuery if required.
I wanted to make an ion-list sortable by adding some extra attributes, so the markup would look like this:
<ion-list sortable draggable=".card" sorted="onReorder($fromIndex, $toIndex)">
  <ion-item ng-repeat="contact in contacts">
    ...
  </ion-item>
</ion-list>
The sortable attribute invokes the directive. We can also tell it which elements we’re allowed to re-order by specifying the draggable attribute, and provide a callback function for when the moved item is dropped.
Here’s the bare-bones structure of the new directive:
angular.module('starter.sortable', []).directive(
    'sortable', ['$ionicGesture', '$ionicScrollDelegate',
    function ($ionicGesture, $ionicScrollDelegate) {
      return {
        restrict: 'A',
        scope: {
          draggable: '@',
          sorted: '&'
        },
        link: function (scope, element, attrs) {

          var settings = {
            draggable: scope.draggable ? scope.draggable : '.card'
          };

          var dragging, cardSet, initialIndex, currentIndex, offsetY;

          var touchHold = function touchHold(e) {
            // Get the element we're about to start dragging
            dragging = angular.element(e.target).closest(settings.draggable);
            if (!dragging.length) dragging = null;

            if (dragging) {

              // ... code goes here ...
            }
          };
          var holdGesture = $ionicGesture.on('hold', touchHold, element);

          var touchMove = function touchMove(e) {
            if (dragging) {
              // Prevent list scrolling
              e.stopPropagation();

              // ... code goes here ...
            }
          }, element);

          // Handle both mouse and touch gestures
          var touchGesture = $ionicGesture.on('touchmove', touchMove, element);
          var mouseGesture = $ionicGesture.on('mousemove', touchMove, element);

          var touchRelease = function touchRelease(e) {
            if (dragging) {
              dragging = null;

              // ... code goes here ...
            }
          };
          var releaseGesture = $ionicGesture.on('release', touchRelease, element);

          // Detatch all events when destroying directive
          scope.$on('$destroy', function () {
            $ionicGesture.off(holdGesture, 'hold', touchHold);
            $ionicGesture.off(touchGesture, 'touchmove', touchMove);
            $ionicGesture.off(mouseGesture, 'mousemove', touchMove);
            $ionicGesture.off(releaseGesture, 'release', touchRelease);
          });

        }
      };
    }]);
The above code sets up the directive’s scope for binding the draggable and sorted attributes. Then it adds handlers for the Ionic gestures hold, touchmove/mousemove and release.
In touchHold, it looks for the element that the user is about to start dragging.
In touchMove, it calls stopPropagation() to prevent anything else from handling the event, because we don’t want the list’s normal scroll behaviour to activate when the user drags up and down.
Switching to re-order mode
When the user starts dragging an item, it needs to switch that item to absolute positioning, and replace it with a placeholder. Add this to the touchHold() function:
    initialIndex = currentIndex = dragging.index(settings.draggable);
    // offsetY is the touch position within the drag item
    var position = dragging.position();
    offsetY = e.gesture.touches[0].clientY - position.top - element.offset().top;

    // Switch to Absolute position at same location
    dragging.css({
        position: 'absolute',
        zIndex: 1000,
        left: position.left + 'px',
        top: position.top + 'px',
        width: dragging.outerWidth() + 'px'
      }).addClass('dragging');

    // Insert a placholder element
    $('<div class="placeholder"></div>')
      .css( 'height', dragging.outerHeight() + 'px')
      .insertAfter(dragging);

    // Get the set of cards that were re-ordering with
    cardSet = element.find(settings.draggable + ':not(.dragging)');
Adding the draggable class name means we can adjust its appearance to make it seem to lift up from the list of cards:
.dragging {
  -moz-transform: scale(1.05, 1.05);
  -ms-transform: scale(1.05, 1.05);
  -o-transform: scale(1.05, 1.05);
  -webkit-transform: scale(1.05, 1.05);
  transform: scale(1.05, 1.05);

  -moz-box-shadow: 0 0 3px rgba(0, 0, 0, 0.1);
  -webkit-box-shadow: 0 0 3px rgba(0, 0, 0, 0.1);
  box-shadow: 0 0 3px rgba(0, 0, 0, 0.1);
}
Dragging up and down the list
As the user drags the item up and down the list, it needs to move the dragged item with the touch point. As the position changes in the list, the placeholder should be moved to the new location. Add this to touchMove():
    // May be a mouse or touch event
    var touchY = e.touches ? e.touches[0].clientY : e.clientY;

    // Reposition the dragged element
    var newTop = touchY - offsetY - element.offset().top;
    dragging.css('top', newTop + 'px');

    // Find the current position in the list of items
    var newIndex = 0;
    cardSet.each(function (i) {
      if (newTop > $(this).position().top) {
        newIndex = i + 1;
      }
    });

    if (newIndex !== currentIndex) {
      // Position has changed
      currentIndex = newIndex;

      // Move the placeholder
      var placeholder = element.find('.placeholder');
      if (newIndex < cardSet.length) {
        placeholder.insertBefore(cardSet.eq(newIndex));
      } else {
        placeholder.insertAfter(cardSet.eq(cardSet.length - 1));
      }
    }
Repositioning the item
Finally, when the user releases the item, we need to revert it back to its normal position, and if the position has changed call the callback function. The controller’s implementation of the function should re-order the items in the source data, which will cause Angular to refresh the DOM. Add this to touchRelease():
    // Set element back to normal
    dragging.css({
      position: '',
      zIndex: '',
      left: '',
      top: '',
      width: ''
    }).removeClass('dragging');

    // Remove the placeholder
    element.find('.placeholder').remove();

    if (initialIndex !== currentIndex && scope.sorted) {
      // Call the callback with the instruction to re-order
      scope.$fromIndex = initialIndex;
      scope.$toIndex = currentIndex;
      scope.$apply(scope.sorted);
    }
Finishing touches
At this point, we have a basic implementation but we’re missing some finishing touches.
Auto-scroll main window
When the user drags to near the top or bottom of the screen, it should automatically scroll the main window up and down.
I achieved this by setting up a timer interval (setInterval) during the re-order operation, that looks at the current touch position and scrolls if it’s within a certain distance of the top or bottom. See the autoScroll() function in the final solution for more details of the implementation.
Animating the items during re-ordering
For a little bit more polish, it would be nice if the items animated to their new positions as the user drags up and down.
This actually gets a little bit fiddly. My solution uses two placeholder elements as the position changes. The new placeholder starts at height zero and grows to full height, while the old placeholder shrinks to zero. There are some problems with this approach though:
One problem is that the cards have a top and bottom margin. While the old placeholder shrinks down to zero height, it still leaves an extra margin between the two items that are moving together - which means the animation doesn’t quite get them close enough. My solution was to read the topMargin() of the dragged item, and use that as a negative margin on the placeholder element, while adding the same amount to its height. That way, when the height shrinks to zero, it includes the extra margin space.
A related problem is that some browsers allow space for a zero-height element with a margin, while others don’t. This leads to inconsistent behaviour. I worked around it by adding an additional pixel to the topMargin() adjustment above, then animating to 1px height instead.
Efficient animations using CSS transitions
Finally, to make sure the animations are smooth, it’s best to make them css transitions, since many browsers are able to optimise those - some even using hardware acceleration.
This is actually pretty easy to do - we just need to make sure the placeholder class has the transition setting applied:
.placeholder {
  -moz-transition: all 200ms ease-in-out;
  -o-transition: all 200ms ease-in-out;
  -webkit-transition: all 200ms ease-in-out;
  transition: all 200ms ease-in-out;
}
With that done, we can set the height of the element directly, and wait for the animation to complete. Please see the final solution for more details of the implementation.
Touch-hold threshold
The default threshold for the hold event in Ionic is 1. That means that if the touch point moves by more than a pixel, the hold event will be cancelled. In practice that can be quite hard for users to do (and may vary between devices).
The default threshold can be adjusted by adding this line to the start of app.js:
ionic.Gestures.gestures.Hold.defaults.hold_threshold = 20;Conclusion
The replacement to Ionic’s default list reordering functionality is a stand-alone directive that’s easy to drop in to any project. The new process is easy and natural, and looks great.
