
Zero what?
ZeroMQ is an opinionated, light weight, blazing fast messaging library that describes its origins thusly
We took a normal TCP socket, injected it with a mix of radioactive isotopes stolen from a secret Soviet atomic research project, bombarded it with 1950-era cosmic rays, and put it into the hands of a drug-addled comic book author with a badly-disguised fetish for bulging muscles clad in spandex. Yes, ØMQ sockets are the world-saving superheroes of the networking world.
Back in the real world this roughly translates as providing you with an assortment of sockets and patterns with which to connect the disparate parts of your distributed system. These aren’t your run-of-the-mill sockets mind you, so it’ll take some time to wrap your mind around their way of thinking, but I’ve found the time and effort well worth it. The base implementation is in C/C++ with bindings for some 20-odd other languages and native implementations for several including Java and .Net. In this post I’ll walk you through installation for some of the prominent languages used here at Scott Logic followed by a quick look at each of the main messaging patterns found in ZeroMQ. Please note this post has liberally purloined its information, examples and diagrams from the excellent ZeroMQ guide. Once you’ve read this go read that, it’s easily the best documentation/tutorial I’ve ever read. Most of the example code will be in C# because that’s my background. There’ll also be examples in Java and Node.js, languages I have yet to fight with on the battlefield, so I’ll apologise in advance for the poor programming style.
Really? More services/brokers/fiddly bits to install.
Nope, just a library. If you’re living in .Net land you can use the NetMQ native implementation, just bring up the Package Manager Console, select the project that needs some super charged messaging functionality and enter the following magic words:
Install-Package NetMQ -Version 3.3.0.11
(replace -Version 3.3.0.11 with -Pre for the latest and greatest).
For those of you in the Java camp there is the JeroMQ native implementation which just requires adding the following to you pom.xml:
<dependencies>
  <dependency>
    <groupId>org.zeromq</groupId>
    <artifactId>jeromq</artifactId>
    <version>0.3.4</version>
  </dependency>

  <!-- for the latest SNAPSHOT -->
  <dependency>
    <groupId>org.zeromq</groupId>
    <artifactId>jeromq</artifactId>
    <version>0.3.5-SNAPSHOT</version>
  </dependency>
</dependencies>

<!-- If you can't find the latest snapshot -->
<repositories>
  <repository>
    <id>sonatype-nexus-snapshots</id>
    <url>https://oss.sonatype.org/content/repositories/snapshots</url>
    <releases>
      <enabled>false</enabled>
    </releases>
    <snapshots>
      <enabled>true</enabled>
    </snapshots>
   </repository>
</repositories>
And for Node.js there is the zeromq.node binding. First you need to download and install the C/C++ version and then:
npm install zmq
That wasn’t so painful now was it. For those of you used to other messaging solutions you might be wondering where the brokers/gateways/etc. are. ZeroMQ doesn’t provide any of that extraneous architecture out of the box so if you want them you’ll have to write them (or better yet, steal them out of the guide).
Let’s do the mind warp
ZeroMQ comes with 5 basic patterns
- Synchronous Request/Response
- Asynchronous Request/Response
- Publish/Subscribe
- Push/Pull
- Exclusive Pair
each of which comes with its own pair of sockets (some can be mixed-and-matched, but we’ll worry about that later).
Contexts
Before embarking on any ZeroMQ expedition you’ll need to create a context. Contexts help manage any sockets that are created as well as the number of threads ZeroMQ uses behind the scenes. Create one when you initialize a process and destroy it as the process is terminated. Contexts can be shared between threads and, in fact, are the only ZeroMQ objects that can safely do this.
Synchronous Request/Response
Firstly we’ll look at the synchronous request/response pattern to create the obligatory “Hello World” application.
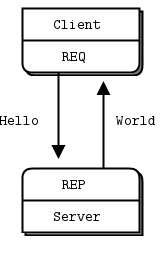
Request-Reply by iMatix Corporation is licensed under cc-by-sa 3.0
using System;

using NetMQ;

namespace HelloWorld {
  class Program {
    static void Main(string[] args) {
      string connection = "inproc://HelloWorld";
      using (NetMQContext ctx = NetMQContext.Create()) {
        using (var server = ctx.CreateResponseSocket()) {
          server.Bind(connection);
          using (var client = ctx.CreateRequestSocket()) {
            client.Connect(connection);

            client.Send("Hello");

            string fromClientMessage = server.ReceiveString();
            Console.WriteLine("From Client: {0}", fromClientMessage);
            server.Send("Hi Back");

            string fromServerMessage = client.ReceiveString();
            Console.WriteLine("From Server: {0}", fromServerMessage);

            Console.ReadLine();
          }
        }
      }
    }
  }
}
First we create a connection string, which I’ll talk more about in a minute, and the context. Then we create a response socket and bind it using the connection string, followed by a request socket and connect it. Much like regular TCP sockets one end must bind and the other must connect. Theoretically it shouldn’t matter which does what, but in practice that’s not quite the case. Generally you want to bind the most stable parts of your topology and connect the more ephemeral ones. Here, thinking of the response socket as the server and the request socket as the client works well enough so we bind and connect appropriately. Once our sockets are set up we send a request, read it and print it. We then send a response, read it and print it. Because request and response sockets are synchronous their send and receive calls must be made in a specific order. Request sockets must send and then receive and vis-versa for response sockets. If you try these operations in the wrong order or double up on one of them then an exception is thrown.
Connection strings
Once a socket has been created it needs to be bound or connected. To do this a string is passed in of the form “transport:endpoint”. The transport can be any of the following values:
- inproc
- thread to thread within a single process
- ipc
- inter-process communication (Linux only and not available in any of the native ports as yet)
- tcp
- box to box communication and inter-process when “ipc” isn’t available
- epgm, pgm
- multicast protocols that make my head hurt, the guide has more information if you really want to use these
Once you’ve decided on a transport you need to define an endpoint as follows:
- inproc
- unique (enough) ASCII string
- ipc
- unique (enough) ASCII string (usually postfixed with “.ipc”)
- tcp
- internet address and port number
So in our first example we used thread to thread communication (inproc) through the “HelloWorld” endpoint.
Publish - Subscribe
What if you wanted to publish a stream of data and allow any number of clients to consume that stream. Well, ZeroMQ has a pattern for that using publish and subscribe sockets. In this example we’ll break the client and server out into separate processes. This will allow us to show off the ability of ZeroMQ to communicate across languages so we’ll write the server in Java and the client in C#.

Publish-Subscribe by iMatix Corporation is licensed under cc-by-sa 3.0
package org.PubSub;

import java.util.Random;

import org.zeromq.ZMQ;

public class Server {

  public static void main(String[] args) {
    try(ZMQ.Context ctx = ZMQ.context(1);
      ZMQ.Socket publisher = ctx.socket(ZMQ.PUB)) {
      publisher.bind("tcp://*:5556");

      Random random = new Random();
      while (true) {
        int id = random.nextInt(100000);
        int data = random.nextInt(500);
        publisher.send(String.format("%05d %d", id, data));
      }
    }
  }
}
Here we start by creating our context and publisher socket and binding to our endpoint. We then loop, each time pushing a random value to one of 100000 ids.
using System;

using NetMQ;

namespace PubSub {
  sealed class Program {
    public static void Main(string[] args) {
      using (NetMQContext ctx = NetMQContext.Create()) {
        using (var subscriber = ctx.CreateSubscriberSocket()) {
          subscriber.Connect("tcp://localhost:5556");
          int id = new Random().Next(100000);
          subscriber.Subscribe(id.ToString("D5"));

          long totalData = 0;
          int updateNumber = 0;
          for (; updateNumber < 100; updateNumber++)
          {
              string message = subscriber.ReceiveString();
              totalData += int.Parse(message.Split(' ')[1]);
          }

          Console.WriteLine(string.Format("Average data for id {0} was {1}",
              id, (totalData / updateNumber)));
        }
      }
    }
  }
}
So again, we create our context, a subscriber socket and connect to our endpoint. We then select a random ID to subscribe to. Note, even if you want to subscribe to all events published by the sever you MUST set a subscription (to get all messages you need the empty string) or the client will receive nothing. Subscriptions do a string match against the beginning of the message. If a match is found the client receives the message. We get one hundred messages from the publisher totalling up the total amount of data we have received. Once we have processed the messages we print out the ID we were subscribed to and the average of the data.
Push - Pull
Push and pull sockets are used for fan-out, fan-in one way communication. Push will evenly distribute messages to all available clients and pull will fairly queue messages from all connected clients. To demonstrate this we’ll create a ventilator to distribute work to some workers and then collect the results in a sink. Since we’ve got three pieces to our architecture this time lets add a third language, JavaScript running on Node.js.
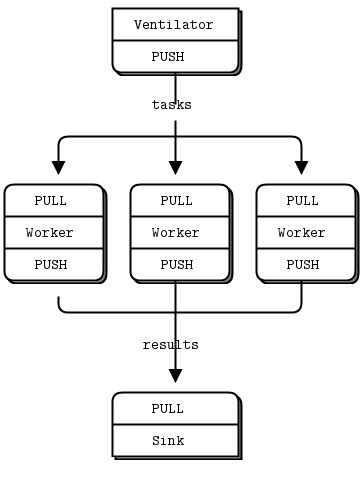
Extended Request-Reply by iMatix Corporation is licensed under cc-by-sa 3.0
package org.Ventilator;

import java.io.IOException;
import java.util.Random;

import org.zeromq.ZMQ;

public class Ventilator {
  public static void main(String[] args) throws IOException {
    try(ZMQ.Context ctx = ZMQ.context(1);
      ZMQ.Socket sender = ctx.socket(ZMQ.PUSH);
      ZMQ.Socket sink = ctx.socket(ZMQ.PUSH)) {
      sender.bind("tcp://*:5557");
      sink.connect("tcp://localhost:5558");

      System.out.println("Press Enter when the workers are ready: ");
      System.in.read();
      System.out.println("Sending tasks to workers...");

      sink.send("0");
      Random random = new Random();

      int totalMSec = 0;
      for (int taskNumber = 0; taskNumber < 100; ++taskNumber) {
        int workload = random.nextInt(100) + 1;
        totalMSec += workload;
        sender.send(String.format("%d", workload));
      }

      System.out.println(String.format("Total expected cost: %d msec", totalMSec));
    }
  }
}
It’s the usual start, but we’re also going to create a socket to connect to the downstream sink. Then we wait for the user to tell us all the workers are up and running. We need this otherwise the first worker to complete its connection will grab most (if not all) of the work. There are ways to fix this, but they would detract from looking at the pattern itself so we’ll leave them out for now. Once the user has indicated the workers are ready we notify the sink and dispatch 100 workloads.
using System;

using NetMQ;
using System.Threading;

namespace Worker {
  class Program {
    static void Main(string[] args) {
      using (NetMQContext ctx = NetMQContext.Create()) {
        using (var receiver = ctx.CreatePullSocket()) {
          receiver.Connect("tcp://localhost:5557");
          using (var sender = ctx.CreatePushSocket()) {
            sender.Connect("tcp://localhost:5558");
            while (true) {
                var message = receiver.ReceiveString();
                Console.WriteLine(message);
                Thread.Sleep(int.Parse(message));
                sender.Send("");
            }
          }
        }
      }
    }
  }
}
The workers are the ephemeral parts of our architecture so we’ll connect upstream to the ventilator to obtain work and downstream to the sink to pass out results. We’re able to start as many as we like. Each worker simply receives a message from the ventilator, does an appropriate amount of “work” and then notifies the sink that it has completed a single task.
var zmq = require('zmq')
  , receiver = zmq.socket('pull');

var started = false
  , i = 0
  , label = "Total elapsed time";

receiver.on('message', function() {
  if (!started) {
    console.time(label);
    started = true;

  } else {
    i += 1;
    process.stdout.write(i % 10 === 0 ? ':' : '.');
    if (i === 100) {
      console.timeEnd(label);
      receiver.close();
      process.exit();
    }
  }
});

receiver.bindSync("tcp://*:5558");
The sync binds to its endpoint, waits for the signal from the ventilator then times how long it takes for 100 tasks to complete. The more workers there are the quicker this should be (up to a point).
Asynchronous Request - Response
Let’s go back to the Request - Response pattern and put some real power into it. Rather than having one client request work from one worker can we get any number of clients to request work from any number of workers. We could pre load each client with a list of workers and have each client talk directly to a worker. This works, but what if we add or remove workers, we then need to update every client. A better solution would be to have a broker which both clients and workers connect to and is responsible for passing messages back and forth. Since this broker will need to deal with many simultaneous requests and responses we’ll need some new sockets. Routers are like asynchronous response sockets and dealers like asynchronous request sockets.
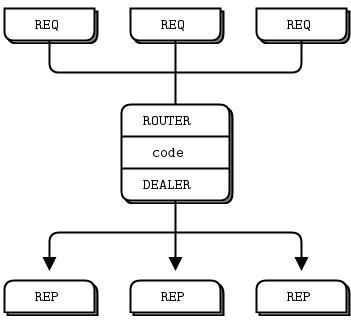
Extended Request-Reply by iMatix Corporation is licensed under cc-by-sa 3.0
package org.AsyncReqRep;

import java.util.Random;

import org.zeromq.ZMQ;

public class Worker {
  public static void main(String[] args) throws InterruptedException {
    try(ZMQ.Context ctx = ZMQ.context(1);
      ZMQ.Socket responder = ctx.socket(ZMQ.REP)) {
      responder.connect("tcp://localhost:5560");
      int id = new Random().nextInt(100);
      while (true) {
        String message = responder.recvStr();
        System.out.println(String.format("Received request: [%s]", message));
        Thread.sleep(new Random().nextInt(4000) + 3000);
        responder.send(String.format("World (from %d)", id));
      }
    }
  }
}
This worker is very similar to the response socket we saw in the first example except that we create a random identity for ourselves and whenever we receive a message we do “work” for 3-7 seconds. The client is, likewise, very similar to the request socket in the original example.
using System;

using NetMQ;

namespace AsyncReqRep {
  class Client {
    static void Main(string[] args) {
      using (NetMQContext ctx = NetMQContext.Create()) {
        using (var requester = ctx.CreateRequestSocket()) {
          int id = new Random().Next(100);
          requester.Connect("tcp://localhost:5559");
          int requestNumber = 0;
          for (; requestNumber < 10; ++requestNumber) {
              requester.Send(string.Format("Hello (from {0})", id));
              string message = requester.ReceiveString();
              Console.WriteLine(string.Format("Received reply {0} [{1}]", requestNumber, message));
          }
        }
      }
    }
  }
}
Here we set up our socket, generate a random identity for ourselves and serially send our 10 requests, printing the response. So we’ve got our client and worker, now we need our broker.
var zmq = require('zmq')
  , frontend = zmq.socket('router')
  , backend = zmq.socket('dealer');

frontend.on('message', function() {
  var args = Array.apply(null, arguments);
  backend.send(args);
});

backend.on('message', function() {
  var args = Array.apply(null, arguments);
  frontend.send(args);
});

frontend.bindSync('tcp://*:5559');
backend.bindSync('tcp://*:5560');
We create a router socket as our frontend (which our clients will connect to) and a dealer socket as our backend (which the workers connect to). Whenever a message is received by a socket it is sent out on its counterpart, pretty straight froward really. Now, fire up a few clients, a few workers and a broker and see what happens. Take away or add some workers and/or clients and notice that everything still works as expected. Despite this there are a couple of things to notice here. Firstly there’s no context. I’m not entirely sure why, but suspect this is because Node is single threaded and therefore only one can be used so it’s created as a global object when the library is initialised. Secondly, how does the router socket send the correct replies to the correct workers? This is quite a complex area of ZeroMQ, but at the moment it’s enough to know it will just work for simple cases like this. If you want to know more chapter 3 of the guide is the place to start.
Exclusive Pair
Exclusive pairs are used to co-ordinate multi-threaded applications. Hintjens makes the following statement in the guide:
If there’s one lesson we’ve learned from 30+ years of concurrent programming, it is: just don’t share state. It’s like two drunkards trying to share a beer. It doesn’t matter if they’re good buddies. Sooner or later, they’re going to get into a fight. And the more drunkards you add to the table, the more they fight each other over the beer.
Mostly this is still true, but with the advent of immutable data structures and thread safe queues (sort of, they’re available for .Net 4.5 in the Google Guava library for Java and there are the mori and immutable.js libraries for JavaScript, having incubated in the functional programming domain) I think there’s less need for these. Exclusive pairs tightly couple the threads of your application (much like the immutable collections) and can’t scale out to processes so the only real advantage I can see would be not having to learn about immutable data structures. But, if you’re using one of the many languages for which such collections don’t exist exclusive pairs are infinitely better than sharing mutable state and using locks, semaphores and/or mutexes. On with the demonstration.
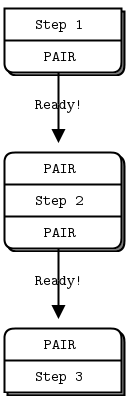
The Relay Race by iMatix Corporation is licensed under cc-by-sa 3.0
var zmq = require('zmq')

var step3Receiver = zmq.socket('pair');
step3Receiver.on('message', function() {
  console.log('Test successful');
});
step3Receiver.bindSync('inproc://step3');

var step2Receiver = zmq.socket('pair');
step2Receiver.on('message', function() {
  var xmitter = zmq.socket('pair');
  xmitter.connect('inproc://step3');
  console.log('Step 2 ready, signalling step 3');
  xmitter.send('READY');
});
step2Receiver.bindSync('inproc://step2');

var xmitter = zmq.socket('pair');
xmitter.connect('inproc://step2');
console.log('Step 1 ready, signalling step 2');
xmitter.send('READY');
In this final example a three step process is created connected by exclusive pair sockets over the inproc transport. The steps are created in the reverse order in which they’ll be used and wait for the READY signal from the previous step.
Conclusion
Messaging has long been dominated by complex message brokers which typically become the fragile centres of the architectures they inhabit. The ZeroMQ library allows a different approach with smart endpoints and dumb pipes. Here it was shown how easily the library can be used by a number of languages (C#, Java and Node.js in this case) and examples of the 5 basic patterns it provides. If this has whetted your appetite far more detailed (and entertainingly written) information can be found in the official guide.

