
I recently had some free time and decided to play with two technologies that I’ve long been interested in - Docker and Erlang. I set myself the task of getting a three container system up and running in a completely automated way. I approached the task incrementally, from getting Erlang working locally, to working in a container, to working between containers. I’ve set out the journey in this blog post and hope you find it as interesting as I did!
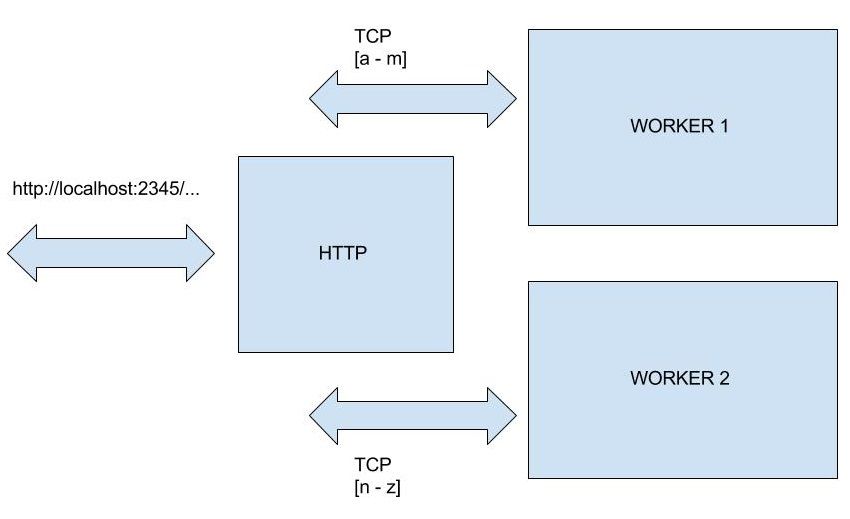
To keep it simple, I decided to have one container expose an HTTP server and then have that container delegate work to one of two “worker” containers, based on the URL being requested. If the path segment of the URL starts with a character in the first half of the alphabet, the HTTP server returns a response from worker 1, and if the path starts with a character in the second half of the alphabet, the HTTP server returns a response from worker 2. (If the first character of the path is something else, an error is returned.) Here’s the basic idea:
You can play with the end result by cloning the repo from GitHub and then running docker-compose up.
git clone https://github.com/ceejsmith/distributed-erlang
docker-compose up
You’ll need to have Git, Docker Engine and Docker Compose installed. Note that the latter doesn’t currently run on Windows. I’ve been doing this investigation on Ubuntu 14.04 LTS (as a VM in VirtualBox on my Windows machine).
I found it useful to add my user to the docker group so that I didn’t have to keep typing sudo all the time, as described here. Also, if you start up your Ubuntu VM and the screen is really small, you’ll probably need to install the Guest Additions for Ubuntu on VirtualBox.
When the system comes up, hitting something like http://localhost:2345/a will give you a plain text response of “First”. Hitting http://localhost:2345/z will give you “Second”. Clearly, this blog post is about how useful it is to be able to spin up a full system with one command, rather than the spectacular functionality of the system in question!
In this post, I’ll describe how I incrementally got to the final solution. I’ll start with brief descriptions of Docker and Erlang.
Docker
Docker is a virtualisation solution based on Linux containers. It’s making big noises in the IT space and so if you’re reading this blog, you’ve probably heard of it. It works by isolating a set of Linux processes and giving them their own file system, network stack etc. Containers are more lightweight than VMs and spin up faster. If you’re interested and don’t know much about Docker, I’d advise you to fire up your favourite search engine and go surfing.
Erlang
Erlang is a functional programming language based on actors. It was originally developed by Ericsson and is now open source. It’s good for soft real time, highly concurrent, robust systems. One of the reasons I wanted to look at it is the intellectual challenge - getting your head round purely functional programming (no mutability allowed), actors and supervision trees certainly exercises the old grey matter!
The Erlang code I’ve used in this blog draws on Chapter 14 (Programming with Sockets) of Joe Armstrong’s excellent book “Programming Erlang”. It’s important to note that I’m only an Erlang newbie and this is “toy” code. Production Erlang applications use OTP - the Open Telecom Platform, with supervision trees for robustness.
Setting up a worker container
So, let’s roll our sleeves up and dive into running Erlang code in containers. We’ll talk about hooking multiple containers up into a system later.
The worker containers could of course do pretty much anything, but for this demonstration I just want them to return a fixed identifier whenever they receive something on their TCP socket. To that end, I wrote a static TCP server:
-module(server_tcp_static).
-export([start/1]).

start([Response]) ->
    io:format("SERVER Trying to bind to port 2345~n"),
    {ok, Listen} = gen_tcp:listen(2345, [binary, {packet, 0}, {reuseaddr, true}, {active, true}]),
    io:format("SERVER Listening on port 2345~n"),
    accept(Listen, Response).

accept(Listen, Response) ->
    {ok, Socket} = gen_tcp:accept(Listen),
    respond(Socket, Response),
    accept(Listen, Response).

respond(Socket, Response) ->
    receive
        {tcp, Socket, Bin} ->
            io:format("SERVER Received: ~p~n", [Bin]),
            gen_tcp:send(Socket, Response),
            respond(Socket, Response);
        {tcp_closed, Socket} ->
            io:format("SERVER: The client closed the connection~n")
    end.
That looks a bit different to Java or C# code!
There are a few things to bear in mind here:
- A module is a bit like an assembly in .NET or a package in Java. It groups functions, and only exposes those listed in the export directive.
- Erlang uses functions exclusively and nothing is mutable. Actors are functions with a mailbox and the receive keyword is used to pull messages from the mailbox.
- Pattern matching is used extensively. For instance {tcp, Socket, Bin} means “match a message with that structure and assign the variables Socket and Bin”. That message corresponds to a binary message arriving on a particular socket using the TCP protocol.
If this has piqued your interest, I highly recommend Learn You Some Erlang for Great Good!.
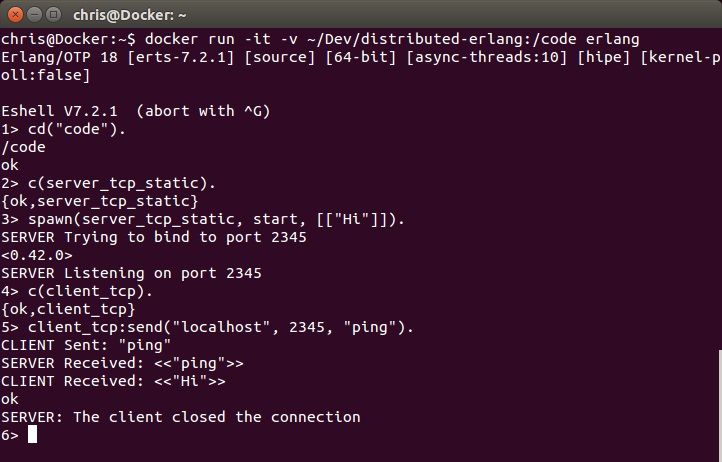
Throughout this investigation, I didn’t need to install Erlang on my Ubuntu box. Instead, I used containers and mapped the code into the container to be compiled and run. To test this little server, I ran this command in a terminal:
docker run -it -v ~/Dev/distributed-erlang:/code erlang
An Erlang shell comes up on the root of the container’s file system. Note that I’ve mapped my copy of the repo at ~/Dev/distributed-erlang into /code in the container. I’ve also asked for an interactive terminal (as opposed to something like a daemon with -d) using -it. If you do this and the official Erlang image isn’t on your hard drive, you’ll see Docker pull from the hub.
I can then compile the static TCP server:
cd("code").
c(server_tcp_static).
Running the server involves spawning a process and returning to the shell:
spawn(server_tcp_static, start, [["Hi"]]).
(The double square brackets are to accommodate the way “erl -run” is used to run Erlang code from the command line when we define our own Docker images later on.)
This starts a process listening on port 2345 and returns control to the shell. Normally we’d store the PID (process identifier) of this new process in a variable in the current process so that we can communicate with it, but “fire and forget” is OK while we’re learning. (The PID is <0.42.0> in the terminal session below.) The shell will clean up processes when it exits and it’s also worth remembering that we’re in a container which we can dispose of cleanly whenever we like.
I also wrote a little TCP client module, which I won’t list here. It’s in the repo. When I use it to send anything to the static server, I get “Hi” back, as shown in the terminal session below.
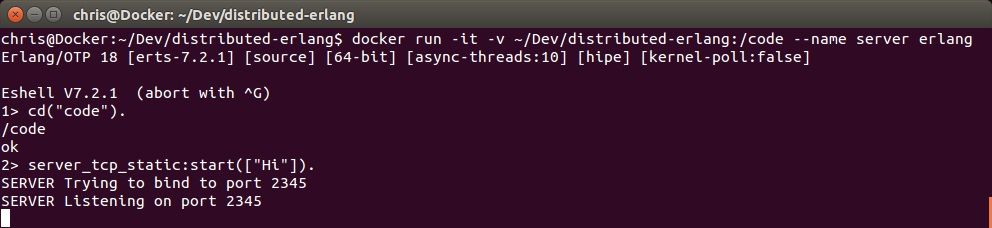
That proves that things work within a single container, but what about between containers? Let’s set up a named container with a TCP echo server running on port 2345:
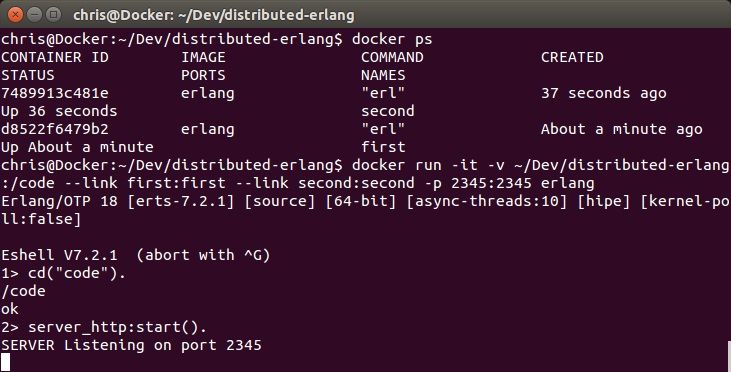
In a separate terminal, we can start another container and run the TCP client code. Docker has added an entry to the /etc/hosts file within this new container pointing to “server”. Note that we can’t hit the echo server from the Ubuntu host - only the linked container can see server.

When you send via TCP from the client container, you’ll see the server container log the event.
Setting up the HTTP server container
The next piece of the puzzle is to write a small HTTP server, and have it delegate to one of two possible backend TCP static servers, depending on the path segment of the URL. Here’s the code:
-module(server_http).
-export([start/0]).

%% This server only stays alive for one connection, but this is OK for demonstration in a modern
%% browser, since HTTP 1.1 keeps the connection open for multiple requests.

start() ->
    {ok, Listen} = gen_tcp:listen(2345, [binary, {packet, 0}, {reuseaddr, true}, {active, true}]),
    io:format("SERVER Listening on port 2345~n"),
    {ok, Socket} = gen_tcp:accept(Listen),
    gen_tcp:close(Listen),
    loop(Socket).

loop(Socket) ->
    receive
        {tcp, Socket, Bin} ->
            io:format("SERVER Received request~n"),
            Host = host_for(Bin),
            io:format("SERVER Chose host ~p~n", [Host]),
            spawn(fun () -> respond(Host, Socket) end),
            loop(Socket);
        {tcp_closed, Socket} ->
            io:format("SERVER: The client closed the connection~n")
    end.

%% Paths beginning in the first half of the alphabet go to the first back end node
%% The second half go to the second back end node
host_for(Bin) ->
    [Line|_] = string:tokens(binary_to_list(Bin), "\r\n"), %% First line is the GET request
    Code = lists:nth(6, Line), %% "GET /" are the first 5 characters
    if
        Code > 64, Code < 78 -> "first"; %% A - M
        Code > 96, Code < 110 -> "first"; %% a - m
        Code > 77, Code < 91 -> "second"; %% N - Z
        Code > 109, Code < 123 -> "second"; %% n - z
        true -> "error"
    end.

respond(Host, ResponseSocket) ->
    {ok, RequestSocket} = gen_tcp:connect(Host, 2345, [binary, {packet, 0}]),
    ok = gen_tcp:send(RequestSocket, "ping"),
    io:format("SERVER Sent request to back end~n"),
    receive
        {tcp, RequestSocket, Bin} ->
            Response = plain_text_response(binary_to_list(Bin)),
            io:format("SERVER Sent HTTP response: ~p~n", [Bin]),
            gen_tcp:send(ResponseSocket, Response)
    end.

plain_text_response(Text) ->
    Length = integer_to_list(string:len(Text)),
    "HTTP/1.1 200 OK\r\nContent-Length: " ++ Length ++ "\r\nContent-Type: text/plain\r\n\r\n" ++ Text.
That’s a bit longer. The interesting bit of the code is the spawn call within the loop function. We pass it the socket we’re listening on so that it can respond when it receives an answer from the chosen container. The spawn call spins up a process running the respond function and returns immediately so that we can listen for new HTTP requests. Again, note that this is “toy” code. There’d be interleaving and ordering problems with this in a normal system because we don’t know how long it will take for a worker container to respond. Also, there’s no error handling for things like network problems.
The host names for the worker containers (“first” and “second”) are hard coded, which isn’t something we’d do in a production system. It’s illustrative for learning purposes though. We can spin up named containers as we did for “server” and have them return “First” and “Second” when they receive something over TCP. Then we can spin up a third container with links to the two worker containers, expose its port 2345 on the Ubuntu host and hit it with a web browser:
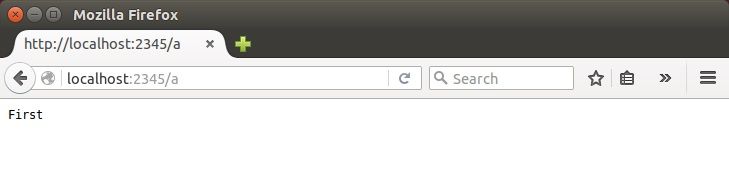
You’ll also see the HTTP server log the interaction:
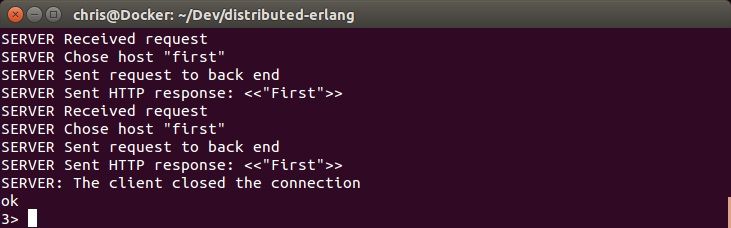
(It happens twice because the browser initially requests “favicon” as well.)
Automating system start-up
There are two remaining steps before we can just type
docker-compose up
and have a working system. Firstly, we need our own images containing the code for the workers and the HTTP server, and we need a docker-compose.yml file describing which containers to start and how to link them.
Here’s the Dockerfile for the workers:
FROM erlang

COPY server_tcp_static.erl server_tcp_static.erl

RUN erlc server_tcp_static.erl

ENTRYPOINT ["erl", "-noshell", "-run", "server_tcp_static", "start"]
When we run “docker build”, the Docker command line client sends the current directory (and all sub-directories) to the Docker daemon as the “build context”. In this Dockerfile, we pick only the Erlang file that we need, copy it into the container and then compile it (RUN erlc …) to produce a BEAM file that can execute on the Erlang VM. We then set the ENTRYPOINT of the container to spin up a static TCP server. Note that the argument we supply to “start” is missing. We’ll come to that in a minute.
There is a similar Dockerfile for the HTTP server (called Dockerfile_gateway).
For a running system, we want to spin up two worker containers and an HTTP server linked to them. Here’s the docker-compose.yml file that does this:
worker-first:
    build: .
    dockerfile: Dockerfile_worker
    command: First

worker-second:
    build: .
    dockerfile: Dockerfile_worker
    command: Second

gateway:
    build: .
    dockerfile: Dockerfile_gateway
    links:
     - worker-first:first
     - worker-second:second
    ports:
     - "2345:2345"
We specify the build context for the images as the same directory as the one containing the docker-compose.yml file. The Dockerfile’s copy and compile only the code they need. Note that we link the workers to the gateway and then only expose the gateway’s port 2345 on the Ubuntu host.
If you run “docker-compose up” you’ll see images being built and containers starting. If you then hit http://localhost:2345/a, you’ll see all three containers log the interaction.
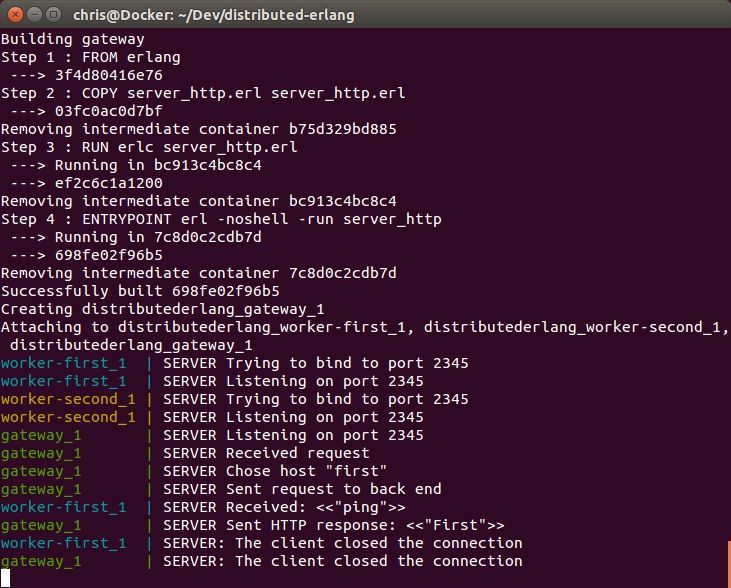
I’ve only shown the image build and container start for “gateway”. “worker-first” and “worker-second” were built similarly.
If you run
docker images
docker ps -a
in a terminal, you’ll see images for each of the workers and the gateway and corresponding containers.
Conclusion
At this point, I decided I’d achieved my objective of getting a multi-container system up and running in an automated way, but I wanted to see how it looked on someone else’s machine. I asked one of my colleagues to clone the repo onto his Ubuntu VM and bring up the system. We watched as Docker pulled the official Erlang image, built the custom images, started the containers and linked them up. It was impressive and I started to think of ways of using it to speed up development and deployment of systems built on microservices.
I hope you’ve found this journey interesting and feel inspired as well. Docker is a powerful tool that’s gaining a lot of traction in the world of IT. Erlang is definitely more niche, but I think we’ll be seeing more and more about functional programming in 2016 and beyond. I’m now hoping to start a development project using Docker and a functional language and I’ll blog about my experiences.
