Having spent a few days experimenting with setting up a build process for creating an Electron-based application thought I would put together a post describing the setup. First, a disclaimer that this is still a work in progress and as with everything within the JavaScript world it seems like there are a thousand ways to do it and this is just one way. Secondly, I am by no means an expert and this is just the process I wanted to create - I am sure there are improvements that can be made and would value suggestions!
So my requirements are:
- Want to use Electron for creating a simple (or not…) desktop application
- Want to use TypeScript for the majority of the code
- Where I have to use JavaScript code, want to have it linted by StandardJS
- Want the TypeScript code to be linted by ts-lint but conforming to consistent rules with standardjs
- Want to use WebPack (version 2) to control the build process
- Want to use babel to transpile from ES6 to ES5 as needed for node, and to compile the JSX
- Want to use React and
tsxon the front end - Want to use the Jest unit testing framework
- Want to have one place to control how TypeScript / TSX is linted and built, one place to control how JavaScript / JSX is linted and build and one place to run all the tests!
Additional development environment goals:
- Want to have a CI build process hosted within Visual Studio Team Services
- Want to have the code hosted on GitHub
- Be able to run the build and tests within Visual Studio Code
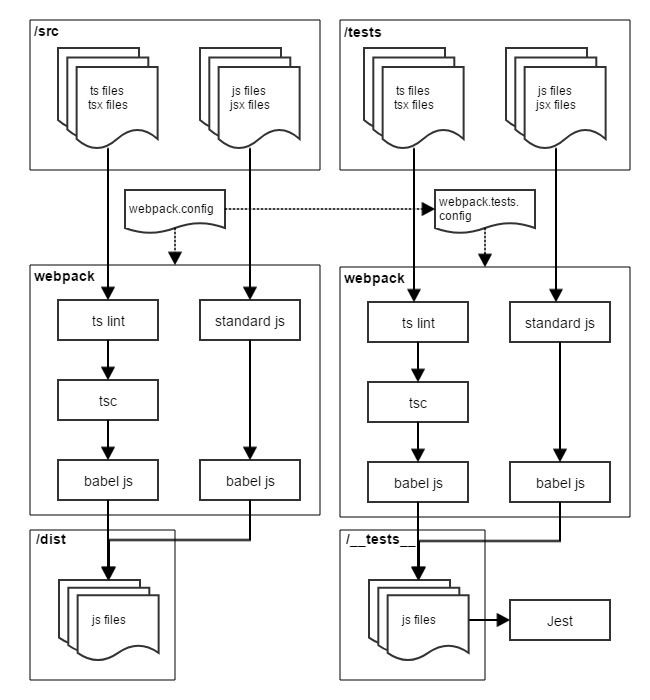
The diagram below shows the end goal for the build process we are going to create.
This guide is probably a bit too long (feels like my longest post in a while!), so if you prefer you can just download the initial project from github.
Importing the packages…
In this guide, I am using yarn but the same process will work with npm as well. Let’s start by creating an empty project by running and completing the wizard:
yarn init
Next, import all the packages we need for the build as development dependencies:
For compiling and linting TypeScript (WebPack, TSLint, TypeScript)
yarn add webpack tslint-config-standard tslint-loader ts-loader tslint typescript -D
For transpiling and linting ES2015 code for Node (Babel, Babel Presets, StandardJS)
yarn add babel-core babel-loader babel-preset-es2015-node babel-preset-react standard standard-loader -D
Setting Up The Build Process
In order to set this up, we need to set up a fair few pieces. Let’s start by getting the TypeScript process set up to build a file from the src directory to the dist folder. To configure the TypeScript compiler, add a new file called tsconfig.json to the root folder of the project with the following content:
{
    "compileOnSave": false,
    "compilerOptions": {
        "target": "es2015",
        "moduleResolution": "node",
        "pretty": true,
        "newLine": "LF",
        "allowSyntheticDefaultImports": true,
        "strict": true,
        "noUnusedLocals": true,
        "noUnusedParameters": true,
        "sourceMap": true,
        "skipLibCheck": true,
        "allowJs": true,
        "jsx": "preserve"
    }
}
This tells the TypeScript compiler not to compile on save (as we are going to use WebPack) and to be strict (as this is a ‘greenfield’ project).
Compiler Options:
| Setting | Value | Description |
|---|---|---|
target |
es2015 |
Specify output ECMAScript version to be ES2015 (ES6) |
moduleResolution |
node |
Determine that modules get resolved consistently with Node.js system |
pretty |
true |
Stylise errors and messages with colour and context |
newLine |
LF |
Use Linux style line endings |
allowSyntheticDefaultImports |
true |
Allows for a nicer (in my opinion) syntax for importing defaults |
strict |
true |
Enables strict type checking |
noUnusedLocals |
true |
Report errors if local variable unused |
noUnusedParameters |
true |
Report errors if parameter unused |
sourceMap |
true |
Generate a corresponding .map file |
skipLibCheck |
true |
Skip type checking of all .d.ts files (type definition files) |
allowJs |
true |
Allow JavaScript files to be compiled |
jsx |
preserve |
Preserve means we produce a JSX file leaving the JSX mark up unchanged |
In order to set up tslint to be consistent with StandardJS, add another new file to the root directory called tslint.json with the following content:
{
  "extends": "tslint-config-standard",
  "rules": {
    "indent": [true, "spaces"],
    "ter-indent": [true, 2],
    "space-before-function-paren": ["error", {
      "anonymous": "always",
      "named": "never",
      "asyncArrow": "ignore"
    }]
  }
}
This makes tslint follow the same configuration as StandardJS. I found the white-space settings were causing me some errors hence needing to add the additional configuration over tslint-config-standard.
Next, configure WebPack to compile TypeScript files (ts or tsx extensions) found in the src folder and output to the dist folder. The structure I use here is a little different from the standard as we will need two parallel configurations when we come to the Electron set up. Create a file called webpack.config.js and add the following:
const path = require('path')

const commonConfig = {
  output: {
    path: path.resolve(__dirname, 'dist'),
    filename: '[name].js'
  },
  module: {
    rules: [
      {
        test: /\.ts$/,
        enforce: 'pre',
        loader: 'tslint-loader',
        options: {
          typeCheck: true,
          emitErrors: true
        }
      },
      {
        test: /\.tsx?$/,
        loader: 'ts-loader'
      }
    ]
  },
  resolve: {
    extensions: ['.js', '.ts', '.tsx', '.jsx', '.json']
  }
}

module.exports = Object.assign(
  {
    entry: { main: './src/main.ts' }
  },
  commonConfig)
The first rule tells WebPack to run tslint at the prebuild step, before then moving on run the TypeScript compiler. The resolve option adds the TypeScript extensions into WebPack so it will look for both JavaScript and TypeScript files (including JSX or TSX files).
To add the build command to yarn or npm, add the following code to the packages.json. This is assuming you don’t have scripts section already if you do merge it in.
  "scripts": {
    "build": "webpack --config webpack.config.js"
  },
Visual Studio Code Set Up
In order to run this build from within Visual Studio Code, the next step is to configure the task and also set up the workspace environment appropriately.

Press Ctrl-Shift-B and then click Configure Build Task. Choose npm as a starting point, and then replace the default tasks array with:
    "tasks": [
        {
            "taskName": "build",
            "args": ["run", "build"],
            "isBuildCommand": true
        }
    ]
If using yarn, then change the command from npm to yarn.
The last part of setting up the editor is to add a settings.json within the .vscode folder (which should have been created for the tasks.json file) specifying the number of spaces and line endings to match the linting settings:
{
    "editor.tabSize": 2,
    "files.eol": "\n"
}
A restart of Visual Studio Code might be required in order for it to pick up these changes.
Testing the build
There are three ways to run the build (and all will do the same):
- From within the root directory of the project, run
yarn run build(ornpm run build) - From within the root directory of the project, run
.\node_modules\.bin\webpack - Press
Ctrl-Alt-Bwithin Visual Studio Code
As there is no code yet, running the build will just result in an error:
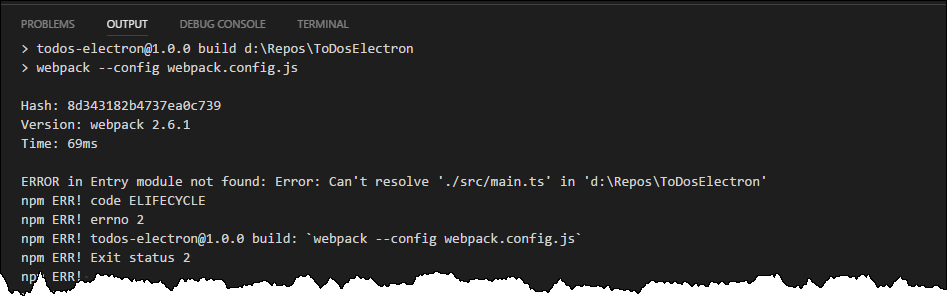
To test the build set up, create a src directory and add a main.ts file, with the following content (note the empty line at the end):
export class SimpleClass {
  Add(a: number, b: number): number {
    return a + b
  }
}

const simpleClass: SimpleClass = new SimpleClass()
console.log(simpleClass.Add(2, 3))
If all is working you should get output like:
ts-loader: Using typescript@2.3.3 and D:\Repos\ToDosElectron\tsconfig.json
Hash: c35650ba72c226225609
Version: webpack 2.6.1
Time: 3554ms
  Asset     Size  Chunks             Chunk Names
main.js  2.91 kB       0  [emitted]  main
   [0] ./src/main.ts 73 bytes {0} [built]
The dist folder should be created and a main.js file should exist. To test this, run node dist/main.js in the root folder. The output should be 5.
Setting Up Babel
Looking at the main.js file, the output is ES2015 style (this will be surrounded by a fair amount of WebPack boilerplate):
class SimpleClass {
    Add(a, b) {
        return a + b;
    }
}
/* harmony export (immutable) */ __webpack_exports__["SimpleClass"] = SimpleClass;

const simpleClass = new SimpleClass();
console.log(simpleClass.Add(2, 3));
The next goal is to use babel-js to convert from this to fully compatible JavaScript for Node. As of Babel 6, a .babelrc file is used to tell it what ‘presets’ to load. The following will tell it to understand both ES2015 and React, and to transpile down as needed for Node:
{
  "presets": ["es2015-node", "react"]
}
WebPack also needs to be told to call Babel. The loader setting in each rule can take an array of loaders which are loaded in reverse order. Replacing loader: 'ts-loader' with loader: ['babel-loader', 'ts-loader'] makes WebPack run the TypeScript code through the TypeScript compiler and then the Babel compiler.
After re-running the build the new main.js will be very similar to the last version, but should allow for all ES2015 features:
class SimpleClass {
    Add(a, b) {
        return a + b;
    }
}
exports.SimpleClass = SimpleClass;
const simpleClass = new SimpleClass();
console.log(simpleClass.Add(2, 3));
...
Having set up Babel for the second step in TypeScript build, need to also configure it for compiling JavaScript files. Additionally, StandardJS should be used as a linter for JavaScript files. To do this add the following 2 rules section of the webpack.config.js:
      {
        test: /\.js$/,
        enforce: 'pre',
        loader: 'standard-loader',
        options: {
          typeCheck: true,
          emitErrors: true
        }
      },
      {
        test: /\.jsx?$/,
        loader: 'babel-loader'
      }
If you also want to target browsers you could switch from es2015-node preset to the es2015 preset.
Electron
So far the process above doesn’t have any settings to deal with Electron. Electron adds a few additional complications we need to deal with. The following command will add the core Electron package and the type definitions for Electron and Node. It also adds the HTML WebPack plugin which I will use to generate a placeholder index.html for the UI side of Electron.
yarn add electron html-webpack-plugin @types/electron @types/node -D
An Electron application consists of two processes:
- Main: This is a NodeJS based script which serves as the entry point into the application. It is responsible for instantiating the
BrowserWindowsinstances and also manages various application lifecycle events - Renderer: This is a Chromium based browser. It is the User Interface part of the application. It has the same kind of structure you would expect if you use Chrome. One master process and each
WebViewis its own process.
The two process share some APIs and communicate between each other over using interprocess communication. There is a great amount of detail on this Electron’s process post.
As we have two processes we are wanting to build output for we need to adjust the webpack.config.js file to handle this. For the two processes, there are two different target settings needed - electron-main and electron-renderer. If the configuration file exports an array then WebPack will interrupt each of the objects as parallel build processes. Replace the module.exports section of the configuration with:
const HtmlWebpackPlugin = require('html-webpack-plugin')
module.exports = [
  Object.assign(
    {
      target: 'electron-main',
      entry: { main: './src/main.ts' }
    },
    commonConfig),
  Object.assign(
    {
      target: 'electron-renderer',
      entry: { gui: './src/gui.ts' },
      plugins: [new HtmlWebpackPlugin()]
    },
    commonConfig)
]
This will pick up the main.ts file and compile this as the Electron main process. It also will compile a gui.ts to be the Electron renderer process. The HtmlWebpackPlugin will create an index.html automatically that includes a reference to the compiled gui.js.
WebPack also defaults to substituting the __dirname which is useful within Electron. This can be stopped by adding a setting to the commonConfig object:
  node: {
    __dirname: false
  },
Now to put together the main.ts script to create the Electron app and BrowserWindow:
import { app, BrowserWindow } from 'electron'
declare var __dirname: string
let mainWindow: Electron.BrowserWindow

function onReady() {
  mainWindow = new BrowserWindow({
    width: 800,
    height: 600
  })

  const fileName = `file://${__dirname}/index.html`
  mainWindow.loadURL(fileName)
  mainWindow.on('close', () => app.quit())
}

app.on('ready', () => onReady())
app.on('window-all-closed', () => app.quit())
console.log(`Electron Version ${app.getVersion()}`)
For the UI side, a simple gui.ts writing the node version out to the document:
document.getElementsByTagName('body')[0].innerHTML = `node Version: ${process.versions.node}`
The last adjustment is to add a new task the packages.json file. The prestart entry makes it build it as well.
    "prestart": "yarn run build",
    "start": "electron ./dist/main.js",
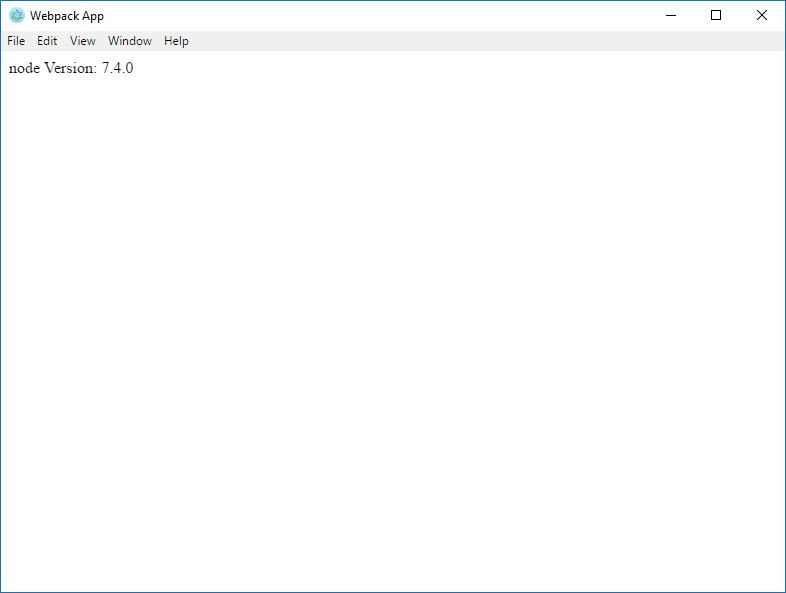
If you run yarn run start hopefully an electron window will appear with the node version displayed in it:
Adding React
In order to move to using TSX (or JSX), need to add React packages to the project:
yarn add react react-dom
yarn add @types/react @types/react-dom -D
The entry point for the UI part of the application needs to be switched from gui.ts to gui.tsx. First, change the entry: { gui: './src/gui.ts' }, line in the webpack.config file to entry: { gui: './src/gui.tsx' }, and rename the file to gui.tsx. Replace the content in gui.tsx with:
import React from 'react'
import ReactDOM from 'react-dom'

ReactDOM.render(
  <div>Node version: {process.versions.node}</div>,
  document.getElementsByTagName('body')[0])
Rerunning yarn run start will produce the same result as before but now we have an Electron-based application written in TypeScript using React and build with WebPack!
Unit Tests
The next piece to set up is a unit testing solution. Sticking with the rule that WebPack should build all the TypeScript, the idea is that the tests are written in TypeScript compiled from tests directory into another directory where Jest then runs the JavaScript output.
Again the first step is to add the additional packages:
yarn add jest jest-junit @types/jest -D
WebPack needs another configuration file to run the tests. In general the settings should be the same between the two. By requiring the main webpack.config file, this test config file can use it as a starting point. Create a new config file called webpack.tests.config.js and add the following content:
const webPack = require('./webpack.config')
const fs = require('fs')
const path = require('path')

const readDirRecursiveSync = (folder, filter) => {
  const currentPath = fs.readdirSync(folder).map(f => path.join(folder, f))
  const files = currentPath.filter(filter)

  const directories = currentPath
    .filter(f => fs.statSync(f).isDirectory())
    .map(f => readDirRecursiveSync(f, filter))
    .reduce((cur, next) => [...cur, ...next], [])

  return [...files, ...directories]
}

const getEntries = (folder) =>
  readDirRecursiveSync(folder, f => f.match(/.*(tests|specs)\.tsx?$/))
    .map((file) => {
      return {
        name: path.basename(file, path.extname(file)),
        path: path.resolve(file)
      }
    })
    .reduce((memo, file) => {
      memo[file.name] = file.path
      return memo
    }, {})

module.exports = [
  Object.assign({}, webPack[0], {entry: getEntries('./tests/host/')}),
  Object.assign({}, webPack[0], {entry: getEntries('./tests/gui/')})
].map(s => {
  s.output.path = path.resolve(__dirname, '__tests__')
  return s
})
The getEntries function is designed to search all folders within tests/host and tests/gui for TypeScript files with filenames ending either with tests or specs. This scan process limits the watch functionality of WebPack as it will only scan for files at start up. Files within tests/host will be built with the target setting of electron-main and tests/gui will be electron-renderer. The output will be built to a __tests__ folder and as before will pass through tslint, tsc and babel to produce JavaScript files.
To add the test command to yarn, add the following to packages.json. The pretest stage will build all the test files before running jest on the result.
    "pretest": "webpack --config webpack.tests.config.js",
    "test": "jest"
By default, Jest will search for the test files within the __tests__ folder or any JavaScript file with a filename ending either spec or test. Adding the configuration below (to package.json) limits Jests to just reading the __tests__ folder. The second part configures jest-junit to write out an XML file containing the test results - this is for Visual Studio Team Services to be able to read the results.
  "jest": {
    "testRegex": "/__tests__/.*\\.jsx?",
    "testResultsProcessor": "./node_modules/jest-junit"
  },
  "jest-junit": {
    "suiteName": "jest tests",
    "output": "./TEST-jest_junit.xml",
    "classNameTemplate": "{classname}-{title}",
    "titleTemplate": "{classname}-{title}",
    "usePathForSuiteName": "true"
  }
Finally, create the test directory structure and a couple of placeholder tests. Note the top line in the sample code below, this adds the global variables that Jest declares into TypeScript so the compiler will be happy!
tests/host/host_tests.ts
/// <reference types="jest" />
describe('Host', () => {
  test('PlaceHolderPassingTest', () => {
    expect(1 + 2).toBe(3)
  })
})
tests/gui/gui_tests.ts
/// <reference types="jest" />
describe('GUI', () => {
  test('PlaceHolderFailingTest', () => {
    expect(1 + 2).toBe(4)
  })
})
Running yarn run test will build these two tests files and then run Jest on the resulting output:

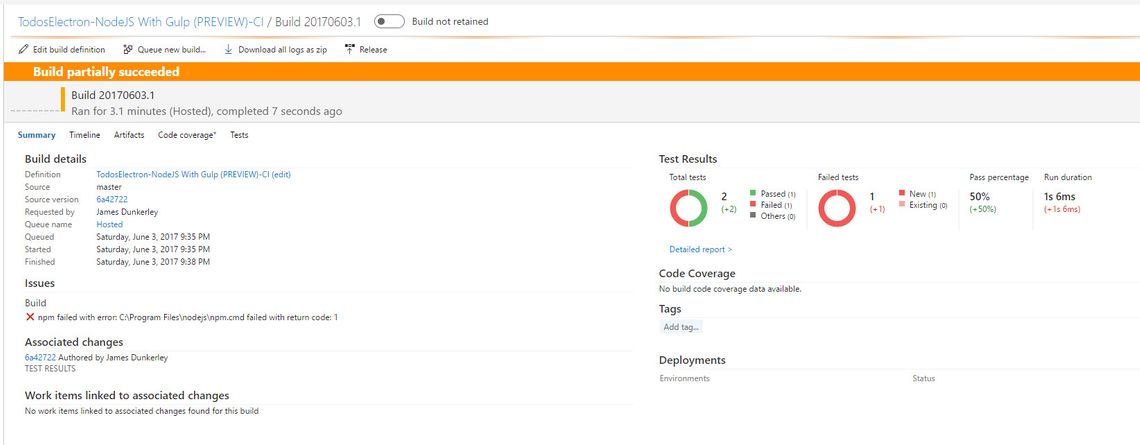
It will also create a TEST-jest_junit.xml file. This is for reading with Visual Studio Team Services so we get nice test results.
Visual Studio Team Services
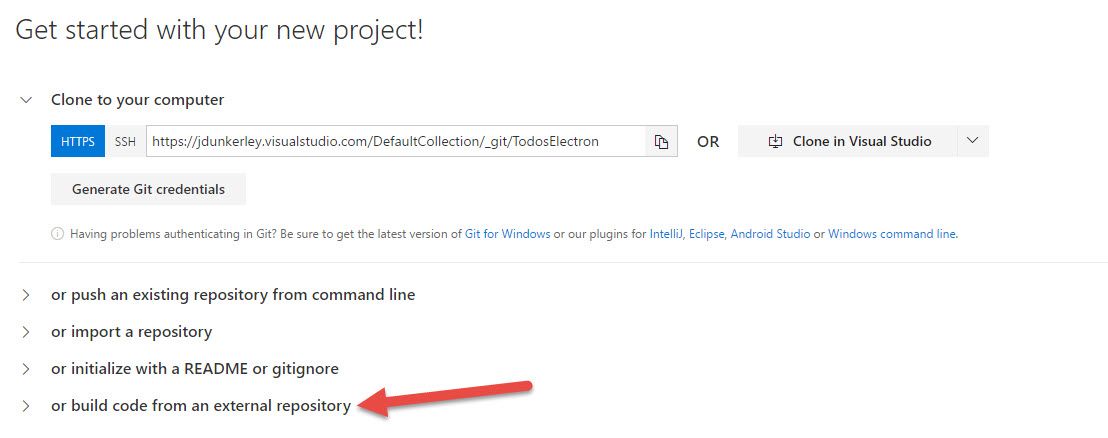
Create a new project in Visual Studio Team Services and select build code from an external repository.
Select New Definition and choose either of NodeJS scripts as a starting point. These are based on top of npm so it is easy to configure to build this project. I am sure you could make it use yarn but for simplicity have stuck with npm.
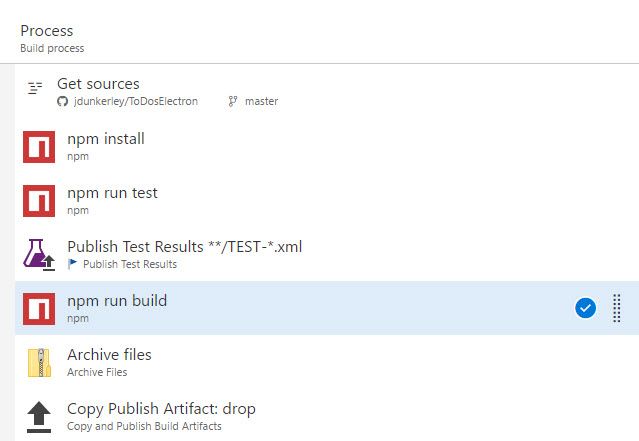
First, reconfigure the Get Sources step to get the code from GitHub (you may need to allow pop-ups for the authorization step). It’s great how easy it is to integrate with external repositories now within VSTS.
Next, remove the Run gulp task. Add a new npm task after the npm install, with npm command of run and argument of test. This will build and run the Jest tests. It needs to continue even if it the tests fail so choose Continue on error within the Control Options section.

In order to make VSTS report the test results, add a new task to Publish Test Results. The default configuration of this task will pick up the JUnit format XML we have configured to be published in the npm test step.
The last step is to run the actual WebPack build. So add another npm command. This time configured to run build.
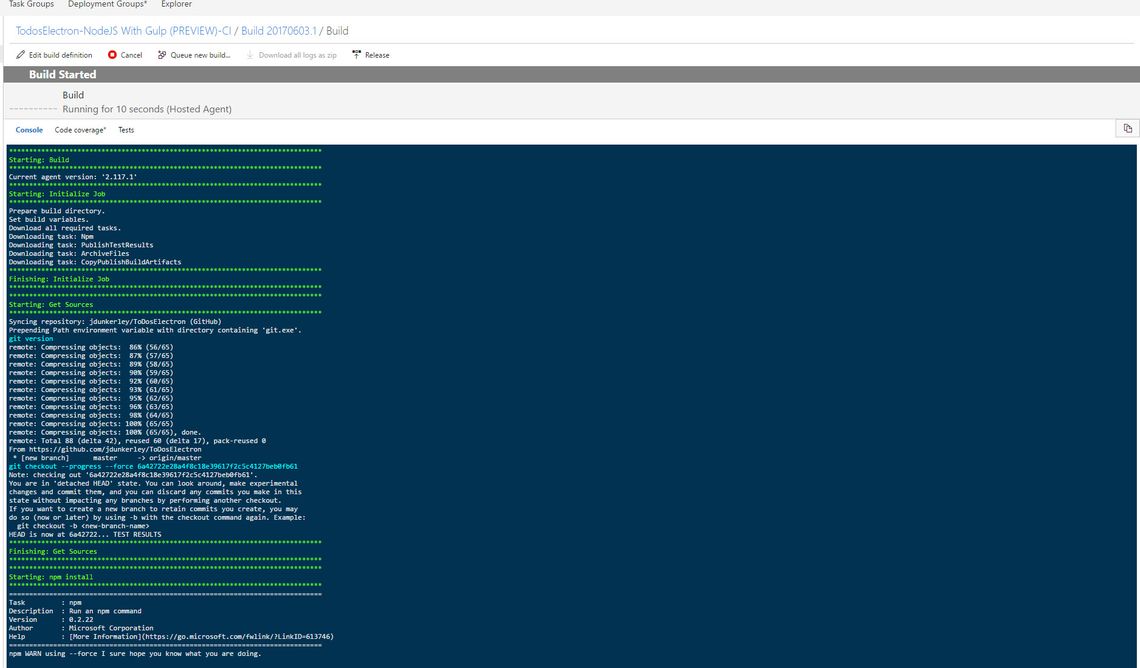
Finally, switch on the triggers for Continuous Integration and Pull Requests. That is it - a CI process from GitHub into VSTS!
Future Improvements
Since I started writing this Electron has updated with support for TypeScript. This doesn’t change much but does mean you don’t need type definitions for electron and node. If you have followed these instructions all you need do is run:
yarn upgrade electron -D
yarn remove @types/electron @types/node -D
Currently, I don’t have a good solution for watching tests. While watch mode works fine for build (run yarn run build -- --watch) the test command set up doesn’t support watching yet. I’ll inevitably spend a fair chunk of time mucking around trying to get this bit set up as well but at present, I accept just having to run the command to run my tests.
Primarily to keep this post shorter (well a little shorter), I haven’t gone into much detail on writing the Electron or React side of an application, instead just looking at the build process.
I haven’t covered packaging or any of the other steps needed for Electron. Lots more I can add if people are interested.
Hopefully, as I experiment and learn more, I will write a few more posts on Electron as it is a platform I am growing to really like.
This post was also published on my own personal blog - jdunkerley.co.uk