Over the past couple of months I’ve been exploring the potential of WebAssembly; initially looking at compilation options and performance, and more recently the migration of D3 Force Layout to WebAssembly using AssemblyScript.
I wanted to try my hand at creating a more complex WebAssembly application, which is why I’ve been spending my evenings working on a CHIP-8 emulator … and learning Rust!

You can find the code for the finished emulator on GitHub. It’s also hosted online if you want to have a play (I’d recommend Kraftwerk’s Computer Love as suitable backing track!).
Why Rust?
While there are a number of languages with support for WebAssembly, many of these are quite immature in their implementation. WebAssembly currently lacks a garbage collector (GC), and as a result languages that don’t require a GC tend to have better support. The most mature support is for C / C++ via Emscripten, although if I’m being totally honest, I don’t really like C++ … or Emscripten!
Rust is a relatively new language (2010) which, while syntactically similar to C++, is designed to be more ‘safe’. It also has many language features in common with other modern programming languages such as Swift. This, combined with an active community, has contributed to it holding the title of “Most Loved Language”
Rust is looking to be a popular choice for WebAssembly and its community is really embracing it …
We’re poised to be THE language of choice for wasm. (from Rust an the case for WebAssembly)
So for my CHIP-8 emulator I wanted a language with relatively mature WebAssembly support (if that’s such a thing!), that doesn’t create bloated binaries (i.e. no GC and a minimal runtime), that would be fun to learn.
Rust was the obvious choice.
I’m not going to cover my CHIP-8 implementation in great detail, however, I will pick out a few areas which highlighted Rust language features that I enjoyed.
But before that, what’s CHIP-8 all about?
CHIP-8
I must admit, writing an emulator has been on my programming ‘bucket list’ for a long time now. My earliest programming experiences were on early 8-bit microcomputers, and I’ve always enjoyed returning to writing code that is close to the ‘metal’. My initial idea was to write a Atari 2600 VCS emulator because its architecture is absolutely fascinating. However, that architecture also makes it a real challenge to emulate. Perhaps it made sense to start with something simpler?
After a bit of reading around I found that CHIP-8 (https://en.wikipedia.org/wiki/CHIP-8) is a good starting point for would-be emulator authors due to its relatively simple instruction set and architecture. Interestingly CHIP-8 isn’t a physical architecture, it is a virtual machine that was implemented by a number of computers in the 1970 and calculators in the 1980s. You can read more about CHIP-8, and the benefits of interpreters, from Joseph Weisbecker in his article for Byte Magazine.
In brief, CHIP-8 has 4k of RAM, although the first 512 bytes are used by the machine-specific interpreters (yes, just 512 bytes!). It has 16 8-bit registers and one 16-bit program register. It has a stack that can store up to 16 addresses, allowing support for ‘call’ operations as well as ‘jump’. The CPU supports 35 different opcodes (i.e. instructions), which are all 2-bytes wide. For peripherals it has a simple 64 x 32 pixel display, basic sound support and a 16-key keypad.
As well as being relatively simple, CHIP-8 does not appear to be proprietary, and as a result technical reference materials, and numerous ROMs are readily available.
If you’re interested in how to write an emulator, I’d highly recommend Laurence Muller’s article that covers CHIP-8 emulation in detail. In this post I’ll concentrate on the Rust and WebAssembly aspects.
Building WebAssembly with Rust
Rust support for WebAssembly has evolved rapidly in the past few months. Initially it depended on Emscripten and the ‘fastcomp’ fork of LLVM, however, this results in quite a weighty runtime being added to the wasm binary.
More recently a new wasm-unknown-unknown target was added to Rust, it is very much a work-in-progress that removes the Emscripten dependency, making use of the LLVM backend directly. As a result, the output binaries are much more lightweight. Although, there is still room for improvement, which is why the Rust team created a small utility wasm-gc, for post processing wasm files to clean up unused code.
With this update, creating wasm modules is very straightforward, as detailed in this brief setup guide. The following cargo build creates a wasm module:
cargo +nightly build --release --target wasm32-unknown-unknown
NOTE: cargo is a Rust’s package manager and build tool. It allows you to manage external dependencies (crates) and runs your build / test.
Emulator Structure
The core of the emulator is a CPU which is implemented as a structure (i.e. struct). The fields of this structure map pretty much directly onto the CHIP-8 architecture, consisting of memory, registers, a program counter etc …
pub struct Cpu {
    // index register
    pub i: u16,
    // program counter
    pub pc: u16,
    // memory
    pub memory: [u8; 4096],
    // registers
    pub v: [u8; 16],
    // peripherals
    pub keypad: Keypad,
    pub display: Display,
    // stack
    pub stack: [u16; 16],
    // stack pointer
    pub sp: u8,
    // delay timer
    pub dt: u8
}
The keypad and display are separate structures that manage these peripherals.
The execution cycle of the CHIP-8 processor is really quite simple. With my implementation, the Cpu exposes a public method, execute_cycle, which reads an opcode from the current memory location and processes it.
fn read_word(memory: [u8; 4096], index: u16) -> u16 {
    (memory[index as usize] as u16) << 8
        | (memory[(index + 1) as usize] as u16)
}

impl Cpu {
    pub fn execute_cycle(&mut self) {
        let opcode: u16 = read_word(self.memory, self.pc);
        self.process_opcode(opcode);
    }

    fn process_opcode(&mut self, opcode: u16) {
      ...
    }
}
Each instruction, which is two bytes, is interpreted by the process_opcode method, which I’ll cover in a little more detail later on. Based on the opcode, the Cpu might update registers, draw to the display, read input from the keypad, among other operations.
The core of this emulator implementation, which is comprised of the Cpu, Display and Keypad is the same as most other Rust implementations you’ll find on GitHub and elsewhere. Nothing WebAssembly specific going on here!
We want the lifecycle of the Cpu to be the same as the WebAssembly module itself, so it makes sense to create it as a global static value:
static mut CPU: Cpu = Cpu {
   // Default field values added here
};
In order to allow the hosting JavaScript code to interact with this static instance, a number of public global functions are defined:
#[no_mangle]
pub fn execute_cycle() {
    unsafe {
        CPU.execute_cycle();
    }
}

#[no_mangle]
pub fn get_memory() -> &'static [u8; 4096] {
    unsafe {
        &CPU.memory
    }
}

#[no_mangle]
pub fn get_display() -> &'static [u8; 2048] {
    unsafe {
        &CPU.display.memory
    }
}

// etc …
The no_mangle attribute turns off name mangling, ensuring that these functions retain their names and are callable externally.
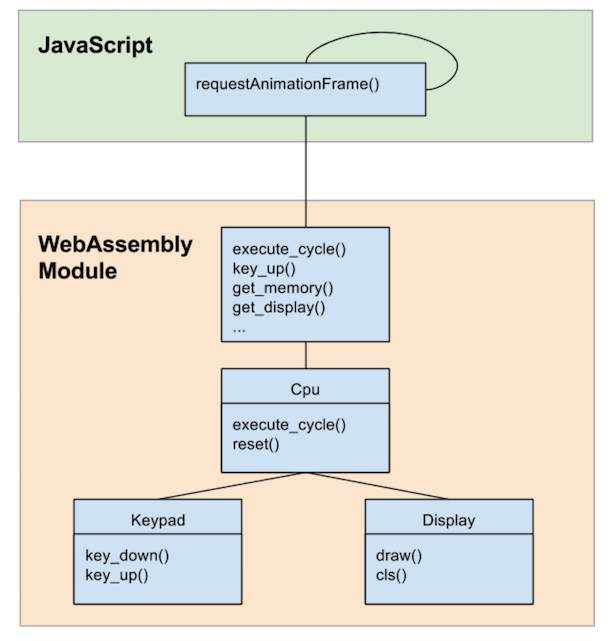
These global functions form a simple API that allows the JavaScript code to interact with the WebAssembly module. Once the WebAssembly module is fetched, compiled and instantiated, a requestAnimationFrame (rAF) run loop is used to repeatedly invoke the execute_cycle function:
const res = await fetch("chip8.wasm");
const buffer = await res.arrayBuffer();
const module = await WebAssembly.compile(buffer);
const instance = await WebAssembly.instantiate(module);
const exports = instance.exports;

const runloop = () => {
    for (var i = 0; i < 10; i++) {
      exports.execute_cycle();
    }
  }
  exports.decrement_timers();
  updateUI();
  window.requestAnimationFrame(runloop);
};
window.requestAnimationFrame(runloop);
Note that on each rAF cycle, the execute_cycle function is invoked ten times. The CHIP-8 emulator has a clock speed of approximately 500Hz, so with the runloop being invoked at around 60fps, this gives roughly the right speed. The loop also decrements the CHIP-8 delay timer which runs at 60Hz.
ROMs and memory access
With many applications, creating a WebAssembly interface can be quite challenging. WebAssembly only supports four basic types (all numeric), so passing anything more complex across the WebAssembly / JavaScript boundary requires some encoding / decoding.
WebAssembly and JavaScript operate on shared memory which both can access and mutate. Data can be shared between the two via this shared memory.
As an example, the CHIP-8 emulator has 4k of memory, which is defined within the structure and exported as follows:
static mut CPU: Cpu = Cpu {
    memory: [0; 4096],
    // other fields go here …
}

#[no_mangle]
pub fn get_memory() -> &'static [u8; 4096] {
    unsafe {
        &CPU.memory
    }
}
At runtime the instance of the Cpu will be allocated somewhere within the WebAssembly module memory. The get_memory function that tells us where this is.
Within the hosting JavaScript, this shared memory is accessible via exports.memory. Using the get_memory function, the 4k of CHIP-8 memory can be accessed as follows:
const instance = await WebAssembly.instantiate(module);
const exports = instance.exports;

const programMemory = new Uint8Array(
  exports.memory.buffer,
  exports.get_memory(),
  4096
);
When I run the above, get_memory returns a value of 16760, which is where the Rust compiler has decided to allocate this structure.
Loading a ROM into memory is as simple as fetching it, resetting the Cpu (resets registers etc ..) then writing to the programMemory array:
fetch(`roms/${rom}`)
  .then(i => i.arrayBuffer())
  .then(buffer => {
    const rom = new DataView(buffer, 0, buffer.byteLength);
    exports.reset();
    for (i = 0; i < rom.byteLength; i++) {
      programMemory[0x200 + i] = rom.getUint8(i);
    }
  });
Notice the 0x200 offset, which is due to the ROMs being loaded at a 512 byte offset.
Reading the display, or register values, uses exactly the same approach as above.
A little bit of Rust
I’m very new to Rust (two weeks and counting), so I’m not going to spend much time talking about my code, for fear of making a fool out of myself!
My experience with Rust so far has been very good, it certainly is far stricter than any other language I’ve used before, and the opposite end of the spectrum when compared with JavaScript! Rust also feels very modern and elegant.
Probably the hardest concept that will take quite a bit more getting used to is Rust’s concept of ownership. I’ve experienced a range of memory management techniques (garbage collection, automatic reference counting), however Rust’s concept of ownership, where you can only have a single mutable binding to any given resource at any one time, is new to me.
One part of the CHIP-8 emulator code that I found particularly elegant, and highlighted some of the modern features of Rust was the execute_opcode method. CHIP-8 instructions are 16 bits in length, as detailed in this technical reference.
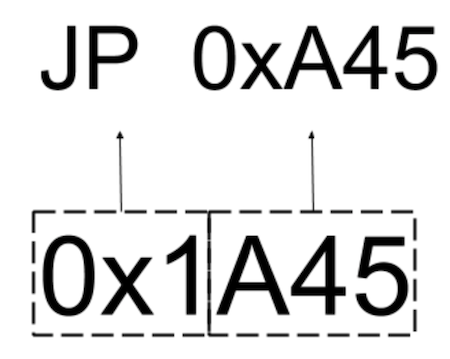
For a number of instructions, the first nibble (4 bits) represents the opcode, with the other nibbles encoding the opcode data. For example, the ‘jump’ operations updates the program counter to a certain address. It is encoded as 0x1nnn, where first nibble value of 0x1 encodes the jump operation and the next 3 nibbles represent the address.
Rust’s pattern matching, with ranges, is an ideal tool for implementing this. Here’s an example that uses range matching to implement the jump instruction:
fn process_opcode(&mut self, opcode: u16) {
    match (opcode) {
        0x1000 ... 0x1FFF => self.pc = opcode & 0x0FFF,
        // match other ranges to process other opcodes.
        _ => ()
    }
}
However, not all of the instructions can be partitioned based on the first nibble. For example, there are nine different instructions that start with a 0x8, resulted in nested matching:
fn process_opcode(&mut self, opcode: u16) {
    match (opcode) {
        0x1000 ... 0x1FFF => self.pc = opcode & 0x0FFF,
        // ...
        0x8000 ... 0x8FFF => {
            match opcode & 0x00F {
                // LD Vx, Vy
                0x0 => self.v[x] = self.v[y],
                // OR Vx, Vy
                0x1 => self.v[x] = self.v[x] | self.v[y],
                // …
             }
        // ...
        _ => ()
    }
}
So, in order to match instructions, we need to be able to match nibbles at various locations. With Rust this is possible by creating a tuple that splits the opcode into four nibbles, then matching these components separately. The following shows an example of some of the different instruction formats are matched:
// break up into nibbles
let op_1 = (opcode & 0xF000) >> 12;
let op_2 = (opcode & 0x0F00) >> 8;
let op_3 = (opcode & 0x00F0) >> 4;
let op_4 = opcode & 0x000F;

match (op_1, op_2, op_3, op_4) {
    // CLS
    (0, 0, 0xE, 0) => self.display.cls(),
    // JP
    (0x1, _, _, _) => self.pc = nnn,
    // LD Vx, Vy
    (0x8, _, _, 0x0) => self.v[x] = self.v[y],
    // OR Vx, Vy
    (0x8, _, _, 0x1) => self.v[x] = self.v[x] | self.v[y],
    // AND Vx, Vy
    (0x8, _, _, 0x2) => self.v[x] = self.v[x] & self.v[y],
    // LD F, Vx
    (0xF, _, 0x2, 0x9) => self.i = vx as u16 * 5,
    // ...
    (_, _, _, _) => ()
}
Note, I could use destructuring to pull out the other components of each instruction, for example …
(0x8, x, y, 0x0) => self.v[x as usize] = self.v[y as usize]
However, this is repetitive and often involves quite a bit of additional casting, which is why I extract most of the typical opcode patterns before the match expression:
let x = ((opcode & 0x0F00) >> 8) as usize;
let y = ((opcode & 0x00F0) >> 4) as usize;
let vx = self.v[x];
let vy = self.v[y];
let nnn = opcode & 0x0FFF;
let kk = (opcode & 0x00FF) as u8;
let n = (opcode & 0x000F) as u8;
Dependency management
Rust packages reusable components into crates, which are managed by the cargo tool. This is quite similar to npm, CocoaPods and other package managers.
With my project there were a couple of crates that would have been useful to use: - rand - it doesn’t look like Rust has built in support for random number generation. - lazy_static - with Rust you cannot call a function in order to construct a static value, hence you cannot use a constructor function. The lazy static macro allows you to initialize static variables lazily, avoiding this restriction.
Unfortunately I had trouble integrating both of these into my project! Crates may have platform specific code which means they will need to be updated to support WebAssembly. I did find a fork of rand that had some of these changes, but not everything I needed.
In my case I simply took a random number implementation and dropped it straight into my codebase, and lived without lazy initialisation!
Conclusions
I’ve been really impressed with Rust, and do agree that WebAssembly is a great opportunity for this language to pick up more users. In the short term WebAssembly language choice is a little limited. For web developer who want to give this technology a try, Rust does look like the best option available at the moment.
I certainly enjoyed my brief experience with the language.
Now … who knows where I can find a good Atari VCS 1200 architecture reference? :-)
My CHIP-8 emulator is available on GitHub, most ROMs work, although there is a bug relating to hit-testing that I’m still trying to track down!