Introduction
This post explores some of the ideas and technology features behind Docker and Kubernetes. We delve into deploying a simple Java application on the Google Cloud Platform using a managed Kubernetes Cluster.
To start things off at a very high level we can describe the roles of Docker and Kubernetes in the following way:
- The role of Docker is to provide lifecycle management of containers.
- The role of Kubernetes is to provide orchestration and managing clusters of containers.
If we want to understand a bit more about how Docker and Kubernetes fulfill these roles it is useful to define some of the related terminology:
Image
A Docker image is a read-only template (Dockerfile) which provides the foundation to build a container.
A Dockerfile contains a series of instructions that Docker composes into a series of stacked layers (intermediate images). Docker uses the union file system to combine these layers into a single entity.
Container
A container is a self contained Linux execution environment.
Docker relies on a Linux kernel feature called control groups (cgroups). Control groups allow Docker to enforce limits and constraints by isolating CPU, memory and I/O to a group of one or more processes. Docker utilises kernel namespaces allowing multiple containers to share the same kernel at the same time as maintaining an isolated workspace. Together these Docker features allow containers to operate effectively as single process sandboxes.
When a container is stopped it will retain all its settings and filesystem changes (stored in the top layer that is writable), all processes running in the container will be stopped and you will lose everything in memory. This is what differentiates a stopped container from a Docker image.
Volumes
Volumes live outside the union file system and exist as normal directories and files on the host filesystem.
Volumes have the following uses:
- Sharing data between the host filesystem and the Docker container.
- Retaining data after the container is removed.
- Sharing data between containers.
Node
A node is the smallest unit of computing hardware in Kubernetes.
A node is a representation of a single machine in your cluster. We can simply view each machine as a set of CPU and RAM resources that can be utilised. In this way, any machine can substitute any other machine in a Kubernetes cluster. The cluster is designed such that a worker node runs the tasks as instructed by the master node.
Cluster
In Kubernetes, a group of nodes pool together their resources to form a more powerful machine.
The cluster distributes work to the nodes, redistributing the work load as nodes are added or removed.
Nodes can be physical servers or virtual machines that have the Kubernetes platform installed. The cluster contains a master node and a number of workers. A running application is agnostic to which nodes it is running on. Local data is not persistent, so persistence needs to be handled by network attached persistent volumes.
Pod
A pod is a collection of one or more containers that form a local network and share the same resources.
Pod is the Kubernetes unit or scheduling (replication). Kubernetes can deploy new replicas of a pod as necessary on the cluster to provide load balancing and failover. Pods should be small as possible holding main process and tightly coupled helper containers (side-cars).
Containers in a pod run on the same host, share the same network namespace and are visible to each other via localhost. The pod is the logical set of containers that form the application.
Deployment
The Deployment is a control structure that takes care of spinning up or down of pods.
A number of pod replica sets form a deployment. Kubernetes will aim to maintain and monitor this deployment. When a pod is modified a new replica set will be scaled up while the old replica set is scaled down providing no down-time of the deployed application. Deployments can in this way be updated, rolled out, or rolled back.
Services
A service provides a way to group pods into a kind of single business process and a common access policy.
In Kubernetes a service provides a network connection to one or more pods. Each service has its own IP address and port which remains constant for the lifetime of the service. The service abstraction provides decoupling from the ephemeral nature of the pod lifecycle. Services are persistent and permanent. This allows them to provide discovery and offer load balancing.
Google Kubernetes Engine (GKE)
GKE is a hosted Kubernetes service on Google Cloud Platform (GCP). It exposes standard Kubernetes APIs so that standard Kubernetes tools and apps run on it without needing to be reconfigured.
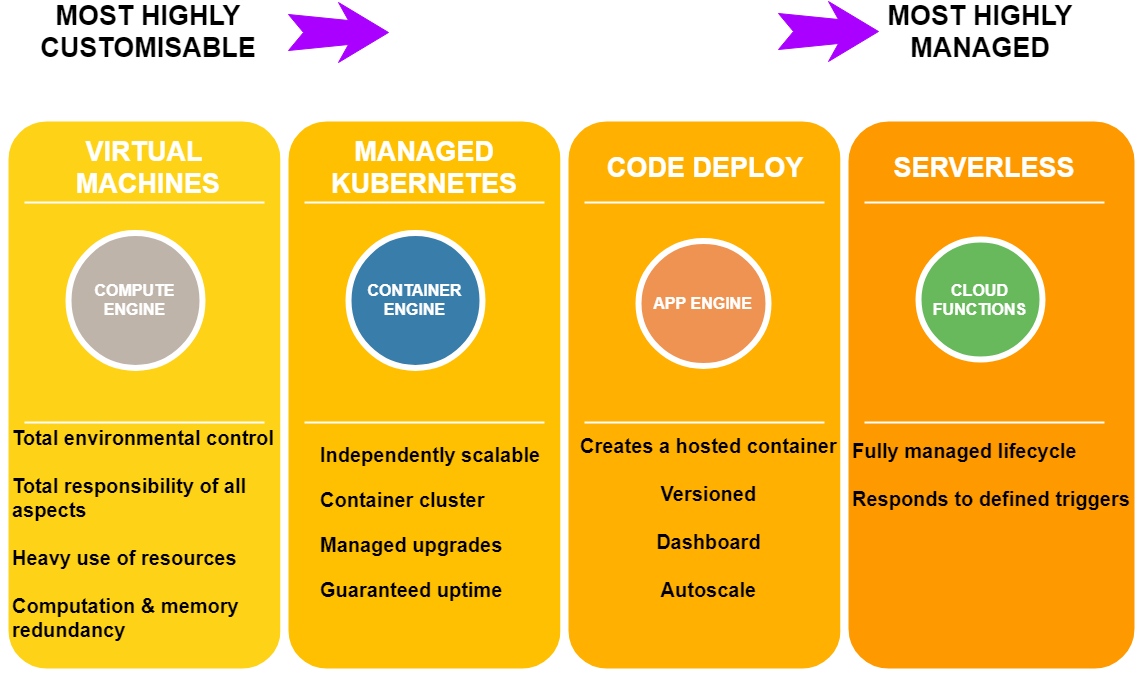
To see where this sits in the Google Cloud Platform (GCP) it is useful to look at the characteristics of the various options provided for code execution.
GCP offers a spectrum of options ranging from highly customisable to highly managed.
Local Development with GKE
We are going to setup a development environment that has three components. It will allow you to develop code locally, then using a locally hosted container with gcloud client configured be able to interact with Google Container Registry and Google Kubernetes Engine.
Host machine
This is where you do your coding and run tests on your locally checked out code. This will require a recent version of docker to be installed so that we can run a container that acts as a client to google cloud.
Cloud client
We are going to run the cloud-sdk inside a container on the host machine. It will use docker volumes to access the local code and cloud configuration.
Google Kubernetes Engine
We are going to set up a project on GCP, build docker images in the Google Container Registry and deploy to a new Kubernetes Cluster.
Step 1 Signup to Google Cloud Platform
- Sign up for a GCP account
- Set up a project
- Enable billing
If you do not currently have a google cloud account
You get given $300 free credit to use over next 12 months.
This enables you to use up to 8 cores concurrently on free usage.
You have to supply credit card to prove you are not a robot, but there is no automatic charge after the free trial ends.
In fact you won’t be charged unless you manually upgrade to a paid account.
sign up
Create a new project in the GCP web console. Wait for the API and related services to be enabled. This can take several minutes.
Next we need to enable billing
Step 2 Setup Docker Client for Google Cloud Platform
If you don’t already have a recent version of Docker installed on your host machine then you can install docker following these instructions
Google produce a Docker image that has gcloud client and all the dependencies installed.
Pull the latest image from Dockerhub
magnus@magnus2025:~/Dev/docker$ docker pull google/cloud-sdk:latest
latest: Pulling from google/cloud-sdk
Digest: sha256:96dff3a5f7c34cc0afecc49f38571ad9d933870c66462379bda8abb2e84e6550
Status: Image is up to date for google/cloud-sdk:latest
To verify the version spin up a temporary container and call gcloud version
magnus@magnus2025:~/Dev/docker$ docker run --rm -ti  google/cloud-sdk:latest gcloud version
Google Cloud SDK 220.0.0
alpha 2018.10.08
app-engine-go
app-engine-java 1.9.66
app-engine-python 1.9.77
app-engine-python-extras 1.9.77
beta 2018.10.08
bigtable
bq 2.0.34
cbt
cloud-datastore-emulator 2.0.2
core 2018.10.08
datalab 20180823
gsutil 4.34
kubectl 2018.10.08
pubsub-emulator 2018.10.08
The next step is to authenticate and authorise the gcloud container. We are going to run gcloud init. This will authorise Cloud SDK tools to use your user account credentials to access Google Cloud Platform , or lets you select an account if you have previously authorised access. It sets up a Cloud SDK configuration and sets a base set of properties, including the active account from the step above, the current project, and if applicable, the default Google Compute Engine region and zone.
further details
Here we are creating a named container. Inside the container as root we will then call gcloud init
magnus@magnus2025:~/Dev/docker$ docker run -ti --name gcloud-config google/cloud-sdk bash
root@7281eb88fc08:/# gcloud init
Welcome! This command will take you through the configuration of gcloud.

Settings from your current configuration [default] are:
component_manager:
  disable_update_check: 'true'
core:
  disable_usage_reporting: 'true'
metrics:
  environment: github_docker_image

Pick configuration to use:
 [1] Re-initialize this configuration [default] with new settings
 [2] Create a new configuration
Please enter your numeric choice:  1

Your current configuration has been set to: [default]

You can skip diagnostics next time by using the following flag:
  gcloud init --skip-diagnostics

Network diagnostic detects and fixes local network connection issues.
Checking network connection...done.
Reachability Check passed.
Network diagnostic (1/1 checks) passed.

You must log in to continue. Would you like to log in (Y/n)?  Y

Go to the following link in your browser:
    https://accounts.google.com/o/oauth2/auth?redirect_uri=...
Enter verification code: 4/ewBato-...
You are logged in as: [mustang.shim@gmail.com].

Pick cloud project to use:
 [1] red-carver-219211
 [2] Create a new project
Please enter numeric choice or text value (must exactly match list
item):  1

Your current project has been set to: [red-carver-219211].

Do you want to configure a default Compute Region and Zone? (Y/n)?  Y

Which Google Compute Engine zone would you like to use as project
default?
If you do not specify a zone via a command line flag while working
with Compute Engine resources, the default is assumed.
 ...
 [24] europe-west2-b
 ...
Please enter numeric choice or text value (must exactly match list
item):  24

Your project default Compute Engine zone has been set to [europe-west2-b].
You can change it by running [gcloud config set compute/zone NAME].

Your project default Compute Engine region has been set to [europe-west2].
You can change it by running [gcloud config set compute/region NAME].
...
Your Google Cloud SDK is configured and ready to use!


root@7281eb88fc08:/# exit
exit
magnus@magnus2025:~/Dev/docker$
Finally we exit the container.
In the following command --volumes-from will use the filesystem created with the gcloud init command. Using this we can create discardable container using –rm the will use the gcloud-config container we’ve generated.
docker run --rm -ti --name gcloud-client --volumes-from gcloud-config google/cloud-sdk bash
In this manner we are able to handle multiple environments.
Step 3 Prepare code for deployment to Google Cloud Platform
We are going to use a super simple Spring Boot web app as an example.
Clone the repo
On the host machine create a directory where the code that we are working on for an application will live. Clone the git repository https://github.com/spring-guides/gs-spring-boot.git and go to the complete subdirectory
magnus@magnus2025:~/Dev/docker$ mkdir code
magnus@magnus2025:~/Dev/docker$ cd code
magnus@magnus2025:~/Dev/docker/code$ git clone https://github.com/spring-guides/gs-spring-boot.git
Cloning into 'gs-spring-boot'...
remote: Enumerating objects: 1161, done.
remote: Total 1161 (delta 0), reused 0 (delta 0), pack-reused 1161
Receiving objects: 100% (1161/1161), 475.05 KiB | 623.00 KiB/s, done.
Resolving deltas: 100% (778/778), done.
magnus@magnus2025:~/Dev/docker/code$ cd gs-spring-boot/complete
magnus@magnus2025:~/Dev/docker/code/gs-spring-boot/complete$
If you wanted to start the Spring Boot application normally with the Spring Boot plugin then you could execute the following
./mvnw -DskipTests spring-boot:run
Create a JAR file
To package a deployable JAR file for the application run the following that will create a gs-spring-boot-0.1.0.jar in the target subdirectory.
magnus@magnus2025:~/Dev/docker/code/gs-spring-boot/complete$ ./mvnw -DskipTests package
[INFO] Scanning for projects...
[INFO]
[INFO] ------------------------------------------------------------------------
[INFO] Building gs-spring-boot 0.1.0
[INFO] ------------------------------------------------------------------------
...
[INFO] ------------------------------------------------------------------------
[INFO] BUILD SUCCESS
[INFO] ------------------------------------------------------------------------
Create a Dockerfile
Since this is going to run as a containerised application on Google Kubernetes Engine we will need to create a Dockerfile.
In the code/gs-spring-boot/complete directory create a new Dockerfile by entering the following (then ctrl-d)
magnus@magnus2025:~/Dev/docker/code/gs-spring-boot/complete$ cat > Dockerfile
FROM openjdk:8
COPY target/gs-spring-boot-0.1.0.jar /app.jar
EXPOSE 8080/tcp
ENTRYPOINT ["java", "-jar", "/app.jar"]
This creates a very simple Dockerfile that just copies the built jar file to a Java 8 derived image. It then expose port 8080 to the host and calls java -jar /app.jar on container startup
Step 4 Deploy to Google Container Registry (GCR)
Start the cloud client
The command below runs bash in a new temporary container with
- Code directory mounted as a docker volume
-v $PWD/code:/code - Previous gcloud configuration
--volumes-from gcloud-config
magnus@magnus2025:~/Dev/docker$ docker run --rm --name cloud-client -ti -v $PWD/code:/code --volumes-from gcloud-config google/cloud-sdk bash
root@7b5e8f8ee61c:/#
GCR
GCR is Google Cloud Platform’s private Docker image registry offering. It works with Google Container Engine clusters and Google Compute Engine instances out-of-the box without setting up any authentication. Each Google Cloud project gets a registry named gcr.io/{PROJECT_ID}.
gcloud lets you build images on the cloud and push to GCR automatically.
That is to say that if you have a Dockerfile, you can directly push/build without docker:
gcloud builds submit -t gcr.io/{PROJECT_ID}/{image}:tag .
Now we need to push/build in the mounted /code/gs-spring-boot/complete
root@7b5e8f8ee61c:/# cd /code/gs-spring-boot/complete
root@7b5e8f8ee61c:/code/gs-spring-boot/complete# gcloud builds submit -t gcr.io/red-carver-219211/hello-java:v1 .
Creating temporary tarball archive of 26 file(s) totalling 16.9 MiB before compression.
Uploading tarball of [.] to [gs://red-carver-219211_cloudbuild/source/1539852232.66-e9f118216c9849d18cee0089173d871d.tgz]
...
----------------------------- REMOTE BUILD OUTPUT ------------------------------
starting build "ef6ddd4d-cf95-4daa-aa32-3cde9f1d217d"

FETCHSOURCE
Fetching storage object: ...
- [1 files][ 15.0 MiB/ 15.0 MiB]
Operation completed over 1 objects/15.0 MiB.
BUILD
Already have image (with digest): gcr.io/cloud-builders/docker
Sending build context to Docker daemon  17.75MB
Step 1/4 : FROM openjdk:8
8: Pulling from library/openjdk
...
Digest: sha256:1b842a215cf3437c9197f0f47e5c1a12f0a27aed27b84536ee3d8ef6b9b7e19e
Status: Downloaded newer image for openjdk:8
 ---> 77582d6037d7
Step 2/4 : COPY target/gs-spring-boot-0.1.0.jar /app.jar
 ---> 30349de759a4
Step 3/4 : EXPOSE 8080/tcp
 ---> Running in 8b1c197534f1
Removing intermediate container 8b1c197534f1
 ---> f2462f3852b9
Step 4/4 : ENTRYPOINT ["java", "-jar", "/app.jar"]
 ---> Running in 32f36e19e421
Removing intermediate container 32f36e19e421
 ---> f91dd2d4663e
Successfully built f91dd2d4663e
Successfully tagged gcr.io/red-carver-219211/hello-java:v1
PUSH
Pushing gcr.io/red-carver-219211/hello-java:v1
The push refers to repository [gcr.io/red-carver-219211/hello-java]
...
DONE
--------------------------------------------------------------------------------

ID                                    CREATE_TIME                DURATION  SOURCE                                                                                       IMAGES                                  STATUS
ef6ddd4d-cf95-4daa-aa32-3cde9f1d217d  2018-10-18T08:43:57+00:00  16S       gs://red-carver-219211_cloudbuild/source/1539852232.66-e9f118216c9849d18cee0089173d871d.tgz  gcr.io/red-carver-219211/hello-java:v1  SUCCESS
root@7b5e8f8ee61c:/code/gs-spring-boot/complete#
When you run this, the source code is compressed into a tar file, uploaded to a GCS bucket and then Cloud Container Builder builds it and pushes the resulting image to GCR
It is important to provide a tag in the image name. Without the tag Kubernetes will use the latest tag when looking for the image in the repository.
You can list all the container images in your registry with:
root@7b5e8f8ee61c:/code/gs-spring-boot/complete# gcloud container images list
NAME
gcr.io/red-carver-219211/hello-java
Only listing images in gcr.io/red-carver-219211. Use --repository to list images in other repositories.
Step 5 Create Kubernetes Cluster and Deploy Application
Create a new cluster
We are going to create a 2 node cluster using the n1-standard-1 machine type. We can list the available machine specs:
root@7b5e8f8ee61c:/code/gs-spring-boot/complete# gcloud compute machine-types list --filter="name=n1-standard-1 zone=europe-west2-b"
NAME           ZONE            CPUS  MEMORY_GB  DEPRECATED
n1-standard-1  europe-west2-b  1     3.75
Now ask gcloud to create the cluster
root@7b5e8f8ee61c:/code/gs-spring-boot/complete# gcloud container clusters create hello-java-cluster --num-nodes 2 --machine-type n1-standard-1
...
Creating cluster hello-java-cluster in europe-west2-b...done.
...
kubeconfig entry generated for hello-java-cluster.
NAME                LOCATION        MASTER_VERSION  MASTER_IP       MACHINE_TYPE   NODE_VERSION  NUM_NODES  STATUS
hello-java-cluster  europe-west2-b  1.9.7-gke.6     35.230.150.168  n1-standard-1  1.9.7-gke.6   2          RUNNING
root@7b5e8f8ee61c:/code/gs-spring-boot/complete#
Deploy to Kubernetes
Now that we have the image published to Google Container Registry we can create a deployment. To describe the deployment we define a configuration file like the one below
root@7b5e8f8ee61c:/code/gs-spring-boot/complete# cat > deployment.yaml
apiVersion: apps/v1beta2
kind: Deployment
metadata:
  name: hello-java-deployment
spec:
  selector:
    matchLabels:
      app: hello-java
  replicas: 1
  template:
    metadata:
      labels:
        app: hello-java
    spec:
      containers:
      - name: hello-java
        image: gcr.io/red-carver-219211/hello-java:v1
        ports:
        - containerPort: 8080
root@7b5e8f8ee61c:/code/gs-spring-boot/complete#
Now create the deployment
root@7b5e8f8ee61c:/code/gs-spring-boot/complete# kubectl create -f ./deployment.yaml
deployment.apps/hello-java-deployment created
If for any reason you need to make any alterations to the deployment.yaml then the command to update the deployment is
kubectl apply -f ./deployment.yaml
We can see that a deployment and pod has been created
root@7b5e8f8ee61c:/code/gs-spring-boot/complete# kubectl get deployments
NAME                    DESIRED   CURRENT   UP-TO-DATE   AVAILABLE   AGE
hello-java-deployment   1         1         1            0           2m44s
root@7b5e8f8ee61c:/code/gs-spring-boot/complete# kubectl get pods
NAME                                    READY   STATUS    RESTARTS   AGE
hello-java-deployment-8cb7b6fd4-5sffh   1/1     Running   0          2m44s
We can inspect the deployment properties
root@7b5e8f8ee61c:/code/gs-spring-boot/complete# kubectl describe deployment hello-java-deployment
Name:                   hello-java-deployment
Namespace:              default
CreationTimestamp:      Thu, 18 Oct 2018 12:51:43 +0000
Labels:                 app=hello-java
Annotations:            deployment.kubernetes.io/revision: 2
                        kubectl.kubernetes.io/last-applied-configuration:
                          {"apiVersion":"apps/v1beta2","kind":"Deployment","metadata":{"annotations":{},"name":"hello-java-deployment","namespace":"default"},"spec"...
Selector:               app=hello-java
Replicas:               1 desired | 1 updated | 1 total | 1 available | 0 unavailable
StrategyType:           RollingUpdate
MinReadySeconds:        0
RollingUpdateStrategy:  25% max unavailable, 25% max surge
Pod Template:
  Labels:  app=hello-java
  Containers:
   hello-java:
    Image:        gcr.io/red-carver-219211/hello-java:v1
    Port:         8080/TCP
    Host Port:    0/TCP
    Environment:  <none>
    Mounts:       <none>
  Volumes:        <none>
Conditions:
  Type           Status  Reason
  ----           ------  ------
  Available      True    MinimumReplicasAvailable
  Progressing    True    NewReplicaSetAvailable
OldReplicaSets:  <none>
NewReplicaSet:   hello-java-deployment-8cb7b6fd4 (1/1 replicas created)
Events:
  Type    Reason             Age    From                   Message
  ----    ------             ----   ----                   -------
  Normal  ScalingReplicaSet  4m45s  deployment-controller  Scaled up replica set hello-java-deployment-8cb7b6fd4 to 1
root@7b5e8f8ee61c:/code/gs-spring-boot/complete#
At this point you should have your container running under the control of Kubernetes but you still have to make it accessible to the outside world.
Step 6 Externally visible service
External traffic
By default, the pod is only accessible by its internal IP within the cluster. In order to make the hello-java container accessible from outside the kubernetes virtual network, we need to expose the pod as a kubernetes service.
You can expose the pod to the public internet with the kubectl expose command combined with the --type=LoadBalancer flag.
This flag is required for the creation of an externally accessible IP :
kubectl expose deployment {DEPLOYMENT_NAME} --port={EXPOSED_PORT} --type=LoadBalancer
root@7b5e8f8ee61c:/code/gs-spring-boot/complete# kubectl expose deployment hello-java-deployment --port=8080 --type=LoadBalancer
service/hello-java-deployment exposed
See Compute Engine Load Balancing
This should print the service that has been created, and map an external IP address to the service. Where to find this external IP address is listed as part of the newly created service and can be retrieved by running
root@7b5e8f8ee61c:/code/gs-spring-boot/complete# kubectl get services
NAME                    TYPE           CLUSTER-IP      EXTERNAL-IP     PORT(S)          AGE
hello-java-deployment   LoadBalancer   10.19.243.124   35.230.137.97   8080:32574/TCP   2m30s
kubernetes              ClusterIP      10.19.240.1     <none>          443/TCP          174m
Note that you expose the deployment, and not the pod directly. This will cause the resulting service to load balance traffic across all pods managed by the deployment (in this case only 1 pod, but we will add more replicas next).
Now in a web browser you can reach the balanced web app on http://{EXTERNAL-IP}:8080
Step 7 Scaling the Application
When a new deployment has been created then a new ReplicaSet is also created automatically. A ReplicaSet ensures a specified number of Pod replicas are running at any given time.
The format of the command to scale an application is
kubectl scale deployment --replicas {NO_OF_REPLICAS} {DEPLOYMENT_NAME}
root@7b5e8f8ee61c:/code/gs-spring-boot/complete# kubectl scale deployment --replicas 2 hello-java-deployment
deployment.extensions/hello-java-deployment scaled
Later we will see that 2 pods are running in the deployment
root@7b5e8f8ee61c:/code/gs-spring-boot/complete# kubectl get deployments
NAME                    DESIRED   CURRENT   UP-TO-DATE   AVAILABLE   AGE
hello-java-deployment   2         2         2            2           43m
root@7b5e8f8ee61c:/code/gs-spring-boot/complete# kubectl get pods
NAME                                    READY   STATUS    RESTARTS   AGE
hello-java-deployment-8cb7b6fd4-5sffh   1/1     Running   0          11m
hello-java-deployment-8cb7b6fd4-85hll   1/1     Running   0          48s
root@7b5e8f8ee61c:/code/gs-spring-boot/complete#
It is also possible to set auto-scaling parameters based upon cpu utilisation:
kubectl autoscale deployment hello-java-deployment --cpu-percent=40 --min=1 --max=3
In this case we define a target CPU utilisation of 40% and bounds between 1 and 3 replicas
Changes to the cluster resulting from scaling create cluster events. The events can be viewed along with events such as starting and stopping containers:
kubectl get events
Step 8 Logs
The hello-java application writes to standard output and standard error streams.
To view the logs we need first to get the pod name:
kubectl get pods
To show the log of a specific pod
kubectl logs {POD_NAME}
You can also get a shell console attached to the running container:
kubectl exec -it {POD_NAME} -- /bin/bash
or with multiple containers
kubectl exec -it {POD_NAME} -c {CONTAINER_NAME} -- /bin/bash
Step 9 Clean Up
To delete the two replicated containers we need to delete the deployment:
kubectl delete deployment hello-java-deployment
Finally we need to delete the service
kubectl delete service hello-java
Finally..
Although just scratching the surface of what can be done with Google Kubernetes Engine we have:
- Explored some of the terminology and concepts behind Docker and Kubernetes.
- Looked at where the Google Kubernetes Engine fits in the Google Cloud Platform.
- Set up a development environment for a simple dockerised Java application using a docker container and docker volumes.
- Created a Kubernetes cluster, defined a deployment and scaled an application on GKE.
Hopefully this has whetted your appetite to explore further.