
Apple’s XCTest could be described as an untamed beast. An all-encompassing, powerful framework with a range of abilities that you can use to your advantage when automating iOS testing. It holds similarities to a ‘Red Death’ dragon, being the controlling force in the world of iOS testing frameworks. On the other hand, I’d also describe it as erratic or unpredictable. It has copious firepower as it can be used for both Unit and UI testing. Maybe a ‘Monstrous Nightmare’ dragon is a better analogy?
However, if I was to pick the biggest and most irritating trait that XCTest has, it would be its unknowns. I’ve found in particular that when performing UI tests using XCTest, you’re greeted with a plague of issues including race conditions and implementation limitations. In a desperate attempt to tackle these you turn to the docs for help. But this leads to further questions and confusion as Apple have gone to town with ambiguity in their descriptions and examples.
Consequently, I would describe XCTest as a ‘Night Fury’ dragon: Powerful but vastly obscure and mysterious.
In this blog I’ll talk about some of the troubles I’ve experienced when using the framework to conduct iOS UI testing, detailing the approaches I took to tackle these challenges and ultimately how I worked towards UI testing harmony with XCTest.
Setting up a UI automation framework
Before going into detail about the issues that I’ve experienced, it’s worth starting with some examples of how we can structure a UI testing framework to promote efficient testing and adopt good coding practices.
Page object model
The page object model promotes reduced code duplication and improved code maintenance. For these reasons it’s often the adopted approach when designing a good automation testing framework. Below is an example of how we can create functions within a page object class that will act as selectors for page elements:
import XCTest

class IntroductionPage {

    // MARK: - Selectors

    func titleElement() -> XCUIElement {
        return XCUIApplication().staticTexts["introduction_title_label"]
    }

    func bodyElement() -> XCUIElement {
        return XCUIApplication().staticTexts["introduction_body_label"]
    }

    func continueButtonElement() -> XCUIElement {
        return XCUIApplication().buttons["introduction_continue_button"]
    }
}
You can then make use of these in your test class:
import XCTest

class IntroductionPageTests {

    func test_title_text() {
        let observedText = IntroductionPage().titleElement().label
        let expectedText = "Welcome"
        XCTAssertEqual(observedText, expectedText)
    }
}
Scaled up page object model
To allow each test class to be independent from other test classes, each requires a separate set of isolated page object instances. This is possible with the use of a base test class which all test classes can inherit from. In the base test, instances of helpers and page objects can be created to give an isolated context for each test class. Figure 1 shows an overview of the structure of such a UI testing framework.
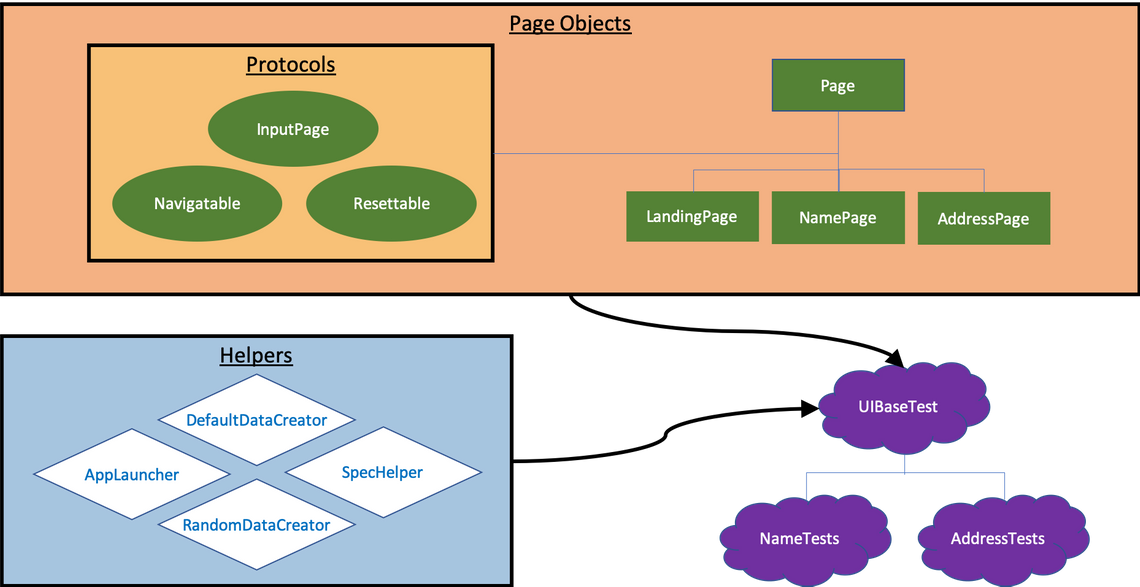
Figure 1: Example construction overview of a UI testing framework
The DataCreator classes play a key part in this framework design. Both the page objects and the test classes use these creators in order to generate data. To prevent the need for multiple instances of the creators being instantiated, a single instance can be created in UIBaseTest which is stored in an instance variable. Each page object can then be passed this variable using dependency injection and a page object holding class, which in the example I have named Pages (see Figure 2).
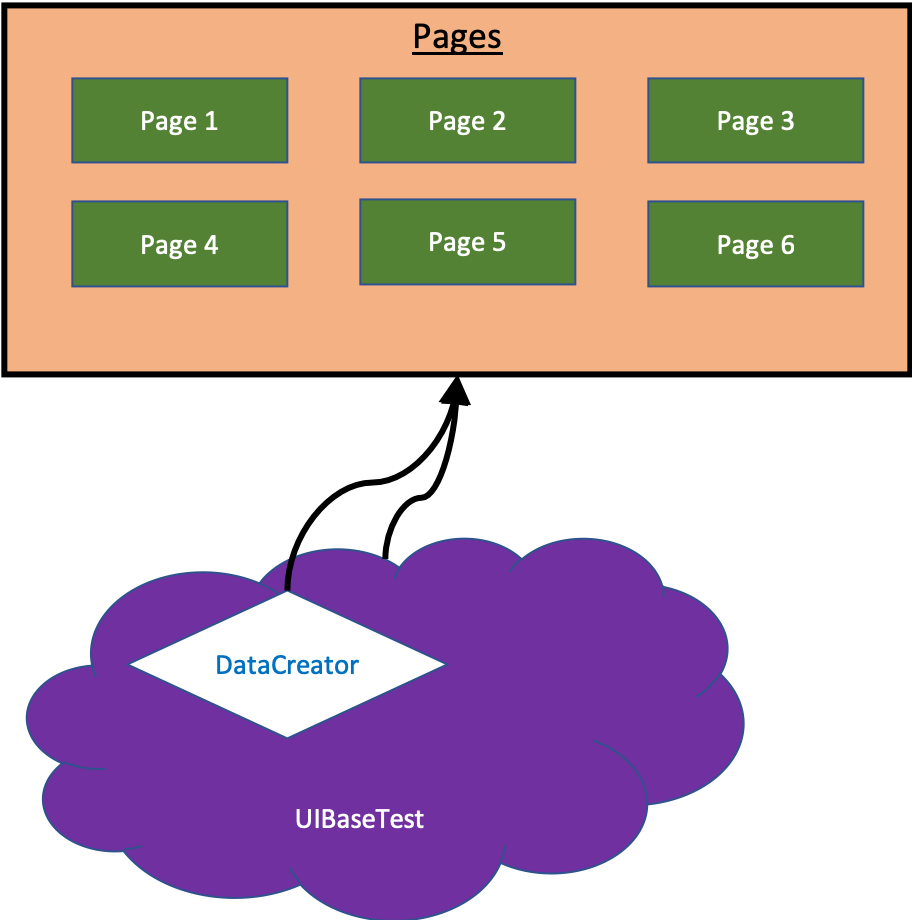 Figure 2: Diagram to show UIBaseTest instantiating DataCreator and passing it to the Pages class
Navigation
Navigating around an application can often come paired with a sizable overhead. This is because a user can’t simply type in a url like they can in a web browser. Instead they are required to navigate through a flow in order to reach their desired page. When we consider automating this journey, it creates the challenge of trying to reduce implicit test duplication whilst achieving good test separation.
Fortunately Apple introduced ‘Universal Links’ as part of iOS 9. This allows a user to seamlessly jump to a particular place in your application via a web link. It is fairly common to include such a system as it can be beneficial for marketing purposes, for example taking a user from an advert to a signup page.
When launching an application using XCTest, you have the option to pass a launch argument. If we pass a universal link then the UIApplicationDeligate class can use it to launch the desired page or flow. Ultimately this can significantly reduce the navigation overhead in our automated UI tests. Figure 3 shows how we could split the flow of our pages into sub-flows where the start of each sub-flow could be launched using a universal link. If you would like to know more about how to implement universal links within your application, you can visit Apple’s iOS developer site.
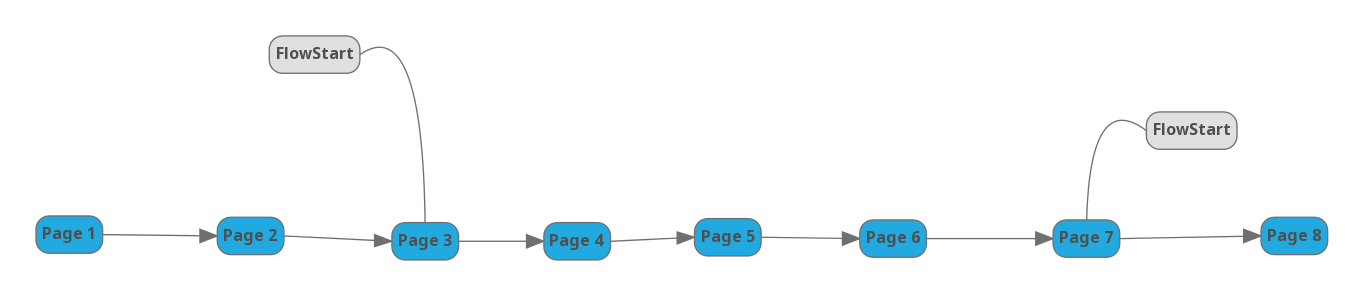 Figure 3: A diagram to show how pages in a flow can be split into sub-flows allowing universal linking to be utilised.
Recording a failure with screenshots
To aid debugging, your framework can be built to take a screenshot when a test fails. XCTest makes this pretty easy to do with the use of the XCUIScreen and XCTAttachment classes. The former allows easy capturing of a screenshot and the latter allows the screenshot (or virtually any type of attachment) to be linked to the failing test case.
In order to do this, all that is required is to override the recordFailure function in our base test:
class UIBaseTest: XCTestCase {

    override func recordFailure(
        withDescription description: String,
        inFile filePath: String,
        atLine lineNumber: Int,
        expected: Bool) {

        let failureScreenshot = XCUIScreen.main.screenshot()
        let failureScreenshotAttachment = XCTAttachment(screenshot: failureScreenshot)
        failureScreenshotAttachment.name = "\(name)-debug-screenshot"
        failureScreenshotAttachment.lifetime = .deleteOnSuccess

        add(failureScreenshotAttachment)
        super.recordFailure(
            withDescription: description,
            inFile: filePath,
            atLine: lineNumber,
            expected: expected
        )
    }
}
The screenshot can then be viewed in the test report afterwards.
XCTest restrictions that can influence your UI automation framework
Whilst building an automated UI testing framework may seem trivial, XCTest has some restrictions that we should consider when building such a framework as the one described previously. In this section we will look at a couple of these restrictions and how we can tackle these challenges.
XCTestCase init
As described previously, UIBaseTest is responsible for some initial setup. Part of this is initialising the DataCreator class which both the test classes and page objects make use of.
Ideally, the following method of initialisation would be used:
var dataCreator: DataCreator = DefaultDataCreator() {
    didSet {
        pages = Pages(dataCreator: dataCreator)
    }
}

var pages = Pages(dataCreator: dataCreator)
However, this is not possible as at the point of property initialisation, ‘self’ is not available, meaning instance members (I.E ‘dataCreator’) can’t be used to initialise other instance members (I.E ‘pages’). Typically, you could make use of the class constructor to solve this. XCTestCase has three forms of its constructor which we would need to implement:
var dataCreator: DataCreator = DefaultDataCreator() {
    didSet {
        pages = Pages(dataCreator: dataCreator)
    }
}

var pages: Pages

override init() {
    self.pages = Pages(dataCreator: dataCreator)
    super.init()
}

override init(selector: Selector) {
    self.pages = Pages(dataCreator: dataCreator)
    super.init(selector: selector)
}

override init(invocation: NSInvocation?) {
    self.pages = Pages(dataCreator: dataCreator)
    super.init(invocation: invocation)
}
Annoyingly this is also not allowed as NSInvocation is not available in Swift, causing an error at compile-time. Ultimately this means you can’t override the constructors of an XCTestCase class.
There is a simple solution to all this though. Swift allows the use of lazy initialisation which we can take advantage of in this instance:
var dataCreator: DataCreator = DefaultDataCreator() {
    didSet {
        pages = Pages(dataCreator: dataCreator)
    }
}

lazy var pages: Pages = {
    return Pages(dataCreator: dataCreator)
}()
Clean, easy to understand code… much better!
XCTestCase class setUp and tearDown bug
Many testing frameworks offer the ability to declare setUp and tearDown blocks (AKA. before and after blocks) that will be ran before and after each test case respectively. It’s also very common to be able to specify a beforeAll and afterAll block that will run before and after all the test cases in a test class. XCTest is no different. Simply override setUp / tearDown or class setUp / class tearDown:
override func setUp() {
    // before each test
}

override func tearDown() {
    // after each test
}

override class func setUp() {
    // before all tests
}

override class func tearDown() {
    // after all tests
}
But wait… nothing is ever that simple. At the time of writing this blog (30/04/19), XCTest contains a bug that silently prevents any interaction with the UI within the beforeAll and afterAll blocks.
This means that if you need to relaunch the app before running a set of test cases, using the provided class setUp and tearDown functions are, for the most part, useless. Fear not though, there is a workaround to this problem. Nobody likes workarounds or hacky code, but it can be a necessary evil in order to achieve working code.
Using the previously described framework as an example, the AppLaucher helper class (see figure 1) can house our fix. Primarily the purpose of such a class is to manage launch arguments. Relaunching the application with new arguments can occur at several points within a UI testing suite. It’s therefore beneficial to track which arguments were last used in order to identify the state that the previous test case has left the application in.
Let’s assume we make an AppLauncher singleton:
class AppLauncher {

    static let shared = AppLauncher()

    //...
}
In essence we have a global instance of the AppLauncher now and we can include a field in the class that acts as a toggle to indicate whether the app should be relaunched or not. This field can then be set within a beforeAll or afterAll block and, when required, could be used to allow or prevent a future relaunch.
Not an ideal implementation but a suitable workaround to an XCTest bug.
NOTE: A bug ticket was submitted to Apple regarding the matter and the response was that it was a known issue.
XCTest quirks
Disclaimer: Points raised in this section are speculation and should not be taken to be fact. Conclusions have been made based on observations and theory.
The curious case of determining hittability
The apple documentation describes the XCUIElement instance property isHittable as:
“Determines if a hit point can be computed for the element”
“isHittable returns true if the element exists and can be clicked, tapped, or pressed at its current location. It returns false if the element does not exist, is offscreen, or is covered by another element.“
(Developer.apple.com, 2019)
This would suggest that the property requires a series of different computations and makes use of a second instance property exists.
The XCUIElement instance property exists is described as:
“Determines if the element exists.”
“This property determines if the element exists within the app’s current UI hierarchy.”
(Developer.apple.com, 2019)
Based on it being described as performing a black and white check on the current UI hierarchy, it suggests that this computed property requires less computation than isHittable.
Identifying whether an element has been displayed is somewhat of a common UI test. You may also use a similar check as part of a setup to a test, for example navigating to a page. Given the above descriptions, it would appear that in order to perform this check, simply calling isHittable would suffice. My personal experience however would suggest otherwise. I have often found that if an element does not exist in the UI hierarchy and you try to resolve whether the element is hittable, XCTest will give you the following error:
Unable to determine hittability of element X
To combat this, you can extend the check to firstly check whether the element exists and if it does, then check whether the element is hittable:
if titleElement().exists && titleElement().isHittable {
    //...
}
However, this solution isn’t without its flaws. As your project scales up you may find that this condition starts to breakdown and tests will fail periodically with the infamous hittability error:
Unable to determine hittability of element X
But didn’t we just check that it existed before evaluating isHittable?
What’s worse is that upon inspection, your failure screenshots and log of the UI hierarchy at the point of failure will show that the element in question was, in actual fact, displayed on screen.
“How can an element not exist when it exists?”
I have found that regardless of whether ‘exists’ returned true, it is irrelevant when evaluating isHittable. Do they use different APIs?
Based on much Googling, the theory is that an XCUIElement is lazily initialised until a property other than exists is called. If this is true, this would mean that isHittable could determine that an element does not exist, despite exists returning true.
I tested this theory by forcing the XCUIElement initialisation. Ultimately a reference to an XCUIElement is created by evaluating an XCUIElementQuery. In our example framework, if we restructure each page object selector to return an element query, this will mean that the element evaluation will occur at the point of usage before being picked up by the garbage collector:
if titleElementQuery().element.exists && titleElementQuery().element.isHittable {
    //...
}
This seems to fix the mysterious hittability error… strange.
System alerts
Annoyingly system alerts are not part of our applications but instead are part of the operating system. This means that any customisation or modifications of system alerts is pretty restricted. When we consider interacting with them in our UI tests, XCTest provides us with a function to invoke a handler when the UI is interrupted by the system (addUIInteruptionMonitor). An example of where you might need to use this is if you are working on an app that requires the user to give camera or microphone access. Just add the following to your XCTestCase setUp function:
addUIInterruptionMonitor(withDescription: "Dismiss the permission alert") { (alert) -> Bool in
    if alert.label.contains("Would Like to Access") {
        alert.buttons["OK"].tap()
        return true
    } else {
        return false
    }
}
Perfect!
…or is it?
Another XCTest quirk incoming!
Although much of documentation available regarding how to use addUIInteruptionMonitor would suggest simply invoking at the start of your test case and XCTest will do the rest for you… you would be mistaken.
If you use only addUIInteruptionMonitor, the handler will sometimes, if not all the time, fail to be called when the UI is interrupted by a system alert.
Trusty Stack Overflow saved the day with this one. I discovered an answer which suggested that user interaction was required in order for the monitor to detect the UI interruption and thus pass control over to the handler. If we make a call to the following function at the point when we expect the UI handler to take control, your troubles will be no more:
func delayedAppInteraction(delay: UInt32 = 2) {
    sleep(delay)
    XCUIApplication().coordinate(withNormalizedOffset: CGVector(dx: 0, dy: 0)).tap()
}
Oh XCTest… you’re full of surprises.
Timing issues
A common trait across UI automation frameworks are timing issues (aka race conditions). These become more and more apparent as a project scales up and could be caused by any number of reasons. For example a higher demand for processing power or maybe bugs being introduced. Different frameworks have different methods for handling these issues. XCTest has a thread polling service that pauses test execution until the main thread is in an idle state. If you run UI tests using XCTest, you will see the following appear in the console:
wait for <package_name> to idle
However, as is the case with many frameworks, this service will not be sufficient enough 100% of the time and you will still run into timing issues every so often. In my experience using XCTest, I have found that these timing issues can largely be related to the speed of screen transitions. A prime example of this is when XCTest clicks a submit button at the end of filling in a form and proceeds to fill in the next page:
NamePage.enterName("Joe Bloggs")
NamePage.clickContinue()
AddressPage.enterPostcode("NE1 1AB")
In the above example, XCTest would try to enter ‘NE1 1AB’ but would then fail due to the postcode field apparently not being available to the user. After inspection you will discover that UI elements for both pages exist in XCTest’s UI hierarchy, suggesting that at the point of invoking actions for the second page (enterPostcode in this example), the app is in mid-transition.
You can combat these issues, by creating a wait helper function. Here is an example of an XCUIElement waitUntil helper struct that takes advantage of XCTWaiter and XCTestExpectation:
struct WaitUntil {
    static func expectation(_ expectation: XCTestExpectation, timeout: Double) {
        let result: XCTWaiter.Result =
            XCTWaiter().wait(for: [expectation],
                             timeout: timeout)
        if result != .completed {
            XCTFail("Condition was not satisfied during \(timeout) seconds")
        }
    }

    static func predicate(element: XCUIElement,
                          until predicate: @escaping (XCUIElement) -> Bool,
                          timeout: Double) {
        let predicate = NSPredicate(block: { object, _ in
            predicate(object as! XCUIElement)
        })
        expectation(XCTNSPredicateExpectation(predicate: predicate, object: element),
                    timeout: timeout)
    }
}
This will allow you to wait for a condition on an element to return true. For example, you may need to wait for an element to not exist anymore:
func waitForNonExistence(timeout: TimeInterval = 10) {
    WaitUntil.predicate(element: self, until: { !$0.exists }, timeout: timeout)
}
Using a wait function, such as the one above, should help to fix a lot of your timing issues.
Wrapping this all up
My personal opinion of XCTest is a mixed one. Whist I like the capabilities of the Swift language and, for the most part, XCTest works straight out of the box, I’ve found very much that the phrase ‘no pain, no gain’ applies. XCTest seems to be riddled with annoyances and Apple provided little to no help resolving these issues. Documentation is poor and the framework is largely a black box. This last point is particularly annoying as Apple hold all the cards when it comes to iOS development and testing. You have few options in terms of tooling and one must press on and battle though the problems that it brings.
In this blog I have explored how we can structure our UI testing frameworks to our advantage by making use of the page object model and recording screenshots on failure. You have also seen how you might firefight XCTest restrictions, quirks and timing issues with some simple solutions.
I hope that this blog has been insightful and has ultimately helped you strive towards blissful testing with XCTest.
Glossary

Red Death - The Red Death is the main antagonist of DreamWorks Animation’s ‘How to Train Your Dragon’. It is a Stoker class dragon and second only in size to the Bewilderbeast, which is the largest of all dragons.

Bewilderbeast - The Bewilderbeast is a gigantic Tidal Class dragon that first appeared in DreamWorks Animation’s ‘How to Train Your Dragon 2’.

Monstrous Nightmare - The iconic Stoker Class dragon, Monstrous Nightmares are the largest of the common dragons and well-known for their violent streak and their copious firepower.

Night Fury - The Unholy Offspring of Lightning and Death itself. Night Furies are fast, stealthy, and hit with enough firepower to blow the tops of catapult towers into cinders. They are the most feared dragons amongst the ranks of the Vikings. They belong to the Strike Class of dragons, emphasizing the classification’s hard-hitting firepower and speed. They have a closely related subspecies with white colouration known as Light Furies.

Light Fury - A Strike Class dragon, an elusive subspecies to the Night Fury that has the ability to cloak itself with its Breath Weapon.
Bibliography
| Developer.apple.com. (2019). XCUIElement | Apple Developer Documentation. (online) Available at: https://developer.apple.com/documentation/xctest/xcuielement (Accessed 21 Mar. 2019). |
.jpg)