The Christmas holidays are a great time for pursuing ‘pet’ projects and trying out new things. This past year I’ve been watching WebAssembly evolve and wanted to create a fun project that allowed me to put it to good use. Over the past couple of weeks I created an Augmented Reality Suduko solver:

This project makes use of the WebAssembly build of OpenCV (a C++ computer vision library), Tensorflow (a machine learning library) and a solver written in Rust. It neatly demonstrates how WebAssembly allows you to write performance-critical web-based applications in a wide range of languages.
This blog post gives a brief overview of the code for this application, which can be found on GitHub. If you’re new to WebAssembly and want to know more about the problem it solves, how it works or what it is, I’d thoroughly recommend Lin Clark’s cartoon guide.
Sudoko Solver
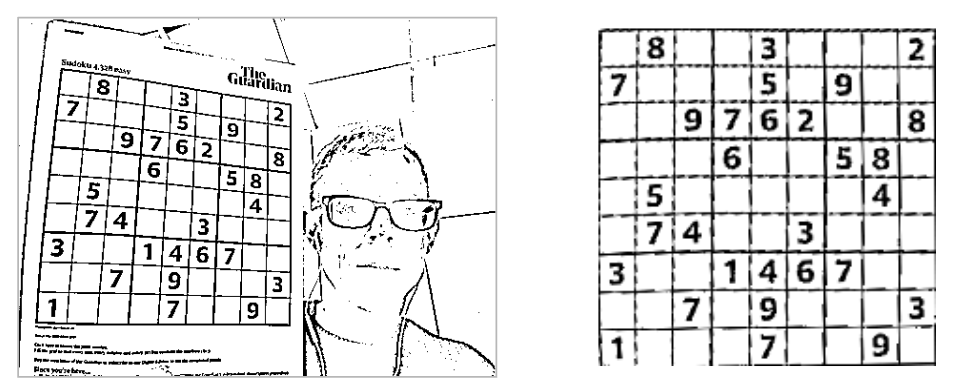
The diagram below neatly illustrates the steps involved in locating a sudoku puzzle in an image, solving the puzzle then rendering the solution back onto the original image:
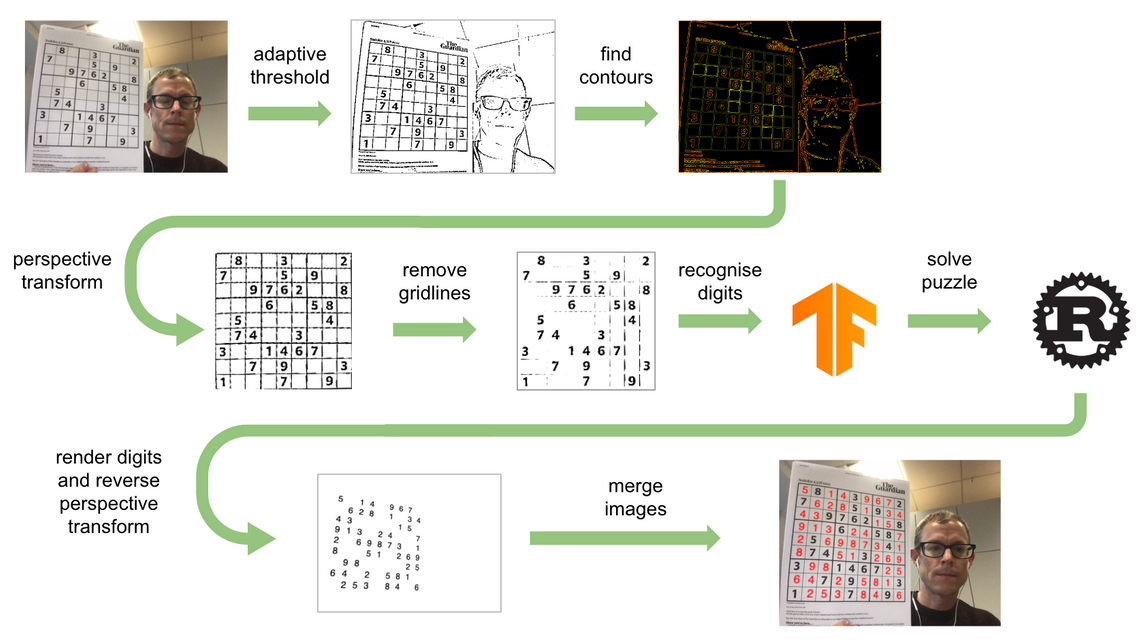
In brief, the steps applied to each video frame are as follows:
- Adaptive thresholding is used to locate edges, resulting in a black and white image
- The edges are approximated as contours; the sudoku grid should be the largest four-sided contour
- A (reversed) perspective transform is applied in order to render the grid as a square image
- The gridlines are erased
- A convolution neural network is used to identify the digits in the 9x9 grid
- The populated grid is solved via a Rust-based module
- The perspective transform from (3) is applied to project the solution back onto the image
- The solution is merged back into the original image
We’ll look at each of these steps in turn.
Adaptive thresholding
This sudoku solver makes use of various computer vision techniques, all of which rely on the OpenCV library.
OpenCV was launched in 1999 and has grown to become a popular computer vision toolkit thanks to its extensive set of features. It also has various add-on modules for a range of machine learning techniques, including neural networks. OpenCV is written in C++, with bindings for Python and Java. In 2018 the Emscripten compiler was used to add JavaScript support.
Despite having ‘official’ support for JavaScript / WebAssembly, OpenCV isn’t all that easy to work with. There are a limited set of OpenCV.js tutorials on the website, and one of the first steps involves building the library from source, not a task for the faint-hearted 😳. There is an open issue requesting they release OpenCV.js via npm which should make life much easier - but doesn’t have much traction yet. For now, I just opened up one of their demos and copied the required JS / wasm files!
The collective goal of the first few processing steps is to locate the sudoku grid within the image, the first of which is to find the outline for the various shapes within the image.
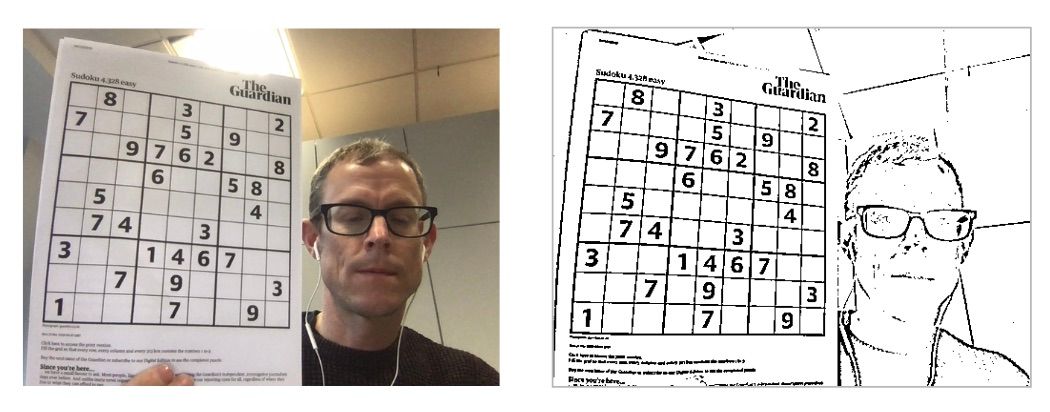
OpenCV supports various approaches to thresholding images, in this case we cannot guarantee even lighting across the sudoku grid, therefore an adaptive thresholding approach is most appropriate.
The following code demonstrates how to create an OpenCV image buffer via matFromImageData (the buffer is an instance of the Mat class), and apply an adaptive threshold:
const imgRead = (canvas)=> {
  const ctx = canvas.getContext("2d");
  const imgData = ctx.getImageData(0, 0, canvas.width, canvas.height);
  return cv.matFromImageData(imgData)
}

const threshold = (src) => {
  // convert to grayscale
  cv.cvtColor(src, src, cv.COLOR_RGBA2GRAY, 0);
  // apply a threshold
  cv.adaptiveThreshold(src, src, 255,
    cv.ADAPTIVE_THRESH_GAUSSIAN_C, cv.THRESH_BINARY, 11, 10)
};

const sourceImage = imgRead(canvasElement);
threshold(sourceImage);
You can see the effect of this transformation on the source image:
It’s worth noting that these OpenCV.js operations are all implemented in C++ and compiled to WebAssembly, the various cv.* function calls in the code shown above are very thin wrappers around their respective WebAssembly functions.
You can actually see how much time is spent within the OpenCV WebAssembly code by recording a performance profile:
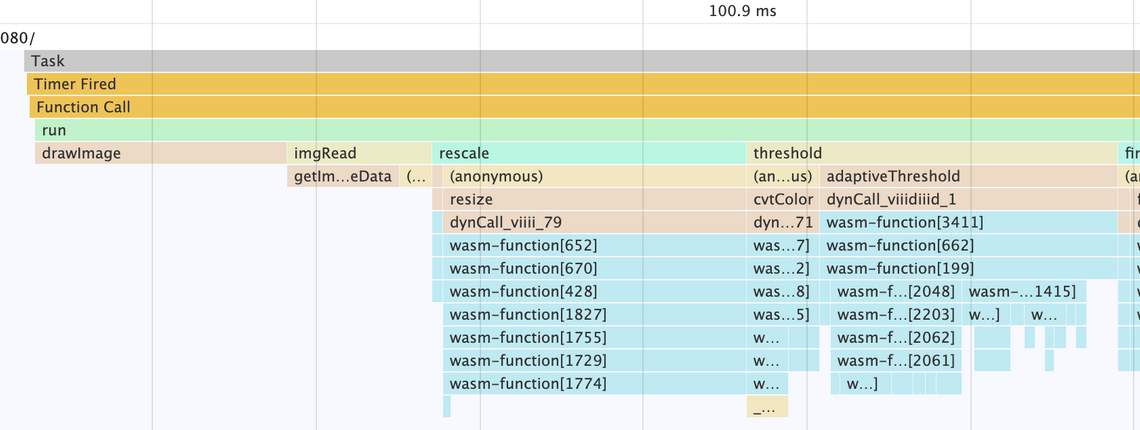
The WebAssembly code is clearly visible at the bottom of the flame chart.
Contour approximation
The next step is a bit more challenging, we need to locate the largest square within the image - which should be the sudoku grid.
OpenCV has a number of methods for locating, approximating and rendering ‘contours’. A contour is a closed loop which describes the boundary of a shape within an image. You can obtain the contours from a binary image using the findContours function:
const contours = new cv.MatVector();
const hierarchy = new cv.Mat();
cv.findContours(
  src,
  contours,
  hierarchy,
  cv.RETR_CCOMP,
  cv.CHAIN_APPROX_SIMPLE
);

...

hierarchy.delete();
contours.delete();
The OpenCV.js certainly feels quite C-like, you first have to create the hierarchy matrix and contours matrix-vector before invoking findContours - you also have to ensure that these objects are freed when no longer needed via their delete method.
The hierarchy allows you to determine which contours contain others, although we don’t need it here - we’re just searching for the largest four-sided shape. However, it’s not quite as straightforward as iterating over the contours looking for one with four vertices (i.e. corners). The contours returned by findContours are quite detailed, mapping out each pixel on the boundary of each shape.
The next step is to approximate each contour, reducing the overall number of vertices, and as a result removing some of the pixel-level details. This is achieved via approxPolyDP:
const EPSILON = 10;
const rectangles = [];
for (let i = 0; i < contours.size(); ++i) {
  const approximatedContour = new cv.Mat();
  cv.approxPolyDP(contour, approximatedContour, EPSILON, true);

  // is it a rectangle contour?
  if (approximatedContour.size().height === 4) {
    rectangles.push({
      coord: Array.from(approximatedContour.data32S),
      area: cv.contourArea(approximatedContour)
    });
  }

  approximatedContour.delete();
}
The above iterates over each of the contours, obtains an approximation, then determines whether it has four vertices, and if this is the case, the coordinates are stored. The cv.Mat class has various properties for obtaining the underlying buffer - in this case we know that contours are stored as signed 32bit integers, so use the data32S accessor. OpenCV also has various utility methods for characterising contours, in this case the contourArea method is used to obtain the area. The largest four-sided contour is assumed to be the sudoku grid.
The EPSILON value passed to approxPolyDP is quite important, it details the approximation accuracy, with higher values permitting a greater deviation between the approximated contour and the original. Finding a suitable value for this parameter involves quite a bit of experimentation - which is a recurring theme when working with computer vision and machine learning!
The following image shows the approximated contours, colour coded by the number of vertices:
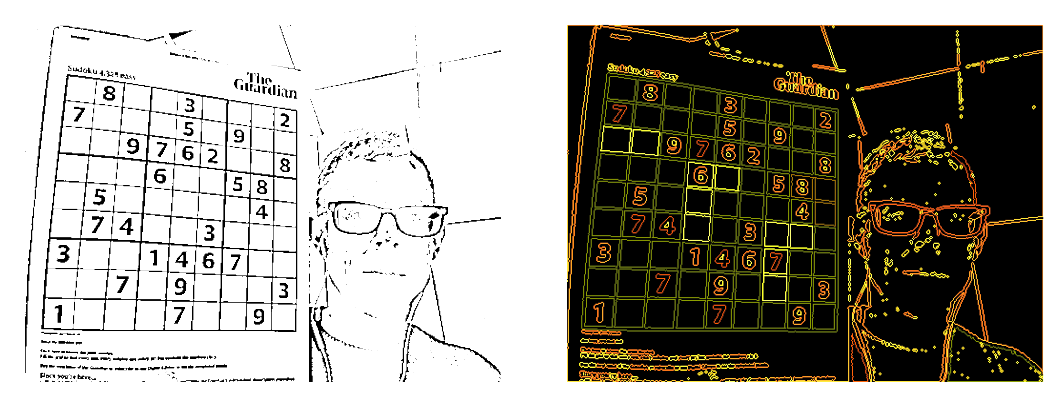
In the above image the contours with the dark greenish colour have four vertices - you can see that some of the squares within the sudoku grid have been approximated with more than four vertices, and as a result a higher epsilon value might be appropriate.
Reverse Perspective Transform
The next step is to use a geometric transformation in order to create an image with just the sudoku grid, transformed such that it is a square. Once again, OpenCV has the required tools!
The following code uses getPerspectiveTransform to create a suitable transform given the 4 vertices of the sudoku grid and the desired location for each in the destination image. In this case the destination is a square buffer with dimensions of 180 x 180. The warpPerspective method performs the transformation on the source image.
const srcCoords = ... // the vertices from the contour detection step

// destination vertices
const dstCoords = [0, 180, 0, 0, 180, 0, 180, 180];

// the destination buffer
const dst = cv.Mat.zeros(180, 180, cv.CV_8UC3);

// create the perspective transform
const srcVertices = cv.matFromArray(4, 1, cv.CV_32FC2, srcCoords);
const dstVertices = cv.matFromArray(4, 1, cv.CV_32FC2, dstCoords);
const perspectiveTransform = cv.getPerspectiveTransform(srcVertices, dstVertices);

// apply to the image
cv.warpPerspective(
  src,
  dst,
  perspectiveTransform,
  new cv.Size(180, 180),
  cv.INTER_LINEAR,
  cv.BORDER_CONSTANT,
  new cv.Scalar()
);
Here’s the result of applying this transformation:
The final processing step is gridline removal, a pretty straightforward task making use of the Region Of Interest (ROI) feature that allows you to apply operations to specific regions of image buffers. I’ll not go into the details here.
Number recognition
The next step is a fun one - the identification of numbers within the sudoku grid. I initially went down a rabbit-hole here … OpenCV has various examples that use Haar Cascades for face recognition, and my initial approach was to train a cascade to recognise digits. However, it looks like this technique is no longer supported in OpenCV 4.x, with the preferred approach being the use of convolution neural networks. However, the OpenCV.js build I’m using doesn’t include the machine learning modules, so I decided to look elsewhere, settling on TensorFlow (which I think is a much better option!).
TensorFlow is a maths library, with a machine learning focus, that is being developed by the Google Brain team. They announced JavaScript support in 2018, and WebAssembly support just a few weeks ago!
In contrast with OpenCV the TensorFlow documentation is wonderful - clear, easy to follow and up-to-date 😊
TensorFlow.js has a comprehensive worked example that covers the process of training a Convolution Neural Network (CNN) to recognise handwritten digits, which was an excellent starting point for my sudoku solver. However, in my case I need to train my network to recognise printed digits rather handwritten ones.
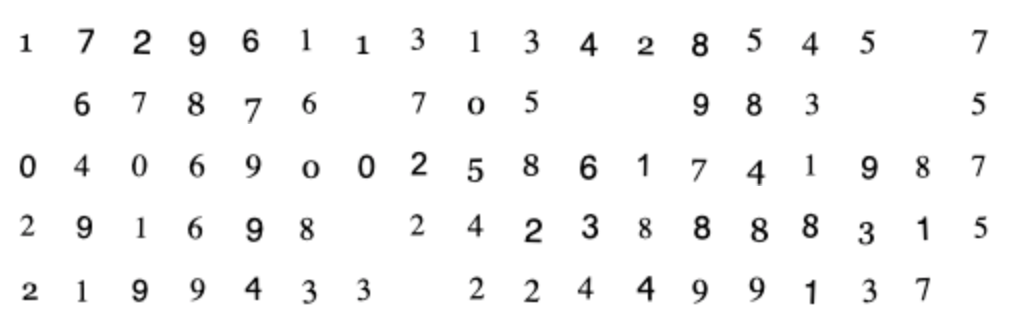
If you’ve not heard of CNNs before I’d recommend this article from Towards Data Science, which includes the image below:
In brief, a CNN is a deep-learning technique where a complex multi-layered neural network learns the various convolution operations to apply to an image in order to recognise objects from a given training set. Once the network has been sufficiently trained, it is then able to recognise objects in new images, i.e. ones that it hasn’t been trained with.
I modified the example from the TensorFlow documentation, which uses a database of handwritten digits, replacing the training data with randomly generated digits. These were rendered to a 20 x 20 canvas using a variety of fonts, font-weight and applying minor (randomised) variations in font size, location and rotation.
Here are some examples:
the training process involves presenting 1000s of these digits to the CNN, alongside the expected output, which is a set of ten weights that indicate the probability that the image contains a specific digit. The training process makes small adjustments to the various weightings deep within the network, with the whole process repeated 1000s of times until the network provides a sufficient recognition accuracy.
One important aspect I learnt through trial-and-error is that as well as training the network to recognise each of the ten digits, I should also train it to recognise empty squares. Hence my CNN provides 11 output probabilities.
Once trained, the network, including the resulting weightings, can be saved. The whole process was really quite quick - taking about one minute on my machine.
The TensorFlow API allows you to perform multiple predictions in one go. The process of creating the model, and feeding it with the same data in a suitable format is really straightforward:
const model = await tf.loadLayersModel("./training/my-model-3.json");
const TOTAL_CELLS = 81;

// extract the image data for each cell
const testDataArray = new Float32Array(src.cols * src.rows);
for (let i = 0; i < TOTAL_CELLS; i++) {
  // a bit of buffer mangling to obtain the image data for each cell
  // [ ... ]
}

// create a tensor that contains the data for all our cells
const testTensor = tf.tensor2d(testDataArray, [TOTAL_CELLS, cellSize]);
const reshaped = testTensor.reshape([TOTAL_CELLS, cellWidth, cellWidth, 1]);

// make our prediction
const prediction = model.predict(reshaped).dataSync();
The prediction for each cell is an array of 11 values, giving the probability of each digit, or an empty cell.
The following code creates a string representation of the Sudoku grid based on the prediction for each cell:
let result = "";
for (let i = 0; i < TOTAL_CELLS; i++) {
  // obtain the 11 predicted states of this cell
  const cellPrediction = Array.from(prediction).slice(i * 11, i * 11 + 11);
  // what is the most likely digit for this cell?
  const digit = indexOfMaxValue(cellPrediction);
  result += digit < 10 ? digit : ".";
}
return result;
A typical output is as follows (I’ve manually line-wrapped to make it clear this is a grid):
...2...63
3....54.1
..1..398.
.......9.
...538...
.3.......
.263..5..
5.37....8
47...1...
I was hoping to use the WebAssembly build of TensorFlow, however I hit a snag. The current release is in alpha and doesn’t support all of the TensorFlow features - when using the alpha build it complained that the fusedBatchMatMul operation was absent from the kernel. Looks like I’ll have to wait a little longer before I can use it!
Solving the puzzle
As both OpenCV and TensorFlow are C++ libraries I thought it would be fun to mix things up a bit, and use Rust for the next step.
Sudoko Solvers are like the Game of Life, both are popular programming challenges and it didn’t take long to find a decent looking solver written in Rust.
The Rust tooling for WebAssembly is really top-notch, considering that my Rust knowledge is (very) limited, I was able to get up and with a fully functional solver in under an hour. I used the wasm-pack template, following the instructions in the Rust 🦀 and WebAssembly 🕸 book to create my skeletal project. I then added the Sudoku crate, and updated the generated code as follows:
mod utils;

use sudoku::Sudoku;
use wasm_bindgen::prelude::*;

// When the `wee_alloc` feature is enabled, use `wee_alloc` as the global
// allocator.
#[cfg(feature = "wee_alloc")]
#[global_allocator]
static ALLOC: wee_alloc::WeeAlloc = wee_alloc::WeeAlloc::INIT;

#[wasm_bindgen]
pub fn solve(sudoku_line: String) -> String {
    let sudoku = Sudoku::from_str_line(&sudoku_line).unwrap();
    if let Some(solution) = sudoku.solve_unique() {
        let line = solution.to_str_line();
        let line_str: &str = &line;
        return line_str.to_string();
    } else {
        return String::from("");
    }
}
The #[wasm_bindgen] directive (if that is what they are called in Rust!) indicates that this function is exposed by the module, in this case it is a solve function that takes a sudoku grid as a string, then returns the solution (also as a string).
The following command builds the project, with the web target indicating that this module will be consumed by a browser (i.e. the wasm module need to be obtained via HTTP rather than the node filesystem APIs):
$ wasm-pack build --target web
The output of this build is a small (70KByte) wasm module and an accompanying JavaScript file which fetches the wasm module and adapts the functions, performing various type conversions. This is where much of the value is added, WebAssembly only supports numeric types, however the code above exports a function with a string argument and return value. The wasm-bindgen project, automatically generates bindings to simplify communication between JavaScript and Rust (compiled to WebAssembly), in this case it handles the encoding and decoding of strings to linear memory, which significantly reduces the effort involved in using Rust code on the web.
Using this WebAssembly module couldn’t be easier:
import initWasmModule, { solve } from "../../rust-solver/pkg/sudoku_wasm.js";

await initWasmModule();

const puzzle = "...2...63....." // etc ...
const solution = solve(puzzle);
Rendering the solution and merging
The final few steps are really quite straightforward, I’m not going to delve into the details, you’ve already seen the techniques in practice.
The solution is rendered to a new 180 x 180 image, using the Canvas API to render each digit. The OpenCV getPerspectiveTransform and warpPerspective method are used to project this back onto the original image, only this time the source and destination coordinates are reversed. Finally, this image is merged with the original to give the solution.
Here’s the final merged image:
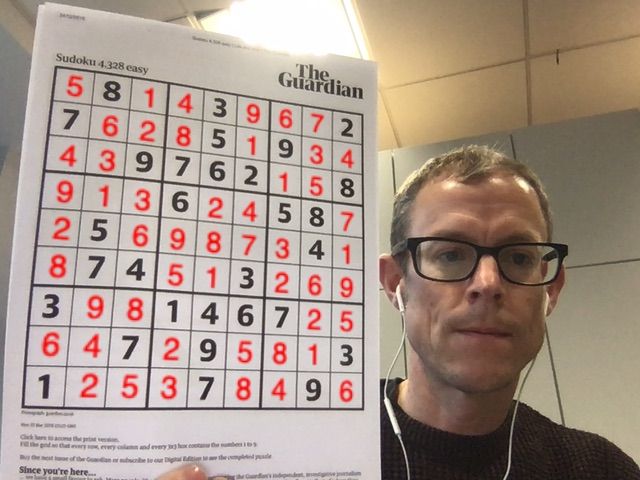
I’m sure I should look happier with the end result!
If you want to try it out for yourself the project is hosted on GitHub pages, and the sourcecode is available also. Please note, as this was a fun project I didn’t want to waste time (and depress myself) by rollifying, transputing or polyfudging. If your browser doesn’t support ES modules, async / await and various other modern features it will not work for you!
Conclusions
This was a fun hobby project and a neat demonstration of how WebAssembly allows you to use a range of different libraries written in various different languages (even if I couldn’t actually use the wasm TensorFlow build).
The final applications performs pretty well, recognising sudoku grids at various different orientations with a variety of different fonts and rendering styles. One thing it does struggle with is motion-blur, I found that if I move the grid quite quickly the blurring of the image hampers the initial adaptive threshold edge-detection.
Regarding speed of processing, it takes approximately 70ms on my computer to perform the full pipeline (threshold, contour, solver, merge, …) which is sufficient. On my iPhone it is noticeably slower and the frame rate isn’t really good enough to achieve the illusion AR tries to present. I’m sure there is room for improvement, as an example, I didn’t spend much time experimenting with the image size, reducing the resolution of the grid (which is currently 180 x 180) would significantly improve performance. Also, a pool of Web Workers could be used to process this pipeline in parallel.
More radical changes could be made, folding some of the processing steps into the CNN, it might be possible to train the network to recognise the grid in the unmodified source image. However, this would require considerable investment in the collection of training data and may not yield better accuracy.
One final note, while the bulk of the work is currently performed in various WebAssembly modules written in C++ and Rust, there is still quite a lot of JavaScript glue code required to coordinate the application. The recently announced interface types proposals should eventually remove the need to write JavaScript code in order to communicate between wasm modules written in different languages. In a few years time I could perhaps write my solver pipeline in Go, communicating directly with my C++ machine vision library and my Rust solver!