
Introduction
Now that I’ve got your attention with a provocative title I suppose I had better come clean and clarify some details:
A few years back I bought a cookery book written by a particularly annoying TV Chef. The title of the book was “30 minute meals”. My assumption (not unreasonably I don’t think) was that here would be some quick easy meals we could make during the week. The reality is that, although it is physically possible to make these meals in 30 minutes, that is only possible if:
- you have access to a good kitchen with lots of equipment
- you are able to prep veg at a professionals speed
- you are prepared to dash through the recipe at break-neck speed, leaving your kitchen looking like the scene of a terrorist attack afterwards
Whilst initially being annoyed at being misled, it’s now one of my favourite cook books, here’s why: Whilst the recipes take longer than 30 minutes for any normal person, these are still some tasty, and quite complex meals that can be made up in a surprisingly short time frame if you’re smart about it.
So what’s all this got to do with software?
In a similar manner to the 30 minute claim, 10 minutes, while physically possible comes with a few caveats:
- This is the fastest I’ve managed to complete this process not the average
- The React App in question is a simple ‘hello world’ example
- I added in just a few simple tests
- I was already signed up the services that I needed
- I knew exactly the steps I needed to do and in what order
However, like the cook book, the overall point here is not that everyone should be able to deploy an app in this time-frame but rather to demonstrate that you can put together, test and deploy a scalable, public facing application, complete with continuous integration in a shorter time-frame than you might expect using readily available tools. Still interested? Let’s take a look how.
The Prep
The “ingredients” that you will need to create your app are:
- VSCode or your favourite text editor
- Git
- Node
- We’ll be using GitHub as a repository so you’ll need a GitHub account
- We’ll use AWS Amplify to deploy our code so you’ll need an AWS account
Method
1. Git init
The first thing we are going to need is a git repo to work in. Head on over to GitHub and click the button to create a new repository. Give it a name such as “hello-world” and fill in any other details you might want. Grab the url and in your local git terminal do a git clone.
2. Create React App
Next we need some code. The easiest way I know of getting started with a new React App is by using create-react-app, so that’s what we’ll use. Back to the terminal, cd into the repo we just created in step 1, and run npx create-react-app hello-world
Wait for the process to complete, then as a last step we’re going to move the files out of the created directory and up one level to our root directory just to keep things tidy:
mv hello-world/* hello-world/.* . && rmdir hello-world
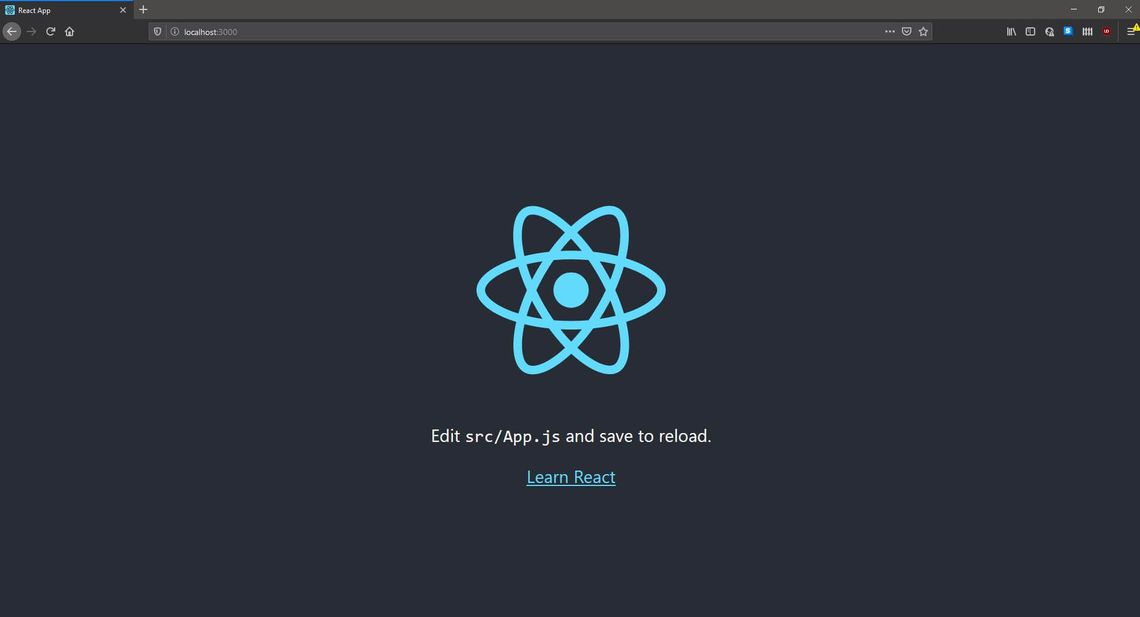
Awesome now we should have a basic React app. Let’s run an npm i to install our dependencies and then npm run start to check everything is working. If everything works your default browser should open with the app running on localhost:3000. Let’s stage and commit the new files, then do a git push to setup our first commit to the repo.
3. Continuous Integration
Next we’re going to edit our GitHub repo and make a few changes that will allow our code to be built and tested each time we make a Pull Request into the master branch.
Head to your repository main page and in the toolbar at the top click on “Actions”.

GitHub should present you with a few default Actions based on the code we’ve pushed to the repo that you can choose from, go to the Node.js one and click “Set up this workflow”.
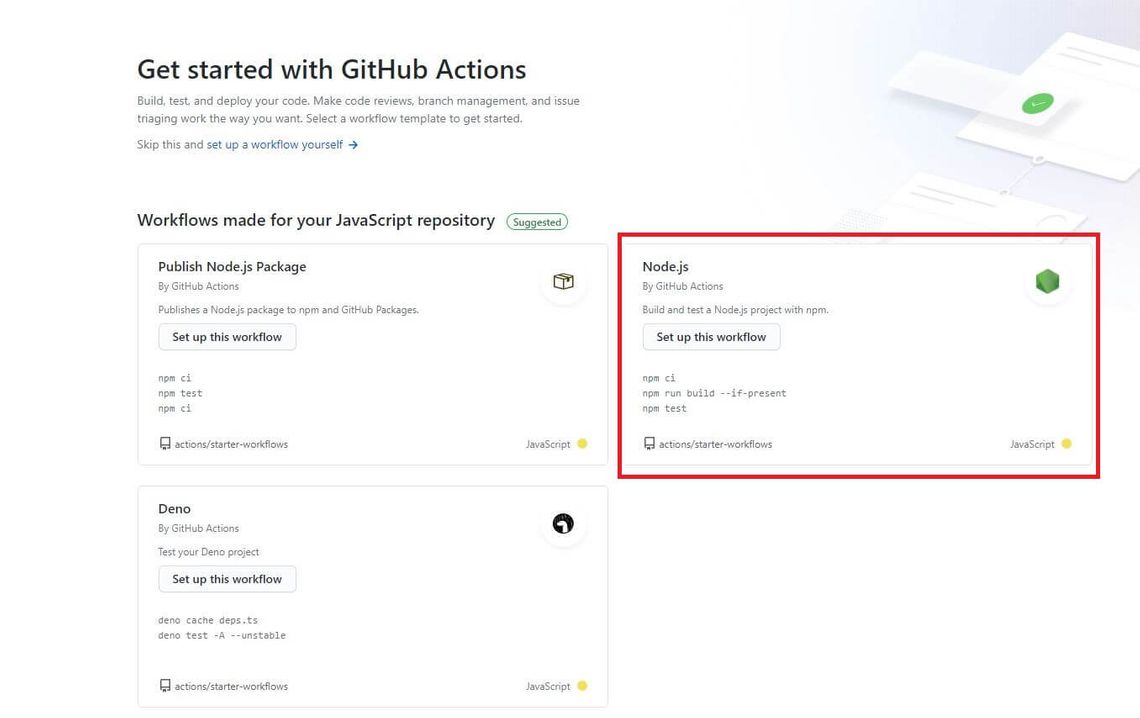
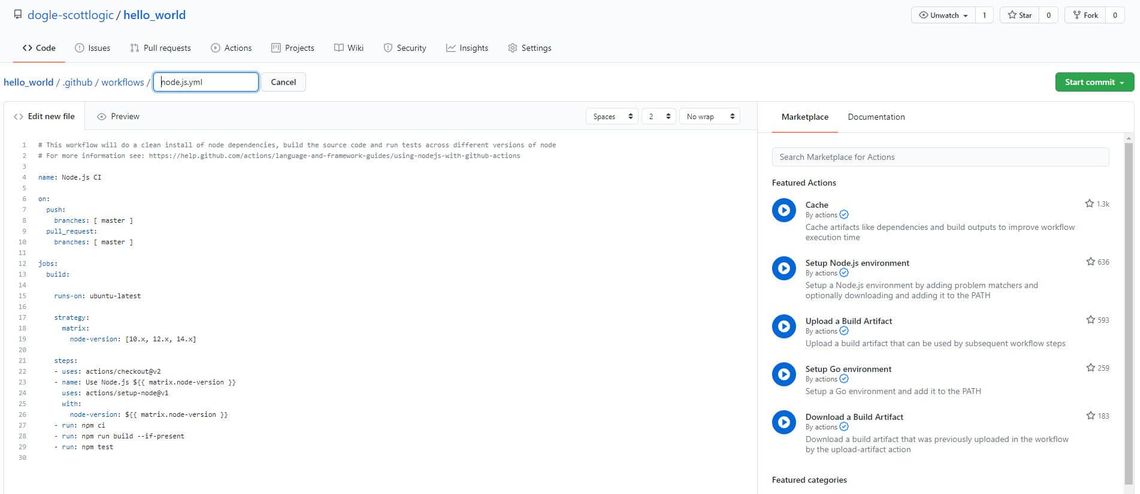
That will generate a .yml file for you that will execute an npm ci, an npm run build and a npm run test each time we push to master or create a pull request (PR) from master. Click the “Start Commit” button and then “Commit new file” to commit the .yml directly to master.
If you go back to your “Code” tab you’ll notice a yellow marker next to the commit. This indicates a build is in progress on the commit we just made, wait for it to go green so you can be confident all is well.

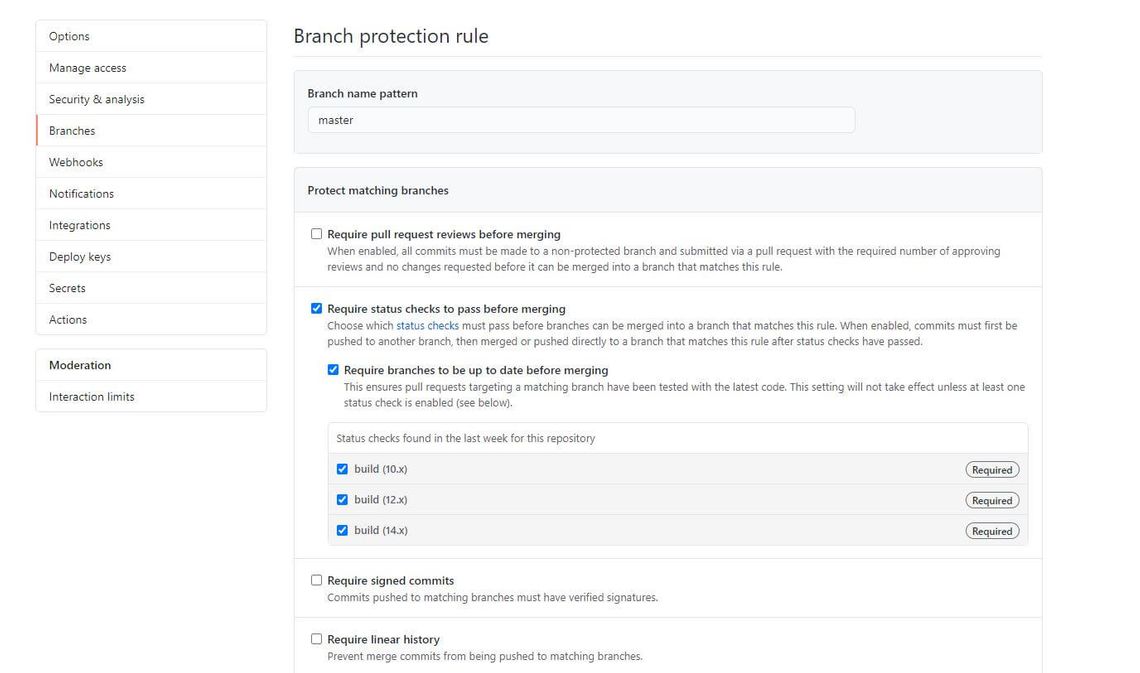
Last thing we’re going to do is insist the build passes before a PR is merged. Go into the settings tab for the repository and click “Branches”. Type master into the “Branch name pattern” text box and then check “Require status checks to pass before merging” and check the box for each node version (10.x, 12.x, 14.x). Hit “Create” then “Save Changes”.
4. Write some JSX
Ok now we’ve got our repository sorted out we need some code, create a new branch, name it what you like. Check it out and then we’re going to alter the app.jsx file to be a basic hello world button and message, something like this:
import React, { useState } from 'react';
import './App.css';

function App() {
  const [ show, setShow ] = useState();
  return (
    <div className="App">
      <button className="hello-button" onClick={() => setShow(!show)} >{show ? 'Reset' : 'Say Hello'}</button>
      {show && (<h1 className="hello-message">Hello World</h1>)}
    </div>
  );
}

export default App;
commit that but don’t push just yet.
5. Test it
Next lets write some tests. We’re going to use Enzyme here to shallow render our App component so lets add it to the package.json npm install --save enzyme enzyme-adapter-react-16 react-test-renderer
Next we need to update src/setupTests.js to so that our app imports it:
import { configure } from 'enzyme';
import Adapter from 'enzyme-adapter-react-16';
configure({ adapter: new Adapter() });
And last we are going to write a few simple tests around our component a bit like this:
import React from 'react';
import { shallow } from 'enzyme';
import App from './App';

test('should not show the message on mount', () => {
    const wrapper = shallow(<App />);
    expect(wrapper.find('.hello-message').exists()).toBeFalsy()
});

test('should show the correct button text on mount', () => {
    const wrapper = shallow(<App />);
    const button = wrapper.find('.hello-button').first();
    expect(button.text()).toEqual('Say Hello');
});

test('should change the button text on click', () => {
    const wrapper = shallow(<App />);
    const button = wrapper.find('.hello-button').first();
    button.simulate('click');
    expect( wrapper.find('.hello-button').first().text()).toEqual('Reset');
});

test('should show the message on button click', () => {
    const wrapper = shallow(<App />);
    let button = wrapper.find('.hello-button').first();
    button.simulate('click');
    expect(wrapper.find('.hello-message').exists()).toBeTruthy()
});
Great now run npm run test to make sure they all pass, then commit the tests with an appropriate message.
Once you’ve pushed the code, create a Pull Request in GitHub, you’ll notice that once you create the PR the build will be triggered and you’ll be blocked from merging until it’s complete. Once it’s passed we can merge and delete the branch, at this point we are nearly done!
Dependabot
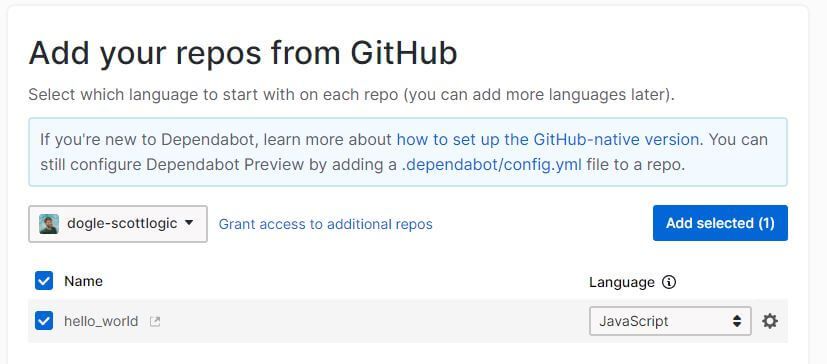
A big issue with long running projects can be keeping your dependencies up to date, it’s easy to fall behind and this can cause a lot of pain when you do eventually get round to updating. We’re going to side-step all that pain by using dependabot to keep things up-to-date for us. First step is to sign up with your GitHub account following the onscreen instructions. Once you’ve done that we need to add a repo. Click “Select Repos to add” and add the hello-world repo.
That’s it, dependabot will create a new PR each time a version needs to be updated and will manage rebasing all out of date PRs it creates. We can go into the settings and set PRs to be auto-merged, which means that if (and only if) the build passes on GitHub, the update PR will be automatically merged for us. All in all this means that we can leave the repository untouched and all non-breaking updates will be handled automatically. When we come back to work on our project we just need to do an npm install and handle any PRs which have breaking changes to be all up-to-date again. That’s a lot of work handled for us in a couple of clicks.
Deploy
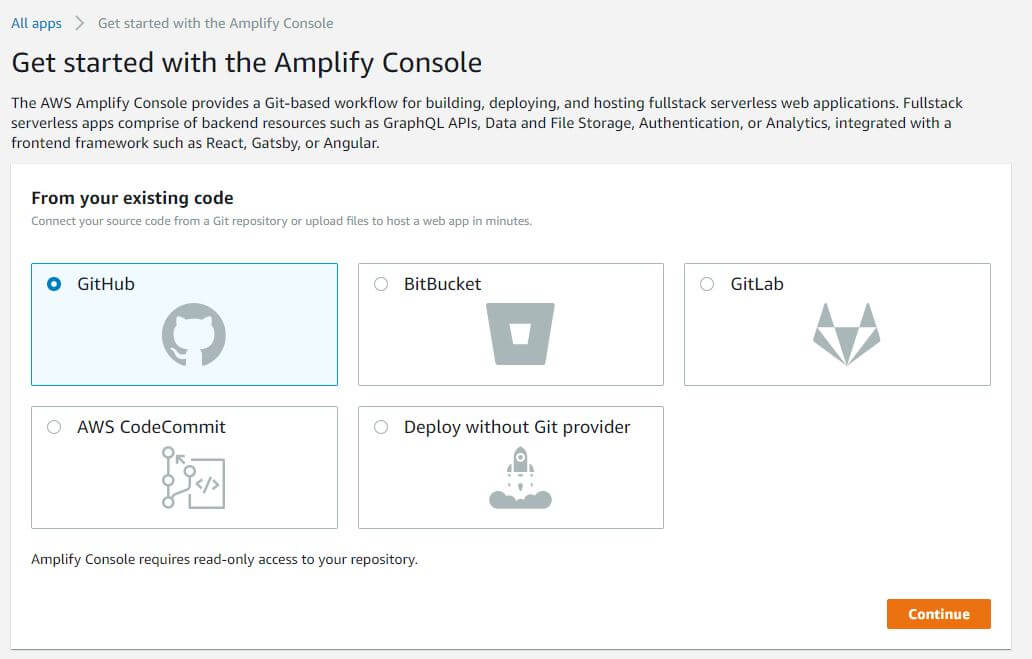
Last step then, we’ve got a working app with tests and a CI pipeline, the only thing we have left to do is deploy. For this we’re going to use AWS Amplify. You’ll need an AWS account, once you have that search for Amplify under Services and navigate to the AWS Amplify Console. Click on “Connect App” and then choose the GitHub Option.
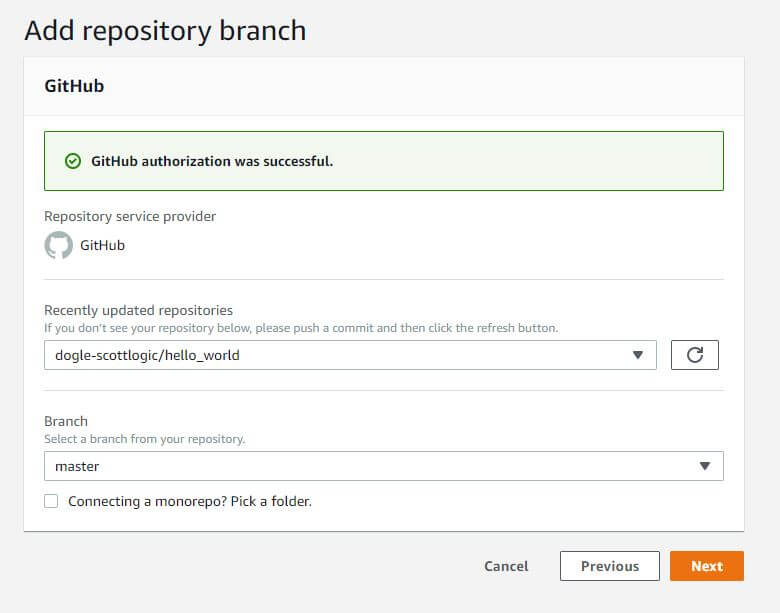
Follow the on-screen steps to connect your GitHub account and then choose your hello-world repo and select the master branch when asked to add a repository branch.
Click next, you’ll be asked to configure your build settings but we don’t need any environmental variables here and the default is fine so let’s just click next again. We are asked to review our settings then click “Save and Deploy”!
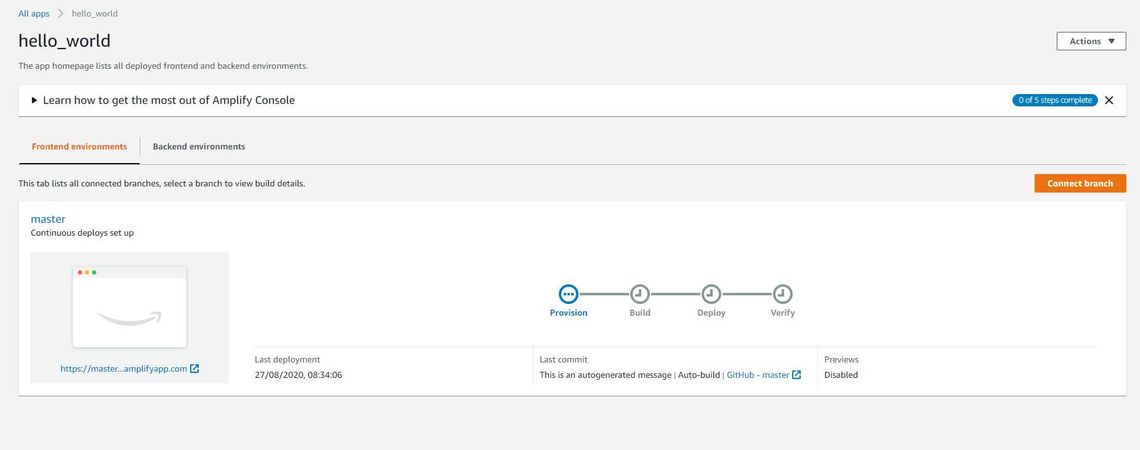
That is it, AWS will show you a timeline of your app building and deploying, when all the steps are green you can click the link and be navigated to your deployed Hello World React app, or go there on your phone just to prove to yourself it’s live! Amplify will automatically pick up any new commit to the master branch and re-deploy a new version of the code for us. This means that if we make a new branch and add a feature, when we create a pull request, the CI pipeline will run the build and tests, when they pass we can merge our code, once the code is merged a new version will be deployed with no extra steps required by us.

Conclusion
We’ve gone from nothing, not even a git repository, to a tested React application complete with continuous integration, automated dependency updates and automated deployment to a public URL in (in my opinion) surprisingly few steps, using tools that are mostly free to access and handle all the boiler plate configuration for you. Let’s have a last look at the tools used here:
- create-react-app: free to use. With a single step will handle all the boiler plate of setting up a modern React app with a Jest test framework. We can extend this easily to add in things like Scss and TypeScript if we wanted.
- GitHub: free to use. GitHub provides us with a remote repository for our code and crucially, provides the ability to set up a CI server that will build and test our code each time we commit, blocking failing builds from being merged to master. All this with minimum configuration.
- dependabot: free to use. Dependabot keeps all our dependencies up-to-date, creating, maintaining and merging non-breaking pull requests. With just a few clicks we no longer need to worry about versions of packages getting stale and the security vulnerabilities which that can invite.
With just the tools listed above, even a developer with little to no experience of front end development and CI tools can create a scalable, production ready front end React application in a short amount of time.
AWS Amplify is the only product here that is not free, it is however pretty low cost at low levels of usage, if you’re simply deploying this example to try it out it should cost next to nothing, although you will want to delete it once you’re done to prevent the cost from accumulating. If you’re looking to deploy a small project I’ve personally found it to be pretty good value.
Hopefully what I’ve demonstrated here is how quickly and easily you can create and deploy an application using these tools, even if you don’t have a lot of knowledge or experience. I’ve used React as create-react-app is a powerful way to spin up a new project quickly but if you already have an application and want to add in CI and / or to deploy it then the process will be even quicker.
So that’s it, zero to deployed in less than 10 minutes… or at the very least in less time than you might expect.

