
Looking for a better way of testing your spring boot repositories? If this is a question that crossed your mind recently, then this article is for you. I’m hoping to share you my experience of writing integration tests to test your repository layer with the use of Testcontainers in this article. Hope this will help you to make a better decision next time when you are faced with the same challenge.
Before moving on to writing tests with Testcontainers, let’s try to investigate our options. Since we are using Spring Boot, you would probably be extending an interface such as CrudRepository or MongoRepository based on your choice of database to create the repositories. So, one may argue that we don’t need to test the repository layer at all; given the fact that it was not written by us. For simple applications which do not have any custom repository queries this may be true. But if you are adding more functionality to your repository than what is provided by spring framework data repository it’s always recommended to test your repositories with integration tests.
Ok, let’s assume you have decided to test your repository layer. The easiest would be to add an Java in-memory database like H2 if you are using a SQL database or add an embedded MongoDB database, like the one provided by Flapdoodle if you are using a NoSQL storage. Wait what?? I have a PostgreSQL database in my production, and now you are asking me to test with a H2? Since they are both relational database management systems, yes you can use that approach. But I don’t recommend. When you have complex queries to execute there is no guarantee that passing tests in CI, means that it will work the same in production if you have different database setups.
Alright, then what should I do? Create a separate database just like the one I use in production, populate it with test data and use it only within my test class?? Yes, why not? It will fix all your problems. But wouldn’t it be too much work? This is where the Testcontainers come into play. Just like you automate many things using annotations in Spring Boot, Testcontainers allows you to do all the things that I mentioned above in few lines of code. Of cause, this results in taking more time to run your tests, but you can always configure your CI to run repository tests only on request which will eliminate the long test execution times and allow you to run them when you require an end-to-end testing.
What are Testcontainers?
‘Testcontainers for Java’ which I will be referring simply as ‘Testcontainers’ throughout this article is a Java library that supports testing frameworks like Junit, by providing light weighted, throwaway instances of common databases, Selenium web browsers, or anything else that can run in a Docker container. At the time of writing this article Testcontainer libraries exists for many other popular programming languages and runtime environments such as .NET, Python, Go, Node.js and Rust.
For more details check out the official site for Testcontainers
Building a demo Spring Boot Application
Since we have a basic understanding of what the Testcontainers are and why we need them, let’s see how we can build a basic Spring Boot application and test it using Testcontainers.
The demo application that we are building in this article will have 2 repositories, namely ConsultantRepository and ProjectRepository. Since I intend to demonstrate the usage of Testcontainers with 2 different database management systems I’m planning to store our consultants in a PostgreSQL database and projects in a MongoDB database. We will not implement the services layer or the controllers layer as they are out of scope of this demo. However, we will be adding the docker-composer.yaml file, so that anyone interested can use it to create 2 separate docker containers, one with a postgres image and the other with a mongo image and connect to them using properties set in application.properties to run and build upon this demo application. Full code of this demo application can be found here.
Prerequisites
- JDK 17 or above
- Docker Desktop
Initialize the demo project
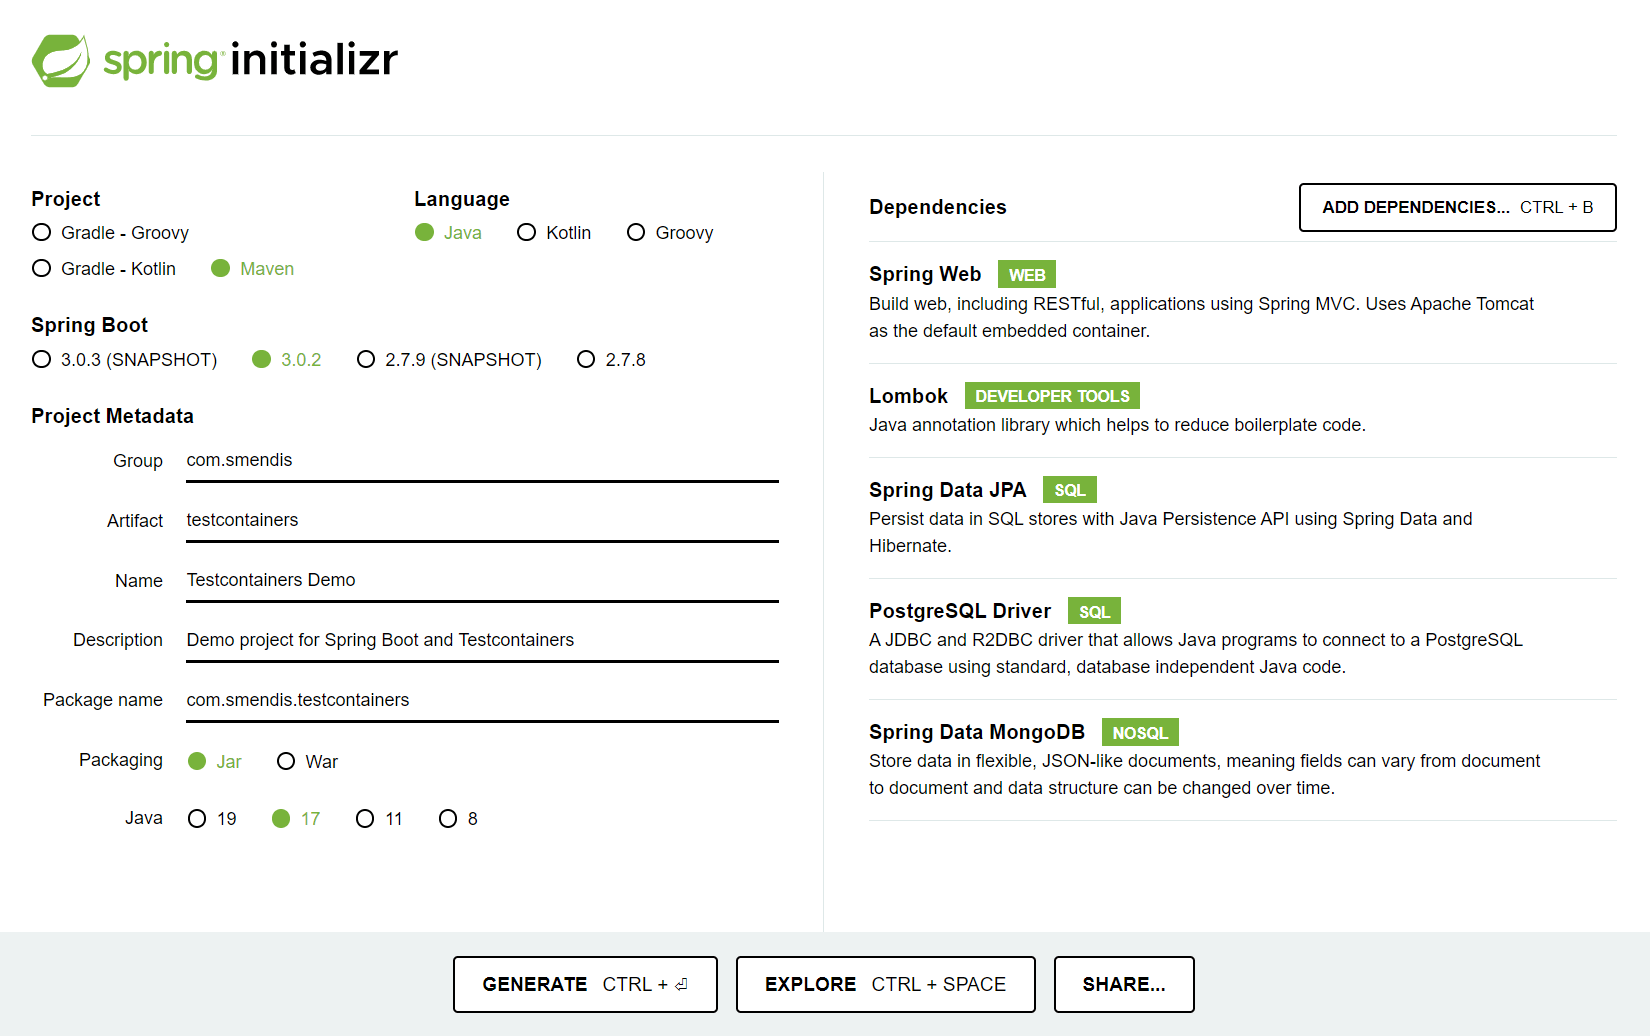
I have used Spring Initializer to bootstrap a basic spring boot application as follows,
Adding Testcontainer dependancies
Open the project in your IDE and open the pom.xml file on the root folder. Add following dependancies and reload the project to load maven changes.
<dependency>
    <groupId>org.testcontainers</groupId>
    <artifactId>junit-jupiter</artifactId>
    <scope>test</scope>
</dependency>
<dependency>
    <groupId>org.testcontainers</groupId>
    <artifactId>mongodb</artifactId>
    <scope>test</scope>
</dependency>
<dependency>
    <groupId>org.testcontainers</groupId>
    <artifactId>postgresql</artifactId>
    <scope>test</scope>
</dependency>
Setting up database connections
This step is not needed for testing with Testcontainers but will require if you want to run the Spring Boot Application.
Spinning up docker containers with databases
Copy the content of this file into a new file on the root directory of your project with the name, docker-composer.yaml. This has all the configuration we need to create 2 docker containers for our 2 different database management systems. Open up a terminal and navigate to the project root and run the following command to spin up the docker containers.
docker-compose -f docker-compose.yaml up
Updating application properties
Copy the content of this file into your application.properties which contains the necessary configuration to connect to our newly created databases in the docker containers.
Congratulations! Now you have a running spring boot application.
Creating the consultants repository
Let’s start this by creating a new package named models and adding a Consultants.java class to it.
@Entity
@Data
@NoArgsConstructor
@AllArgsConstructor
public class Consultant {
    @Id
    private UUID id;
    private String name;
    private int grade;
    private String technology;
}
@Entity annotation will mark this class as an entity in our relational data model. @Data, @NoArgsConstructor and @AllArgsConstructor annotations are from the project lombok.
@Data is equivalent of having @Getter, @Setter, @ToString and @EqualsAndHashCode in its place.
Let’s create a new package named repositories and add a ConsultantRepository.java interface to it.
public interface ConsultantRepository extends CrudRepository<Consultant, UUID> {
    @Query(value = "SELECT * FROM Consultant c WHERE c.grade = 2 AND c.technology = :tech", nativeQuery = true)
    List<Consultant> getSeniorConsulantsByTechnology(@Param("tech") String technology);
}
This interface is extended from CrudRepository interface. We are not hoping to test the functionality provided by the CrudRepository. However, we have added a custom query to this repository to get all senior consultants for a given technology which we need to test.
Testing consultants repository
Under test, create a new package named repositories and add a ConsultantRepositoryTest.java class to it.
@Testcontainers
@AutoConfigureTestDatabase(replace = AutoConfigureTestDatabase.Replace.NONE) // deactivate the default behaviour
@DataJpaTest
class ConsultantRepositoryTest {

    @Container
    static PostgreSQLContainer postgresqlContainer = new PostgreSQLContainer("postgres:11.1")
            .withDatabaseName("test")
            .withUsername("sa")
            .withPassword("sa");

    @DynamicPropertySource
    static void setProperties(DynamicPropertyRegistry registry) {
        registry.add("spring.datasource.url", postgresqlContainer::getJdbcUrl);
        registry.add("spring.datasource.username", postgresqlContainer::getUsername);
        registry.add("spring.datasource.password", postgresqlContainer::getPassword);
    }

    @Autowired
    private ConsultantRepository repository;

    @Test
    public void should_be_able_to_get_senior_consultant_by_technology(){
        //arrange
        Consultant consultant1 = new Consultant(UUID.randomUUID(), "Adam Smith", 2, "Java");
        Consultant consultant2 = new Consultant(UUID.randomUUID(), "Kim James", 2, ".NET");
        Consultant savedConsultant1 = repository.save(consultant1);
        Consultant savedConsultant2 = repository.save(consultant2);
        //act
        List<Consultant> consultants = new ArrayList<>();
        repository.getSeniorConsulantsByTechnology("Java").forEach(c -> consultants.add(c));;
        //assert
        Assertions.assertThat(consultants).hasSize(1);
        Assertions.assertThat(consultants.get(0).getName()).isEqualTo("Adam Smith");
    }
}
If we are writing tests for a repository using JPA we need to annotate the class with @DataJpaTest in order to disable auto-configuration and to apply configuration relevant only to JPA tests. By default Spring Boot tries to use an embedded in-memory database for testing which we need to prevent by adding an extra annotation, @AutoConfigureTestDatabase set to replace none.
To use Testcontainers we need add @Testcontainers annotation on the class as well.
Use the PostgreSQLContainer class provided by the Testcontainers to create a docker container with a PostgreSQL database. It’s using an image named ‘postgres:11.1’ from Docker Hub.
@Container
static PostgreSQLContainer postgresqlContainer = new PostgreSQLContainer("postgres:11.1")
        .withDatabaseName("test")
        .withUsername("sa")
        .withPassword("sa");
Then we need to configure the spring datasource with the properties of the newly created database instance.
@DynamicPropertySource
static void setProperties(DynamicPropertyRegistry registry) {
    registry.add("spring.datasource.url", postgresqlContainer::getJdbcUrl);
    registry.add("spring.datasource.username", postgresqlContainer::getUsername);
    registry.add("spring.datasource.password", postgresqlContainer::getPassword);
}
Yeah! your very own throwable PostgreSQL test container is now in business. Just autowire your repository and start calling its methods to test the repository as you wish.
Creating the projects repository
Let’s start by adding a new class to our the models package with the name Project.java.
@Document
@Data
@NoArgsConstructor
@AllArgsConstructor
public class Project {
    @Id
    private UUID id;
    private String name;
    private Date startDate;
}
@Document annotation will mark this class as a domain object for our MongoDB database.
Let’s add a ProjectRepository.java interface to our repositories package.
public interface ProjectRepository extends MongoRepository<Project, UUID> {
    @Query(value = "{ 'startDate': { '$lte' : ?0 }}")
    List<Project> getProjectsThatAreStartedBefore(Date beforeDate);
}
This interface is extended from MongoRepository interface. We have extended the functionality of the MongoRepository by adding a new query to get all projects that have started before a given date in time.
Testing projects repository
Under test folder, under repositories package and add a ProjectRepositoryTest.java class.
@Testcontainers
@DataMongoTest
@AutoConfigureTestDatabase(replace = AutoConfigureTestDatabase.Replace.NONE) // deactivate the default behaviour
class ProjectRepositoryTest {

    @Container
    static MongoDBContainer mongoDBContainer = new MongoDBContainer("mongo:4.4.2");

    @DynamicPropertySource
    static void setProperties(DynamicPropertyRegistry registry) {
        registry.add("spring.data.mongodb.uri", mongoDBContainer::getReplicaSetUrl);
    }

    @Autowired
    private ProjectRepository repository;

    @Test
    public void should_be_able_to_get_project_that_are_already_started_as_at_given_date(){
        //arrange
        Project project1 = new Project(UUID.randomUUID(), "Primary School Attendance", new Date(2022, 12, 15));
        Project project2 = new Project(UUID.randomUUID(), "Pharmacy Inventory System", new Date(2023, 4, 1));
        Project savedProject1 = repository.save(project1);
        Project savedProject2 = repository.save(project2);
        Date today = new Date(2023,2,19);
        //act
        List<Project> projects = new ArrayList<>();
        repository.getProjectsThatAreStartedBefore(today).forEach(p -> projects.add(p));
        //assert
        Assertions.assertThat(projects).hasSize(1);
        Assertions.assertThat(projects.get(0).getName()).isEqualTo("Primary School Attendance");
    }
}
Like before we are adding DataMongoTest to annotate the class, which will disable auto-configuration and configure only those components, that are relevant for MongoDB tests. In order to use Testcontainers we need add @Testcontainers annotation and deactivate the default database configuration behaviour by adding @AutoConfigureTestDatabase with replace set to none.
Use MongoDBContainer class provided by the Testcontainers to create a docker container with a mongo database. This will pull ‘mongo:4.4.2’ docker image from the Docker Hub.
@Container
static MongoDBContainer mongoDBContainer = new MongoDBContainer("mongo:4.4.2");
We have dynamically set the MongoDB database uri from the container as follows,
@DynamicPropertySource
static void setProperties(DynamicPropertyRegistry registry) {
    registry.add("spring.data.mongodb.uri", mongoDBContainer::getReplicaSetUrl);
}
All done! Your throwable MongoDB container is ready to use. Like before autowire the repository and start writing your tests.
That covers everything I wanted to share with you in this article.
Kudos to Testcontainers and the team behind this amazing project. I hope you will appreciate the value brought in by the Testcontainers as much as I do and use it as necessary for your upcoming projects.