
One of many new features that was introduced with iOS 7 is custom view controller transitions. This feature gives you full control over the animations that are used when a navigation from one view controller to another occurs, whether as a result of navigation controller push / pop, model present / dismiss or as part of a tabbed interface.
In this blog post I’ll look at how to implement a custom ‘flip’ animation which gives the impression of turning a page:
You can find the full sourcecode for this custom animation on github, in a project called VCTransitionsLibrary, which is a collection of different animations and interaction controllers.
I’ve also made a short video of this transition in action:
A brief introduction to custom transitions
The following provides a very brief introduction to the concepts, for more detailed coverage I would thoroughly recommend reading Chapter 3 of iOS 7 By Tutorials - which I wrote! (I’ve heard the other 15 chapters are pretty good too ;-)
There are two key classes involved in a custom transition:
- Animation controller - this class is responsible for performing the custom transitions. When you indicate that a custom transitions should be used, you provide an animation controller. This class performs the required animation, then informs the framework when it has completed.
- Interaction controller - this class is responsible for managing interactive transitions - these are transitions that typically controlled by a gesture, allowing the user to swipe, pinch or perform some other action to navigate between view controllers. Importantly, interaction controllers allow transitions to be cancelled, i.e. a user can start the navigation, change their mind, and reverse it!
NOTE: Animation and interaction controllers are entirely independent, this means you can wire up any interaction controller with any animation controller - which is pretty awesome.
Creating an animation controller
From the brief introduction above, it should be obvious that to implement a flip transition you need to create an animation controller. The framework provides a protocol, UIViewControllerAnimatedTransitioning, that all animation controllers must adopt. This is a pretty simple protocol with two methods, one which asks the animation controller for the duration of its animation, and the second which asks it to animate between a pair of view controllers.
A typical implementation of this protocol (minus the actual animation itself), might look like this:
- (NSTimeInterval)transitionDuration:(id<UIViewControllerContextTransitioning>)transitionContext {
    return 2.0f; // this animation lasts two seconds
}

- (void)animateTransition:(id<UIViewControllerContextTransitioning>)transitionContext {

    UIViewController *fromVC = [transitionContext viewControllerForKey:UITransitionContextFromViewControllerKey];
    UIViewController *toVC = [transitionContext viewControllerForKey:UITransitionContextToViewControllerKey];
    UIView *toView = toVC.view;
    UIView *fromView = fromVC.view;

    UIView* containerView = [transitionContext containerView];

    // your animation logic goes here
}
The transitioning context which is passed to the animateTransition: method is used to obtain the view which is being animated from- and to-. The context also supplies the container view which is the view which currently hosts the from- view and is the view within which your animation should take place.
Slicing the from- and to- view controllers
To implement the flip effect we need to fold our views down the middle, which unfortunately isn’t possible!
A simple alternative is to take a couple of ‘snapshots’ of each view, one for the left-hand side and one for the right-. Fortunately iOS 7 provides a new UIView-Snapshotting API which allows you to quickly and easily create a light-weight snapshot of a view hierarchy, or a region of a view.
To achieve this, I have created a utility method that takes a view and snapshots each side of it, returning the result as an array. This is used for both the form- and to- views:
NSArray* toViewSnapshots = [self createSnapshots:toView afterScreenUpdates:YES];
UIView* flippedSectionOfToView = toViewSnapshots[0];

NSArray* fromViewSnapshots = [self createSnapshots:fromView afterScreenUpdates:NO];
UIView* flippedSectionOfFromView = fromViewSnapshots[1];
With the utility method implemented as follows:
// creates a pair of snapshots from the given view
- (NSArray*)createSnapshots:(UIView*)view afterScreenUpdates:(BOOL) afterUpdates{
    UIView* containerView = view.superview;

    // snapshot the left-hand side of the view
    CGRect snapshotRegion = CGRectMake(0, 0, view.frame.size.width / 2, view.frame.size.height);
    UIView *leftHandView = [view resizableSnapshotViewFromRect:snapshotRegion  afterScreenUpdates:afterUpdates withCapInsets:UIEdgeInsetsZero];
    leftHandView.frame = snapshotRegion;
    [containerView addSubview:leftHandView];

    // snapshot the right-hand side of the view
    snapshotRegion = CGRectMake(view.frame.size.width / 2, 0, view.frame.size.width / 2, view.frame.size.height);
    UIView *rightHandView = [view resizableSnapshotViewFromRect:snapshotRegion  afterScreenUpdates:afterUpdates withCapInsets:UIEdgeInsetsZero];
    rightHandView.frame = snapshotRegion;
    [containerView addSubview:rightHandView];

    // send the view that was snapshotted to the back
    [containerView sendSubviewToBack:view];

    return @[leftHandView, rightHandView];
}
The above method simply uses the new resizableSnapshotViewFromRect:... method to snapshot each side of the provided view. Note that the afterScreenUpdates parameter is YES for the to- view and NO for the from- view. The reason for this is that the from- view is visible and rendered, whereas it is your responsibility to add the to- view to the container as part of the animation. Hence the snapshot needs to wait until this view is rendered.
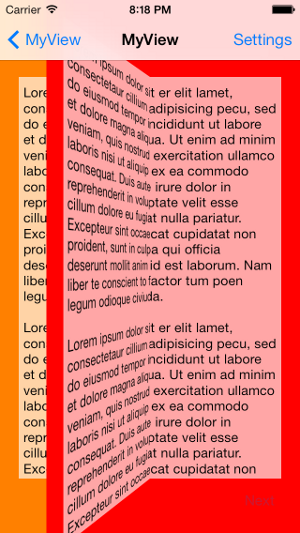
Rotating the snapshots
With core graphics it is easy to rotate a view or a layer, simply apply a 3D transform. In order to give the rotation some ‘depth’, you need to apply a perfection transform to the container.
CATransform3D transform = CATransform3DIdentity;
transform.m34 = -0.002;
[containerView.layer setSublayerTransform:transform];
At this point, if you rotate one of the snapshots you will notice that it rotates around its center point. To rotate around on of the edges of a view you need to set the anchor point of the layer. Unfortunately this will result in an offset being applied to the layer’s frame, so I created a simple utility method that compensates for this effect:
- (void)updateAnchorPointAndOffset:(CGPoint)anchorPoint view:(UIView*)view {
    view.layer.anchorPoint = anchorPoint;
    float xOffset =  anchorPoint.x - 0.5;
    view.frame = CGRectOffset(view.frame, xOffset * view.frame.size.width, 0);
}
This utility method is used to offset the snapshot from each view that is rotated:
[self updateAnchorPointAndOffset:CGPointMake(1.0, 0.5)
                           view:flippedSectionOfFromView];
[self updateAnchorPointAndOffset:CGPointMake(0.0, 0.5)
                           view:flippedSectionOfToView];
Note how one view is anchored to its left edge, and one to the right.
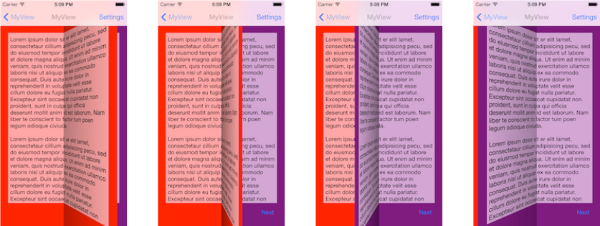
With this in place the views can now be rotated as desired:
flippedSectionOfToView.layer.transform =  CATransform3DMakeRotation(M_PI_2, 0.0, 1.0, 0.0);
flippedSectionOfFromView.layer.transform =  CATransform3DMakeRotation(M_PI_2 / 1.5, 0.0, 1.0, 0.0);
Notice that the to- view is rotated to 90 degrees, meaning that it will not be visible to the viewer.
The result of these transforms is shown below:
Animating
Animating the transition is simply a case of using the new UIView keyframes animation. The first keyframe flips the from- view, the second flips the to- view:
[UIView animateKeyframesWithDuration:duration
           delay:0.0
         options:0
      animations:^{
          [UIView addKeyframeWithRelativeStartTime:0.0
              relativeDuration:0.5
                    animations:^{
                        // rotate the from- view to 90 degrees
                        flippedSectionOfFromView.layer.transform =
                              CATransform3DMakeRotation(M_PI_2, 0.0, 1.0, 0.0);
                    }];
          [UIView addKeyframeWithRelativeStartTime:0.5
              relativeDuration:0.5
                    animations:^{
                        // rotate the to- view to 0 degrees
                        flippedSectionOfToView.layer.transform =
                            CATransform3DMakeRotation(-0.001, 0.0, 1.0, 0.0);
                    }];
      } completion:^(BOOL finished) {

          // remove all the temporary views
          if ([transitionContext transitionWasCancelled]) {
              [self removeOtherViews:fromView];
          } else {
              [self removeOtherViews:toView];
          }

          // inform the context of completion
          [transitionContext completeTransition:![transitionContext transitionWasCancelled]];
      }];
Note the clean-up code in the completion block, this is where you must notify the framework that your custom transition is completed.
Adding shadows
Now to add some more realism … as the page turns, it helps to give the impression of depth by rendering a subtle gradient. In order to add a gradient, the snapshot views are replaced with new views that contain the snapshot, with a gradient view placed over the top.
The following utility method does just that:
- (UIView*)addShadowToView:(UIView*)view reverse:(BOOL)reverse {

    UIView* containerView = view.superview;

    // create a view with the same frame
    UIView* viewWithShadow = [[UIView alloc] initWithFrame:view.frame];

    // replace the view that we are adding a shadow to
    [containerView insertSubview:viewWithShadow aboveSubview:view];
    [view removeFromSuperview];

    // create a shadow
    UIView* shadowView = [[UIView alloc] initWithFrame:viewWithShadow.bounds];
    CAGradientLayer *gradient = [CAGradientLayer layer];
    gradient.frame = shadowView.bounds;
    gradient.colors = @[(id)[UIColor colorWithWhite:0.0 alpha:0.0].CGColor,
                        (id)[UIColor colorWithWhite:0.0 alpha:0.5].CGColor];
    gradient.startPoint = CGPointMake(reverse ? 0.0 : 1.0, 0.0);
    gradient.endPoint = CGPointMake(reverse ? 1.0 : 0.0, 0.0);
    [shadowView.layer insertSublayer:gradient atIndex:1];

    // add the original view into our new view
    view.frame = view.bounds;
    [viewWithShadow addSubview:view];

    // place the shadow on top
    [viewWithShadow addSubview:shadowView];

    return view;
}
The neat thing about the above method is that is inserts the new view (which contains the snapshot and the gradient) at the same subview location as the snapshot, making it very easy to use …
flippedSectionOfFromView = [self addShadowToView:flippedSectionOfFromView reverse:!self.reverse];
UIView* flippedSectionOfFromViewShadow = flippedSectionOfFromView.subviews[1];
flippedSectionOfFromViewShadow.alpha = 0.0;

flippedSectionOfToView = [self addShadowToView:flippedSectionOfToView reverse:self.reverse];
UIView* flippedSectionOfToViewShadow = flippedSectionOfToView.subviews[1];
flippedSectionOfToViewShadow.alpha = 0.0;
The alpha values above just need to be updated within the keyframes of the animation, to give a lovely gradient effect:
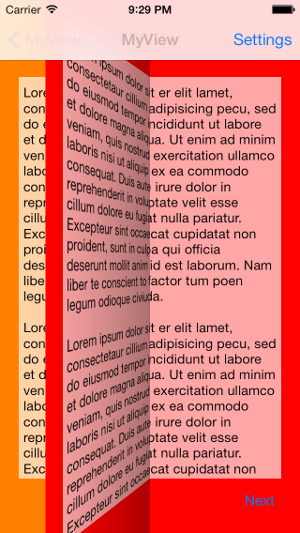
Done!!!
You can find the full sourcecode for this custom animation on github, in a project called VCTransitionsLibrary, which is a collection of different animations and interaction controllers.
Regards, Colin E.
