
In my previous blog post on view controller transitions I demonstrated how to create a page-fold animation controller. In this blog post, I’ll take the concepts a step further by showing how to create interactive tab bar controller transitions.
If you watched the WWDC video #218 “Custom Transitions Using View Controllers” you will have seen a demonstration that showed a tabbed interface where you can swipe left and right to navigate, with the view controllers folding like paper:
![]()
This blog post will show how to replicate this effect.
Here is a quick video of the effect that the transition produces:
A brief introduction to custom transitions
The following provides a very brief introduction to the concepts, for more detailed coverage I would thoroughly recommend reading Chapter 3 of iOS 7 By Tutorials - which I wrote! (I’ve heard the other 15 chapters are pretty good too ;-)
There are two key classes involved in a custom transition:
- Animation controller - this class is responsible for performing the custom transitions. When you indicate that a custom transitions should be used, you provide an animation controller. This class performs the required animation, then informs the framework when it has completed.
- Interaction controller - this class is responsible for managing interactive transitions - these are transitions that typically controlled by a gesture, allowing the user to swipe, pinch or perform some other action to navigate between view controllers. Importantly, interaction controllers allow transitions to be cancelled, i.e. a user can start the navigation, change their mind, and reverse it!
NOTE: Animation and interaction controllers are entirely independent, this means you can wire up any interaction controller with any animation controller - which is pretty awesome.
Setting up the animation
The first step is to create an animation controller which ‘folds’ the views as it transitions between them. This will use may of the same techniques I discussed in my previous blog post - snapshots, transforms and UIView animations.
The first step is to use the snapshotting API to create a copies of the from- and to- views. These copies are arranged in vertical strips, which make up the folds. The following code is executed when the animation is initiated:
CGSize size = toView.frame.size;
float foldWidth = size.width * 0.5 / (float)self.folds ;

// arrays that hold the snapshot views
NSMutableArray* fromViewFolds = [NSMutableArray new];
NSMutableArray* toViewFolds = [NSMutableArray new];

// create the folds for the form- and to- views
for (int i=0 ;i<self.folds; i++){
    float offset = (float)i * foldWidth * 2;

    // the left and right side of the fold for the from- view
    UIView *leftFromViewFold = [self createSnapshotFromView:fromView
                                    afterUpdates:NO location:offset left:YES];
    leftFromViewFold.layer.position = CGPointMake(offset, size.height/2);
    [fromViewFolds addObject:leftFromViewFold];

    UIView *rightFromViewFold = [self createSnapshotFromView:fromView
                           afterUpdates:NO location:offset + foldWidth left:NO];
    rightFromViewFold.layer.position = CGPointMake(offset + foldWidth * 2,
                                                             size.height/2);
    [fromViewFolds addObject:rightFromViewFold];

    // the left and right side of the fold for the to- view
    UIView *leftToViewFold = [self createSnapshotFromView:toView
                               afterUpdates:YES location:offset left:YES];
    leftToViewFold.layer.position = CGPointMake(0.0, size.height/2);
    leftToViewFold.layer.transform = CATransform3DMakeRotation(M_PI_2, 0.0, 1.0, 0.0);
    [toViewFolds addObject:leftToViewFold];

    UIView *rightToViewFold = [self createSnapshotFromView:toView
                            afterUpdates:YES location:offset + foldWidth left:NO];
    rightToViewFold.layer.position = CGPointMake(0.0, size.height/2);
    rightToViewFold.layer.transform = CATransform3DMakeRotation(-M_PI_2, 0.0, 1.0, 0.0);
    [toViewFolds addObject:rightToViewFold];
}
This makes use of a utility method which creates a ‘strip’ at the given offset location:
-(UIView*) createSnapshotFromView:(UIView *)view
                     afterUpdates:(BOOL)afterUpdates
                         location:(CGFloat)offset
                              left:(BOOL)left {

    CGSize size = view.frame.size;
    UIView *containerView = view.superview;
    float foldWidth = size.width * 0.5 / (float)self.folds;

    // create a snapshot
    CGRect snapshotRegion = CGRectMake(offset, 0.0, foldWidth, size.height);
    UIView* snapshotView = [view resizableSnapshotViewFromRect:snapshotRegion
                                            afterScreenUpdates:afterUpdates
                                                 withCapInsets:UIEdgeInsetsZero];

    // add to the container
    [containerView addSubview:snapshotView];

    // set the anchor to the left or right edge of the view
    snapshotView.layer.anchorPoint = CGPointMake( left ? 0.0 : 1.0, 0.5);

    return snapshotView;
}
Notice that the above method sets the anchor point of the snapshot view to either its left or right edge. Transforms use the anchor point as their origin, therefore setting the anchor point to an edge makes it easier to rotate the view around that edge.
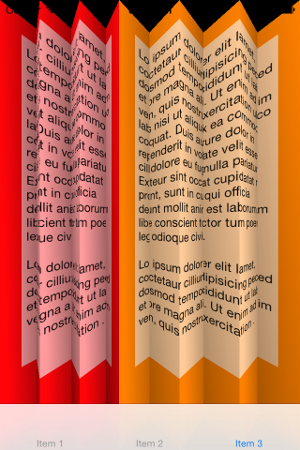
If you add a border to the snapshots you can see how they are arranged vertically as shown below:
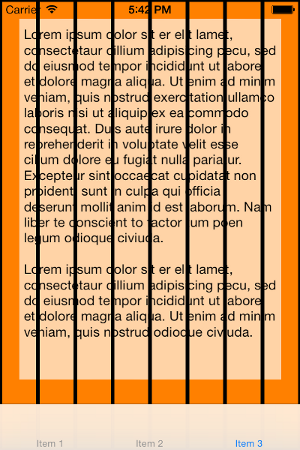
In the above screenshot you can see the ‘sliced’ view that is being navigated from, but where is the view that is navigated to? In the above code that creates the snapshots, each of the to- views has the following applied:
leftToViewFold.layer.position = CGPointMake(0.0, size.height/2);
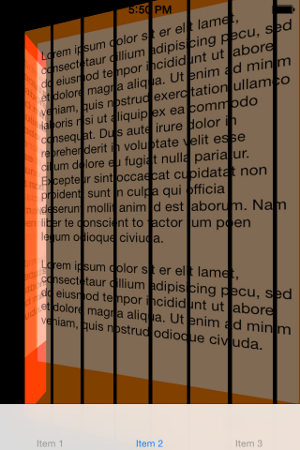
leftToViewFold.layer.transform = CATransform3DMakeRotation(M_PI_2, 0.0, 1.0, 0.0);All the to- views are located on the left hand edge of the screen and rotate by 90 degrees so that they are not visible to the viewer.
If we rotate the viewport just a little, and make the layers opaque, you can see the to- views all bunched up at the edge:
Animating the transition
The animation is surprisingly simply, within a single UIView animation, we iterate over the folds, setting the final state of each of the snapshots:
// create the animation
NSTimeInterval duration = [self transitionDuration:transitionContext];
[UIView animateWithDuration:duration animations:^{
    // set the final state for each fold
    for (int i=0; i<self.folds; i++){

        float offset = (float)i * foldWidth * 2;

        // the from- view snapshots
        UIView* leftFromView = fromViewFolds[i*2];
        leftFromView.layer.position = CGPointMake(size.width, size.height/2);
        leftFromView.layer.transform =
                          CATransform3DRotate(transform, M_PI_2, 0.0, 1.0, 0);

        UIView* rightFromView = fromViewFolds[i*2+1];
        rightFromView.layer.position = CGPointMake(size.width, size.height/2);
        rightFromView.layer.transform =
                          CATransform3DRotate(transform, -M_PI_2, 0.0, 1.0, 0);

        // the to- view snapshots
        UIView* leftToView = toViewFolds[i*2];
        leftToView.layer.position = CGPointMake(offset, size.height/2);
        leftToView.layer.transform = CATransform3DIdentity;

        UIView* rightToView = toViewFolds[i*2+1];
        rightToView.layer.position = CGPointMake(offset + foldWidth * 2,
                                                           size.height/2);
        rightToView.layer.transform = CATransform3DIdentity;

    }
}  completion:^(BOOL finished) {
    // tidy up code goes here ...
    [transitionContext completeTransition:
                      ![transitionContext transitionWasCancelled]];
}];
The above code iterates over the folds, retrieving the snapshot views from the arrays that were created earlier. The from- view snapshots are rotated by 90 degrees and have their position set to locate them at the right edge of the screen - much the same as the to- view snapshots were rotated by 90 degrees and located at the left edge at the start. The to- view snapshots simply have their transform removed and are moved to their final location.
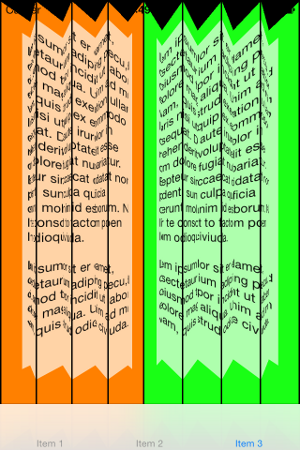
Fortunately, as the animation interpolates the frame for each layer and simultaneously rotates it, the edges are always in contact with the neighbours:
One thing you have to do is make sure you ‘clean up’ after your animation. In the case of this animation, you have to remove all the snapshot views and restore the from- and to- view to their original locations:
// remove the snapshot views
for (UIView *view in toViewFolds) {
    [view removeFromSuperview];
}
for (UIView *view in fromViewFolds) {
    [view removeFromSuperview];
}
// restore the to- and from- to the initial location
toView.frame = containerView.bounds;
fromView.frame = containerView.bounds;
One important thing to not here is that because the animation is achieved using a single UIView animation, this animation controller will work with the framework’s UIPercentDrivenInteractiveTransition class. This is a big bonus, because it means that the framework can play, rewind and step through the animation in order to make it interactive.
Adding some depth
In order to add a bit of realism and depth, I used the same technique as I described in my previous blog post, using a simple utility method to add a gradient as a child of a given view:
- (UIView*)addShadowToView:(UIView*)view reverse:(BOOL)reverse {

    // create a view with the same frame
    UIView* viewWithShadow = [[UIView alloc] initWithFrame:view.frame];

    // create a shadow
    UIView* shadowView = [[UIView alloc] initWithFrame:viewWithShadow.bounds];
    CAGradientLayer *gradient = [CAGradientLayer layer];
    gradient.frame = shadowView.bounds;
    gradient.colors = @[(id)[UIColor colorWithWhite:0.0 alpha:0.0].CGColor,
                        (id)[UIColor colorWithWhite:0.0 alpha:1.0].CGColor];
    gradient.startPoint = CGPointMake(reverse ? 0.0 : 1.0, reverse ? 0.2 : 0.0);
    gradient.endPoint = CGPointMake(reverse ? 1.0 : 0.0, reverse ? 0.0 : 1.0);
    [shadowView.layer insertSublayer:gradient atIndex:1];

    // add the original view into our new view
    view.frame = view.bounds;
    [viewWithShadow addSubview:view];

    // place the shadow on top
    [viewWithShadow addSubview:shadowView];

    return viewWithShadow;
}
With this in place, the snapshots now have a gradient as shown below:
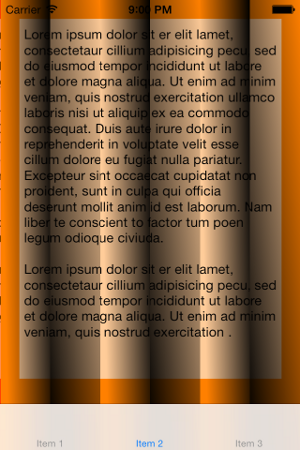
The final step is to animate the alpha value of these gradient views along with the existing animations, so that the gradient is darker as the fold increases:
Done!
Going interactive
Interaction controllers are associated with views, adding gesture recognisers, which trigger interactive transitions. In order to make tab bar controller transitions interactive, a horizontal swipe feature seems appropriate.
When the gesture starts, the swipe direction is used to determined whether to increment or decrement the tab index:
BOOL rightToLeftSwipe = translation.x < 0;

if (rightToLeftSwipe) {
    if (_viewController.tabBarController.selectedIndex <
            _viewController.tabBarController.viewControllers.count - 1) {
        self.interactionInProgress = YES;
        _viewController.tabBarController.selectedIndex++;
    }

} else {
    if (_viewController.tabBarController.selectedIndex > 0) {
        self.interactionInProgress = YES;
        _viewController.tabBarController.selectedIndex--;
    }
}
Other than the above, integrating with a tab bar controller is just the same as the required navigation controller integration.
You can obtain the source code for this interactive transition form the VCTransitionsLibrary project on GitHub.
Regards, Colin E.
