
Recently I’ve been doing a bit of research on machine learning and particularly TensorFlow and Keras. I don’t really have any prior experience of this field, and so far I’ve found that most of the resources I come across either look at these topics from quite a high level or just run through an example without explaining the steps. So I thought I’d write a blog post to help fill in the gap between those two.
As I implied before, I’m not an expert on this topic, so there’s every possibility I might not do everything in the most efficient or best way possible. So, if you spot any errors or areas for improvement, please leave a comment and I’ll endeavour to address those as and when I get the chance.
What is Machine Learning?
“Machine learning is functionality that helps software perform a task without explicit programming or rules. Traditionally considered a subcategory of artificial intelligence, machine learning involves statistical techniques, such as deep learning (aka neural networks), that are inspired by theories about how the human brain processes information.” - Google Cloud Platform
The seven steps of machine Learning
There is a series from Google Cloud Platform on YouTube called AI Adventures, and the host of that series, suggests that there are 7 steps to machine learning:
- Data gathering: you need data to do data science, funnily enough.
- Data preparation: the data needs to be formatted in such a way that the model will understand, and also needs to be split into data for training and data for evaluation.
- Choosing a model: There are a variety of different model types available and they’re each suited to different types of data.
- Training: Train the model with the training data.
- Evaluation: Test the model’s accuracy against data it hasn’t seen in training.
- Parameter tuning: adjust the various parameters of the model to try to improve it’s performance.
- Prediction: Use the model to make predictions about specific pieces of data.
From what I’ve gathered, this is a pretty accurate representation of the machine learning process. I find that it helps when getting started with machine learning to go through the steps as you write the corresponding code.
I recommend watching the series if you haven’t already.
What is TensorFlow?
“TensorFlow is an open-source machine learning library for research and production. TensorFlow offers APIs for beginners and experts to develop for desktop, mobile, web, and cloud.” - TensorFlow Website
So… yeah. That’s what it is.
What is Keras?
“Keras is a high-level neural networks API, written in Python and capable of running on top of TensorFlow, CNTK, or Theano. It was developed with a focus on enabling fast experimentation. Being able to go from idea to result with the least possible delay is key to doing good research.” - keras.io
The introductory tutorials on the TensorFlow website all seem to use Keras rather than vanilla TensorFlow. This would suggest that the smart people behind TensorFlow think that Keras is a good thing to use, at least for beginners. So, in this blog I’ll aim to cover a bit of a tutorial on each, and discuss the differences between the two implementations.
How do I use TensorFlow and/or Keras?
The basic steps are essentially what I covered above, under “The seven steps of machine learning”. We’ll go into more detail on the implementation of these steps in the tutorial.
Aside - RE: Data Science and Machine Learning terminology
If, like me, you’re new to data science, then you might find some of the terminology a bit strange. One of the main queries I had whilst working through tutorials, blogs, and YouTube videos was: “why are features and labels so often referred to as X and y?” So, usually we think of data as rows, columns, and cells. We might have headings for each. In data science there are features and labels, which are often referred to or assigned to variables as X and y respectively. This notation comes from the standardised shorthand of statistical analysis. We can think of labels as the output variables of a function, and features as the input. We input features into our algorithm and aim to get the right label out. In statistics, input variables are commonly denoted as X and output variables are denoted as y. So that’s why we have these single character variable names in our nice, otherwise well written code.
For a more verbose set of definitions for terminology used around data science and machine learning, check out the google developers machine learning glossary.
Tutorial
For the purposes of this tutorial I’m going to assume that you’re going to be using either Google Colab or Kaggle for the actual development. This makes it a bit easier to get started with TensorFlow quickly as there’s virtually no setup at all. If you’d prefer to use your local machine, that’s fine; you just have a little more legwork to do to get your machine setup. You should be able to follow this tutorial once you have TensorFlow and the other necessary libraries installed. See here for how to install TensorFlow using pip.
The dataset I’ll be using can be found here. However, hopefully the principles covered in this tutorial should be applicable to any dataset you like (in theory), as long as you take care in how you process the data and set up the model.
STEP 1 : import the necessities
# TensorFlow and tf.keras
import tensorflow as tf
# Only necessary if you're using Keras (obviously)
from tensorflow import keras

# Helper libraries
import numpy as np
import pandas as pd
import math
import pprint as pp
STEP 2: Parse the data
There are lot of different ways to parse data. For this tutorial we’ll be using pandas.
data = pd.read_csv("zoo.csv")
STEP 3: Shuffle and split the data
# Shuffle
data = data.sample(frac=1).reset_index(drop=True)
# Split
data_total_len = data[data.columns[0]].size
data_train_frac = 0.6
split_index = math.floor(data_total_len*data_train_frac)
training_data = data.iloc[:split_index]
evaluation_data = data.iloc[split_index:];
STEP 4: Separate the data into features and labels
If you want to use your own data, then it might help you at this point to visualise your data, so that you have a better understanding of how it is formatted. A useful tool for this is facets. The key pieces of information you’ll need at this point are:
- how many columns does your dataset have?
- which column holds the labels for your dataset?
You might also want to consider if there are any columns which you don’t want to include in your analysis. For instance, in this example we’re excluding the first column, since we don’t want the name of the animal to be considered when assigning a class.
column_count = 18;
label_column_index = 17 # Zero based index (so this is the 18th column)

def preprocess(data):
    X = data.iloc[:, 1:column_count-1]
    y = data.iloc[:, label_column_index]
    y = y-1 # shift label value range from 1-7 to 0-6
    return X, y
STEP 4 - A: TensorFlow only
This will be used later in defining feature columns for the TensorFlow estimator.
X, y = preprocess(data);
STEP 4 - continued: Both
(train_data, train_labels) = preprocess(training_data);
(eval_data, eval_labels) = preprocess(evaluation_data);
STEP 5 - Build the model
STEP 5 - A: TensorFlow version
TensorFlow models, aka estimators, require data to be formatted as feature columns.
feature_columns = [
    tf.feature_column.categorical_column_with_vocabulary_list(
        key = col_name,
        vocabulary_list = data[col_name].unique()
    ) for col_name in X.columns
]
The DNN classifier we’ll be using requires these feature columns to be wrapped in indicator columns. Linear classifiers can handle feature columns, as is, because the internal representation of categorical columns within that model, effectively does this conversion by default.
deep_features = [tf.feature_column.indicator_column(col) for col in feature_columns]
model = tf.estimator.DNNClassifier(
    feature_columns = deep_features,
    hidden_units = [30,20,10],
    n_classes = 7
)
So, what this does is: instantiate a Deep Neural Network Classifier, which uses the feature columns from our data. It has hidden layers of 30, 20, and 10 neurons, and is expecting to sort the data into 7 different classes.
STEP 5 - B: Keras version
model = keras.Sequential()
model.add(keras.layers.Dense(30, input_shape=(16,)))
model.add(keras.layers.Dense(20, activation=tf.nn.relu))
model.add(keras.layers.Dense(7, activation=tf.nn.softmax))
Take note: none of the tutorials that I read said this explicitly, or even implied it for that matter. So I’m going to make it clear here, so that anyone following along can avoid the confusion and resulting frustration I went through in figuring this out. In a Keras model the number of neurons in the last layer must equal the number of classes, or the model won’t work properly and you’ll see confusing results; like the model predicting values of 8 or 9, when you only have 7 classes.
The above snippet does similar things to the TensorFlow version. It creatures a Sequential model and then adds layers to it. The layers have 30, 20, and 7 neurons respectively. The input_shape is an optional parameter given to the first layer and then inferred by subsequent layers. In this case our data is an array of 16 values, and so has a shape of (16,). If it were say a 2-D array of 10 by 10 data points, then the input shape would be (10, 10).
Activations, are a topic unto themselves, and I’m not going to try to explain them here. Most examples I’ve come across use relu and softmax, as we’re using here.
“A function (for example, ReLU or sigmoid) that takes in the weighted sum of all of the inputs from the previous layer and then generates and passes an output value (typically nonlinear) to the next layer.” - Google Developers Machine Learning Glossary
STEP 6 - Train the model
epochs = 150
batch_size = 12
Epochs are the number of training passes the model will run over all of your data. Batch size is, as it sounds, the size of the batches the model will process in one iteration.
STEP 6 - A: TensorFlow version
Most methods on the model in TensorFlow require us to pass in an input function. This is how the model receives our data.
def train_input_fn():
    dataset = tf.data.Dataset.from_tensor_slices((dict(train_data), train_labels))
    # shuffle, repeat, and batch the examples
    dataset = dataset.shuffle(1000)
    dataset = dataset.repeat(epochs).batch(batch_size)
    return dataset
model.train(input_fn = train_input_fn)
STEP 6 - B: Keras version
With Keras this is a bit simpler. Rather than having to define a function just to pass this information to the model, we can just pass the data and metadata straight to the fit function on the model. However, there is an extra step in that we have to compile the model before we can use it.
model.compile(
    optimizer=tf.train.AdamOptimizer(),
    loss='sparse_categorical_crossentropy',
    metrics=['accuracy']
)

model.fit(train_data, train_labels, epochs = epochs, batch_size = batch_size)
The compile function takes a few parameters:
optimizertells the model which optimisation algorithm to use when adjusting the weights of network connections in the neural network.losstells the model an objective to try to minimise during it’s calculations. Basically this measures how far the predicted label is from the actual label. At time of writing; the Keras docs around these functions is… for want of a better word, sparse. So, I apologise for my lack of further detail (As I said before, I’m no data scientist).metricstells the model how to judge it’s own performance. We’re just interested in accuracy, and so that’s the only metric we’re using here.
STEP 7 - Evaluate the model
This is similar to training the model. It’s fairly simple with both Keras and vanilla TensorFlow, but TensorFlow requires a bit more legwork in defining an input function whereas Keras doesn’t.
STEP 7 - A: TensorFlow version
def eval_input_fn():
    dataset = tf.data.Dataset.from_tensor_slices((dict(eval_data), eval_labels))
    # repeat, and batch the examples
    # NOTE: do not Shuffle
    dataset = dataset.repeat(1).batch(batch_size)
    return dataset
model.evaluate(input_fn=eval_input_fn)
STEP 7 - B: Keras version
model.evaluate(eval_data, eval_labels)
STEP 8 - Make predictions
animal_type = ['Mammal', 'Bird', 'Reptile', 'Fish', 'Amphibian', 'Bug', 'Invertebrate']
prediction_data = evaluation_data
STEP 8 - A: TensorFlow version
As above, the TensorFlow version requires an input function. You’ve probably noticed that these input functions are all quite similar, so there’s room for improvement here. One option is to create a function which takes in the dataset and a few parameters, and generates an input function from that. However, for an introduction, I thought it best to keep these functions separate for clarity.
def predict_input_fn():
    dataset = tf.data.Dataset.from_tensor_slices((dict(prediction_data), eval_labels))
    # repeat, and batch the examples
    # NOTE: do not Shuffle
    dataset = dataset.repeat(1).batch(batch_size)
    return dataset
predictions = model.predict(input_fn = predict_input_fn)
This gives us a dictionary with a bunch of data, but we’re only interested in the probabilities for this tutorial. So we’ll extract those with the following line of code.
predictions = [prediction["probabilities"] for prediction in predictions]
STEP 8 - B: Keras version
predictions = model.predict(prediction_data)
STEP 8 - continued: Both
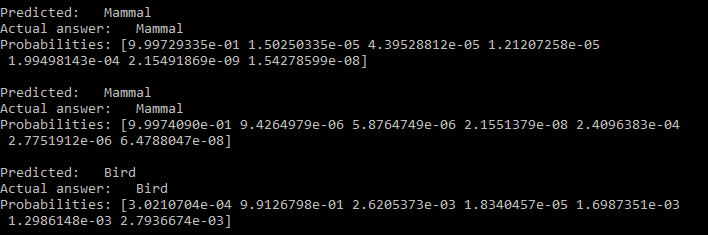
This next snippet isn’t really necessary but I find it helps to visualise the model’s predictions. It simply loops over the predictions and prints out the predicted label, the actual label, and the probabilities the model came up with for each possible label.
for i, prediction in enumerate(predictions):
  predicted_animal = animal_type[prediction.argmax(axis=-1)]
  correct_animal = animal_type[eval_labels.iloc[i]]
  print("Predicted:   {}\nActual answer:   {}\nProbabilities: {}\n".format(predicted_animal, correct_animal, prediction))
Which should give you something that looks like:
And… we’re done
So, hopefully the above has given you enough to get started with TensorFlow and Keras. With a bit of tweaking, you should be able to fit the code we’ve used here to implement a neural network to analyse almost any dataset.
Possible Next Steps?
Machine learning is an enormous field, and it can be difficult to decide where to go after getting to grips with the basics. So here are some ideas, and I’ll also post some links at the end to some of the resources I used in making this post.
- TensorFlow.js
- TF Lite for mobile
- Google ML APIs
- The proper optimisation of models:
- How many layers should I use in the model?
- How many neurons should I use for each layer?
- What type of classifier or activations do I need?
Closing
Overall I personally found vanilla TensorFlow to be a bit easier to understand and get started with. Largely because each step was a lot more explicit in my opinion, and as a developer, I like things that are explicit in what they do and what they need in order to do it. Also, at time of writing, the docs for TensorFlow are a lot more detailed than the Keras docs. However, I think Keras is really powerful, and would probably have made more sense, had I not gone straight from learning TensorFlow to Keras, which is written in an almost completely different way from vanilla TensorFlow. That all being said; I would still recommend using Keras on top of TensorFlow for most applications where you don’t need to veer too far from standard use cases, as it is much faster to write once you know how, and also it seems to actually run a bit faster than the equivalent vanilla TensorFlow.
Links
- TensorFlow official tutorials
- TensorFlow playground
- Google’s machine learning crash course
- A more in depth TensorFlow tutorial
- A guide to improving performance of your models
TTFN
Thanks very much for reading.
If you have any tips or tricks for using TensorFlow or Keras, leave them in the comments!
TTFN
