
Software development was once a slow, laborious process. Analysts would spend weeks detailing comprehensive volumes of requirements, architecture and design documents. Developers waited in the wings while stakeholders reviewed and revised the docs. Document approval sign-offs would signal when the devs could finally get coding.
The wait between project kick-off and testing was of course, even longer. There would be nothing to test until the devs had deployed the initial software releases. How long? - We’re talking months here! - Months!
It’s different now though. Projects start and devs begin chucking stuff out within days, if not hours. Teams deploy frequent, new releases to a similar rhythm. Fantastic! But how on Earth are testers supposed to keep up with this blistering pace?
Well, it’s not easy, but there is a tool that can help - Cypress. It’s a web UI automation tool designed for end-to-end, integration, and unit testing. I’ve only been using it for a few months, but I’ll tell you about my experience with it so far.
How I Discovered Cypress
Near the start of 2019, I joined a project set to deliver a web app - “Desks”. It would allow hot desk users to reserve desks in advance. I had to come up with a strategy to test the product. The strategy involved integrating an automated testing framework into the deployment pipeline.
I wanted a cutting-edge tool that worked well with React, was reliable, user-friendly and was well documented. I also wanted a tool with a large user community and positive reviews.
I Googled, “react frontend testing”, which produced many posts discussing the usual automation suspects. Selenium, Protractor, Nightwatch and Jest did not trigger my “super testory perceptive senses”, as being, “The One”. What struck me were the many comments suggesting Cypress for front-end automation testing.
I recalled a conversation I had with a young developer I was working with a few months prior. I’d asked him what he thought about Protractor - a test tool we were using at the time. His response was something along the lines of, “Forget Protractor - It’s all about Cypress!”. Since I wanted the hottest test tool out there - and given, the way to find out “what’s hot”, is to ask the Youth - I narrowed down my search to “cypress testing”.
The search results yielded several positive reviews from many Cypress users. Cypress’s developers were designing a completely fresh and new product. This meant they could escape from the old school methods and doctrines of web UI testing. They no longer had to, “always do what the user does”. Indeed - according to the headline on the Cypress homepage - “The web has evolved… Finally, testing has too”
I finally chose to give Cypress a go after asking some fellow QA testers what their favourite test automation framework was. Four said Cypress and one said Selenium. With a cheeky bit of rounding of numbers and words that’s 8 out of 10 QATs!
I cracked on. Installation was a cinch. The Cypress docs instructed me to run the npm install command. Since the project was using Yarn, I wanted to follow suit. I scrolled down the page to find instructions to run yarn add. It was clear at that point, how helpful these docs were.
The front-end was being coded in React, which out the box, is a JavaScript library. We decided for this project, that we’d use TypeScript for a more stable codebase. This required an enhanced React configuration to wire this up. To keep testing and development aligned, I installed the Cypress/TypeScript plugin.
After editing the package.json files, I was able to execute the Cypress example test suite. I ran the tests in “Interactive” mode - which displays the tests in a web UI - and in “Run” or “CI” mode - which outputs to a command line interface (CLI). The example tests are JavaScript based. Since I planned to write our tests using TypeScript, I still had a few configuration details to take care of.
TypeScript - The OCD JavaScript
The TypeScript language is a souped-up variant of JavaScript, augmented with strict typing.
JavaScript allows you to write code without having to define types for variables. For example, you can declare a variable in JavaScript as let deskId;. TypeScript does not approve of any of that “off-the-cuff” coding. If you don’t declare a variable’s type, then expect a nagging warning message or two when you compile.
Adding type information is super easy to achieve. Add a colon-prefixed type to the variable name. E.g. let username: string. If you’re accustomed to coding with typed languages - C#, Java etc. - this is not a big deal.
Things can get tricky when using TypeScript with Cypress commands. Cypress - being the supercharged implementation of JavaScript it is - may return some exotic types. TypeScript expects you to figure out and declare upfront what these types are. You may decide against doing a full investigation to determine the type of a returned value. One way you can avoid having to do so is through using a linting tool.
Reduce Coding Errors Through Linting
Many development projects - including Desks - will have adopted a linting tool. Many JavaScript developers use ESLint. A popular choice for TypeScript users is TSLint. Linting is a term used to describe a method of automated, static testing. It aims to expose potential coding issues before compilation or execution.
Word processors underline misspelt text or bad grammar as you write. Similarly, linting tool plugins for your code editor will underline any dodgy syntax as you type. Forget to declare a TypeScript variable as a number? - A red squiggly line appears underneath it. Try to declare a let instead of a const? - Red squiggly line below it. Extra white space at the end of a line? - Red squiggle!
All this fussing and red squiggling for every little thing can seem a tad nit-picky. Although it may annoy the hell out of you, in-line linting keeps your work tight, catching potential runtime errors. Long term, it improves the quality of your coding as you strive to avoid any further red-squiggle harassment.
Rubbing Requirements into Cypress with Cucumbery BDD
I still haven’t told you about the tests I wrote for Desks. Before I take you there - as it’s best practice - we’ll visit requirements. For Desks, we agreed to document requirements through Behaviour Driven Development (BDD). We entered requirements as GitHub tickets using the Connextra style notation,
As a (whatever user or role),
I want (some experience),
So that I can (benefit in some way).
This made it easy to do the whole BDD thing with Cypress. With a little web searching, the docs revealed that there was a Cucumber plugin available for Cypress. This was exactly what I needed since Cucumber is the most popular BDD support tool. The instructions to hook this up were like those given for the TypeScript plugin. Run npm install - or yarn add in my case - for cypress-cucumber-preprocessor and copy/paste a few lines straight from the doc into the plugins/index.js file. I also discovrered that the Cucumber plugin has Typescript support baked-in. So to save a bit of space, I removed the now redundant Typescript plugin.
The first story of the sprint was to allow a user to make desk bookings for the next two working days. Cucumber uses a language called Gherkin to define requirements in “.feature files”. Gherkin is a so-called Non-Domain Specific Language. It describes requirements using the same style as our project i.e. As a user…, I want…, So that…
My first task, then, was to create a feature file.
Feature Files
By default, Cypress expects to see your end-to-end test files in its “integration/” folder. Not sure why it’s the “integration” folder, but it is what it is. I copy-pasted the story from the GitHub project into a new file. I commented out the text to use as reference and saved the file as “book_desks.feature”. The name is important so please take note of it.
Cucumber feature file syntax is standard. At the top of the file is a description of the feature declared in the Connextra format. Below, are one or more scenarios. Scenario definitions follow what is often known as the “Given… When… Then…” style.
A BDD scenario is a use-case which provides a concrete example of what the feature aims to achieve for the user. Therefore, the “book desks” feature could be written as…
Given I am looking at the main screen of the app,
When I tap the tile labelled "Book desk for Today"
Then I can see that the title's text changes to "Desk booked for today"
What you read above, believe it or not, is a snippet of programming code written in the Gherkin language. If you’re thinking, “Hold on a minute matey - that’s just plain old English. Isn’t it?”, well that’s the whole idea. Gherkin is a human-readable language. All team members - from the tech-heads: testers and devs, to the business brains: product owners and BAs - should be able to understand it.
When the test runs, Cucumber reads each step of the Gherkin code. It then finds and runs the matching Java, Ruby, JavaScript or C# test code for each step.
The test code associated with the feature file generally has to be hand-coded. Some IDE plugins can spawn “starter code” from feature files. The generated code contains test methods, ready for you to add the logic.
Test File Structure
Cypress / Cucumber test files belong in subfolders within their related feature files’ folders. Each subfolder must bear the name of its parent feature file. I.e. we’d name the test code subfolder related to the “book_desks.feature” as “book_desks\”.
Standard Cypress test code uses the Jasmine framework. Jasmine code structure consists of test groups - “describe” blocks - which surround “it” blocks - the tests themselves. We, however, are not doing “standard”, we’re doing “Cucumber”, so the code for our book desks feature can start with…
import { Given, When, Then } from 'cypress-cucumber-preprocessor/steps'_


Given(`I'm looking at the app's main page`, () => {
    cy.visit('index.html')
    cy.title().should('eq', 'Desks')
})
The import statement makes the Given, When or Then functions available to the test spec. These functions map to the steps declared in the corresponding feature file.
We can define every step of a feature in a single test spec. But I find it more effective to split out each step into separate files. The big win here is where steps repeat across features. We could reuse a single instance of the step, “Given I have logged in”, for many features if required. To enable this reuse, we store common steps in a folder named “common”, located at the same level as the feature files.
Based on the above, the file structure might look like this…
test/
– cypress/
—- integration/
—— book_desks/
——– i_tap_the_tile.spec.ts
——– i_can_see_the_titles_text_changes_to_desk_booked.spec.ts
—— book_desks.feature
—— common/
——– i_am_looking_at_the_main_screen_of_the_app.spec.ts
Scenario Outlines: Cucumber’s Secret Weapon!
There are times when scenarios can become somewhat repetitive. The example below illustrates this point.
Feature: Book desk for the next viable working day
    As a desk user
    I want to be able to book a desk for the next working day
    So that I don't accidentally book, e.g., at the weekend.


    Scenario: Book desk for the next working day on Monday
        Given I have no desk bookings
        And I'm looking at the app's main page on Monday
        When I book a desk for the next working day
        Then I see the desk number booked for Tuesday


    Scenario: Book desk for the next working day on Friday
        Given I have no desk bookings
        And I'm looking at the app's main page on Friday
        When I book a desk for the next working day
        Then I see the desk number booked for the following Monday


    Scenario: Book desk for the next working day on Christmas Eve
        Given I have no desk bookings
        And I'm looking at the app's main page on Christmas Eve
        When I book a desk for the next working day
        Then I see the desk number booked for the next working day after Boxing Day``
The above feature contains three different scenarios. Despite this, the text of each of them is in fact around 93% identical. We can remove this duplication using my favourite Gherkin syntax - the Scenario Outline.
Scenario outlines allow you to parameterise the changeable values of a test. By doing so means you only need to write the repeated text once. For example, you can condense the above scenarios to the following…
Scenario Outline: Book desk for the next working day on '<day>'`
    Given I have no desk bookings
    And I'm looking at the app's main page on '<date>'
    When I book a desk for '<next working day>'
    Then I see the desk number booked for '<next working day>'


    Examples:
        | day              | date        | next working day |
        | Thu End of Month | 30 Apr 2019 | Tomorrow         |
        | Friday           | 02 Aug 2019 | Monday           |
        | Christmas Eve    | 24 Dec 2019 | Friday           |
Just look at how lean the code has become!
The Code
Once you have prepared the feature file, someone’s going to have to write the Cypress test code. That someone may well be you!
Here’s an example snippet to show how a single test step definition function might look.
``` import { Given } from ‘cypress-cucumber-preprocessor/steps’
Given(I'm looking at the app's main page on {string}, (currentDay: string) => {
const now = Date.parse(currentDay)
// tslint:disable-next-line: no-any
cy.clock(now, [ ‘Date’ ] as any)
cy.visit(‘index.html’)
cy.title().should(‘eq’, ‘Desks’)
})
```
Cucumber will run the above step definition function when it reads a matching step in a feature file. The function receives the currentDay value from the related scenario outline examples table. It then repeats, replacing the currentDay value defined by each row.
The scenario outline allows us to write the function once instead of repeating many variants of the same code. This is a good example of the software development pattern known as “DRY” - Don’t Repeat Yourself!
Execution
Soon, you’ll have written your first test and will be bristling with excitement to run it. You can kick off Cypress tests via the CLI using NPM or Yarn commands. You can choose from 2 test run modes: Interactive or; Shell/Run.
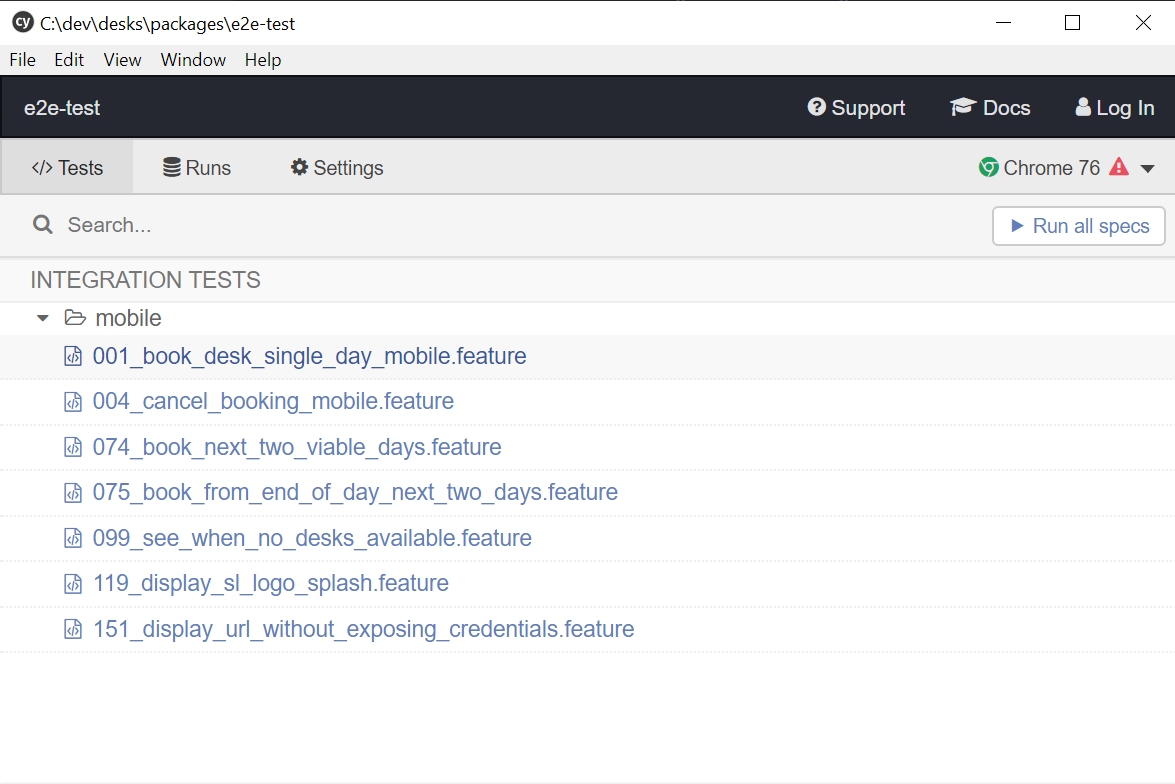
Interactive mode displays a web UI listing your tests, the test setup and the controls to run the tests. When you hit the Run button or click on a test, a second window opens which allows you to follow the tests in real time.
You may start the Cypress interactive test console via your choice of CLI. Windows CMD, PowerShell and Linux bash shell are all supported. If you’re using NPM, enter, ./node_modules/.bin/cypress open. If - like myself - you have opted for Yarn, spin up Cypress with the command, yarn cypress open.
Clicking on a test in the list will open a new browser window which will display the test as it executes as shown below.
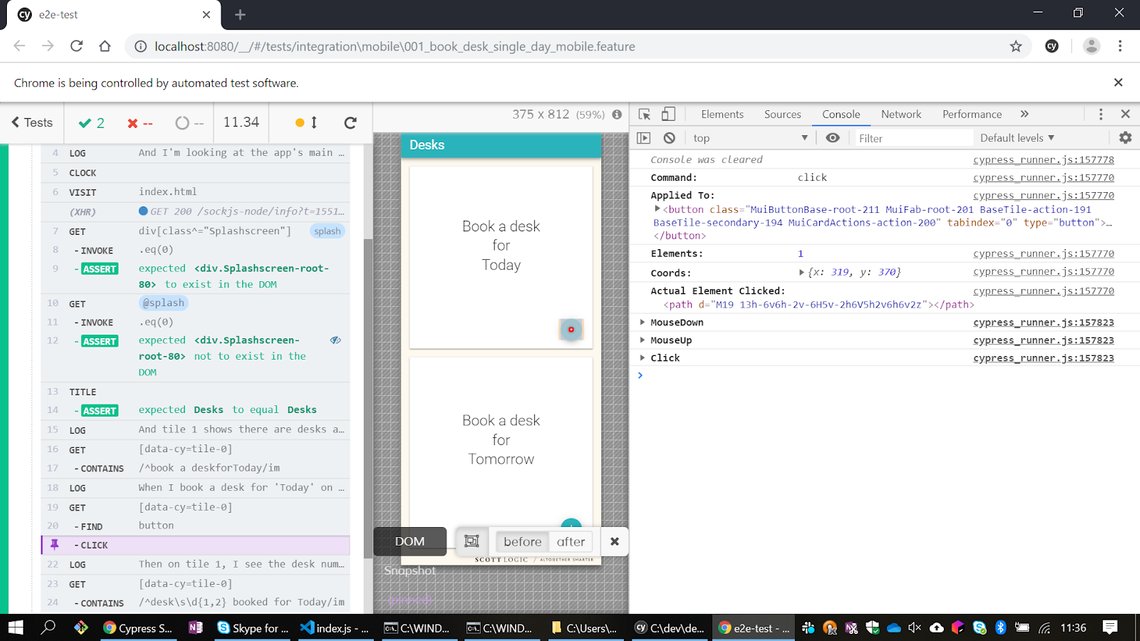
The pane to the left is a log of every command executed during the test. In the centre is a rendering of the browser window as it would appear to the user. The section to the right loads when you open Cypress’ Dev Tools Console.
Selecting an item in the command log displays details of that item in the dev tools view. The wonderful thing about the Cypress is that it allows you to time travel! This means that clicking on a command transports you back to it’s execution time. You’re able to examine the state of the application including the appearance of the UI, as it was. Read more about the Cypress Test Runner
Environment Configs
Cypress provides config files - including cypress.json and cypress.env.json - in which you may define custom environment variables. Variables ensure that tests use the correct environment-specific URLs, backend connection parameters, and user credentials. Config files avoid hard-coding repetitive environment values within the test code.
For example, if you had 100 test cases, each required to load the application’s homepage. With no environment variables, you’d have to hard code the command cy.visit('http://www.ultra-app.com/mainpage.html') 100 times. If the URL were to change, you’d also have to make sure you edited it 100 times.
With a “baseUrl” variable defined in the config, the command would be… cy.visit('') . If the URL were to change, you’d only need to update it once in the config file and not in every test spec as in the prior example.
Software developments tend to deploy to different environments at different release stages. Development, test and production environments have their own, unique set of environment properties. Config files allow you to edit the endpoints and base URLs etc. once, before each test suite run. But there’s a better way which will avoid this tedious task.
Cypress provides a “plugins” file which you can code to switch to the environment defined at the command line. Using a plugins API would allow you to start Cypress with a command like yarn cypress:open:qa. This would load the various properties associated with the QA environment. Go to the following link for more details. Cypress Configuration API pages.
Serial Asynchronous Commands
One of the things I love about Cypress is what they’ve done to simplify writing sequential test steps. JavaScript apps are single-threaded and can only carry out one task at a time. Users hate waiting for slow-to-complete processes such as network requests. JavaScript overcomes delays by initiating functions immediately, one after the other. If the previous function hasn’t had a chance to complete or return a value then tough - the show will go on, regardless!
If the function needs only internal data - e.g. for a simple maths calculation or a short string conversion, then no problem. It returns the result immediately before the next command begins. If the function needs to wait for data from an external server - such as a database or an API endpoint - then that response will come when it comes. The JavaScript process won’t wait for the response, it will move straight to the next job on the stack and deal with the response whenever it finds an available slot.
This can make test coding hard, since we often use data returned from network requests. Take the following pseudocode for example:
1. request day's user logins from server
2. const daysLogins = response.logins
3. const hourlyLogins = daysLogins / 24
4. print hourlyLogins
This code will fail to produce the expected result. When we arrive at step 3, we will not yet have a daysLogin value and your test will fall flat on its face.
Cypress helps you to avoid situations like the above by automatically “chaining” commands. Cypress commands are “promises”. Chained promises will wait until the previous promise in the chain has resolved. In case your eyes have started to glaze over with all this talk of promises and chaining, I’ll stop right here. If you want more, the links below should satisfy your thirst.
How Was It?
Believe or not, this was the tip of the iceberg of my virgin journey into Cypress testing. You may ask, “Was it a good experience? Was it easy to learn? Did it provide everything required out of the box to test effectively? Did it help us to deliver the best desk booking application the world has ever seen?”. The answers to the above are Yes!, Yes!, Yes! And let’s leave that one for another blog!
I enjoyed my first foray into Cypress. Although it’s bursting at the seams with features, they’re all logically put together and work just as I want them to, out of the box. Where it doesn’t quite meet your requirements it’s customisable too. If you need fancy reports or want to test WebSockets - with a plugin or some coding - it’s all doable. Amazingly, you get all this and more for the low, low price of free! A common complaint I hear about Cypress - including from those two QATs I mentioned earlier - is its lack of of support for cross-browser testing. In February 2020, Cypress made the shock announcement that they had added support for both Firefox and Edge. I mean, what more could you possibly want from a tool? - Safari support?