
Pebble recently released their version 4.0 development kit, and one of the primary features was the addition of writing watchfaces and apps in JavaScript. There are a few notable limitations to the SDK as it stands, such as not being able to communicate between phone and watch via message keys, and most importantly not being able to publish on the Pebble store. The Pebble runs JavaScript using Samsung’s JerryScript, intended for Internet of Things devices.
Conveniently, Pebble have a cloud-based development platform that makes use of virtual machines and also your own watch to develop apps. There’s some particularly nice features in there, such as being able to take a screenshot of your watch, which came in handy for showing what the watch face looks like!
Getting started using CloudPebble was straightforward. It was a case of creating a Rocky.js project and creating the index.js file, and I was good to go. Starting off rather simply, Rocky.js, which is the library used for rendering and communication, needed to be loaded:
var rocky = require('rocky');Because this is a watchface, the app needs to render the display, and that was a simple case of adding an event listener to the draw event.
rocky.addEventListener('draw', function(event) {
    // event.context is the canvas context
});
The canvas context itself was easy to used, having previously used the canvas API. I started out by rendering the three background colours I used:
var ctx = event.context;
var bounds = { width: ctx.canvas.unobstructedWidth, height: ctx.canvas.unobstructedHeight };
// Clear the previous selection.
ctx.clearRect(0, 0, ctx.canvas.clientWidth, ctx.canvas.clientHeight);
// Render the 3 stripes
ctx.fillStyle = '#ff00aa';
ctx.fillRect(0, 0, bounds.width, bounds.height / 3);
ctx.fillStyle = '#ff55ff';
ctx.fillRect(0, bounds.height / 3, bounds.width, 2 * bounds.height / 3);
ctx.fillStyle = '#ff00ff';
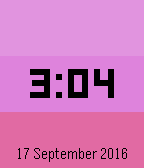
ctx.fillRect(0, 2 * bounds.height / 3, bounds.width, bounds.height);The API for the canvas has some interesting, yet understandable, quirks. For instance, defining a font style has to be one of the pre-defined list. Colours can be any hexcode, Pebble colour code or some (not all!) CSS colour codes. I needed to render the time with one of these fonts in the predefined list, and I opted for the largest available one: 42px bold numbers Leco-numbers.
    ctx.fillStyle = 'black';
    ctx.textAlign = 'center';
    // One of Pebble's predefined list items.
    ctx.font = '42px bold numbers Leco-numbers';

    var time = new Date();
    ctx.fillText((time.getHours() > 12 ? time.getHours() % 12 : time.getHours()) + ':' + (time.getMinutes() < 10 ? '0' + time.getMinutes() : time.getMinutes()),
        bounds.width / 2, bounds.height / 2 - 28);

    ctx.font = '18px Gothic';
    ctx.fillText(time.getDate() + ' ' + months[time.getMonth()] + ' ' + time.getFullYear(), bounds.width / 2, bounds.height - 27);
Additional logic ((time.getHours() > 12 ? time.getHours() % 12 : time.getHours())) had to be employed for the hours, since it was in 12-hour format. time.getHours() % 12 would have meant that at 12:00, the watchface would’ve displayed 00:00. time.getHours() % 13 would’ve made all the hours after noon an hour off (for example, 1:00 PM would have registered 0:00). A simple left-pad ((time.getMinutes() < 10 ? '0' + time.getMinutes() : time.getMinutes())) was employed on the minutes so that minutes within the first ten minutes of an hour (‘12:00’) wouldn’t render as single digits (‘12:0’).
The date render was largely trivial, with the only complication being that the month’s name had to be looked up in an array (['January', 'February', ...]).
I didn’t do much in the way of rendering these using measured proportions, since I was largely looking at just making a watchface with a few bells and whistles. The API supports it, however. The numbers you see above (for example bounds.height / 2 - 28) were just numbers arrived to by experimentation on my own watch.
Since the watchface was now rendering, it needed to render again every minute:
rocky.on('minutechange', function() {
    rocky.requestDraw();
});
In order to make the watchface a little more complicated (and to make it different every time I looked at it), I rotated the background rectangles’ colours every minute.
var allowedColours = ['#ff00aa', '#ff55ff', '#ff00ff'];
var animationFrame = 0;

rocky.on('draw', function(event) {
    // Render the 3 stripes
    ctx.fillStyle = allowedColours[animationFrame % 3];
    ctx.fillRect(0, 0, bounds.width, bounds.height / 3);

    ctx.fillStyle = allowedColours[(animationFrame + 1) % 3];
    ctx.fillRect(0, bounds.height / 3, bounds.width, 2 * bounds.height / 3);

    ctx.fillStyle = allowedColours[(animationFrame + 2) % 3];
    ctx.fillRect(0, 2 * bounds.height / 3, bounds.width, bounds.height);

    animationFrame++;
    animationFrame %= 100;
});
Every time draw was called, the counter was incremented and so the background colours would alternate. I’d tried this animation for the first 10 seconds of every minute, via:
rocky.on('secondchange', function() {
    if (new Date().getSeconds() < 10) {
        rocky.requestDraw();
    }
});
Though, ultimately I decided that the additional overhead of a new event listener for seconds changing wasn’t worth it, as the battery drain I experienced was noticeable over prolonged use. However, as with all matters battery related, your mileage may vary.
My complete watch code ended up as:
var rocky = require('rocky');
var months = ['January', 'February', 'March', 'April', 'May', 'June', 'July', 'August', 'September', 'October', 'November', 'December'];
var allowedColours = ['#ff00aa', '#ff55ff', '#ff00ff'];

var animationFrame = 0;

rocky.on('draw', function(event) {
    var ctx = event.context;
    var bounds = { width: ctx.canvas.unobstructedWidth, height: ctx.canvas.unobstructedHeight };

    // Clear the previous selection.
    ctx.clearRect(0, 0, ctx.canvas.clientWidth, ctx.canvas.clientHeight);

    // Render the 3 stripes
    ctx.fillStyle = allowedColours[animationFrame % 3];
    ctx.fillRect(0, 0, bounds.width, bounds.height / 3);

    ctx.fillStyle = allowedColours[(animationFrame + 1) % 3];
    ctx.fillRect(0, bounds.height / 3, bounds.width, 2 * bounds.height / 3);

    ctx.fillStyle = allowedColours[(animationFrame + 2) % 3];
    ctx.fillRect(0, 2 * bounds.height / 3, bounds.width, bounds.height);

    ctx.fillStyle = 'black';
    ctx.textAlign = 'center';
    ctx.font = '42px bold numbers Leco-numbers';

    var time = new Date();
    ctx.fillText((time.getHours() > 12 ? time.getHours() % 12 : time.getHours()) + ':' + (time.getMinutes() < 10 ? '0' + time.getMinutes() : time.getMinutes()),
        bounds.width / 2, bounds.height / 2 - 28);

    ctx.font = '18px Gothic';
    ctx.fillText(time.getDate() + ' ' + months[time.getMonth()] + ' ' + time.getFullYear(), bounds.width / 2, bounds.height - 27);

    animationFrame++;
    animationFrame %= 100;
});

rocky.on('minutechange', function() {
    rocky.requestDraw();
});

rocky.requestDraw();
I was happy with the result of about half an hour’s work building the face and then a further half hour with some experimentation. It’s still undergoing development, but the ability to run JavaScript on a watch at all is impressive. There are still the limitations of this iteration of Rocky.js, such as being able to send messages between phone and watch via message keys, and accessing timeline and health data. Hopefully, when these APIs are added, some more complex watch apps could be created.
