
Earlier this year, I worked with a few of my colleagues in the Scott Logic User Experience (UX) Design team to run our first Design Sprint on one of our internal projects. It was a great learning experience and turned out to be a very effective way of working for a team of 3 UX Designers. We have already started applying what we’ve learned on our client projects. We are hoping to run an enhanced version of a Design Sprint 2.0. on another project in the near future.
Design Sprint
When not on client projects at Scott Logic, we often have the chance to work on internal projects. Not only does this let us make useful and fun tools for use around the workplace, but it also provides a safe space to try new approaches or working practices. Earlier this year, I had the opportunity to work alongside 2 of my UX Designer colleagues to design a web application that our recently started Graduate Developers would code. The aim was to redesign our system for Magic the Gathering (MtG) players in our office to keep track of their league standings. Appointed as a Product Owner of the project we had James, who is the chief of the league at work. We wanted to take advantage of this opportunity to learn something new outside of the typical client project pressures and contraints.
“The sprint is a five-day process for answering critical business questions through design, prototyping, and testing ideas with customers.” – Google Ventures
I had read about Design Sprint in “Sprint: How to Solve Big Problems and Test New Ideas in Just Five Days” by Jake Knapp and had been looking for an appropriate opportunity to learn more about it and put it into practice.
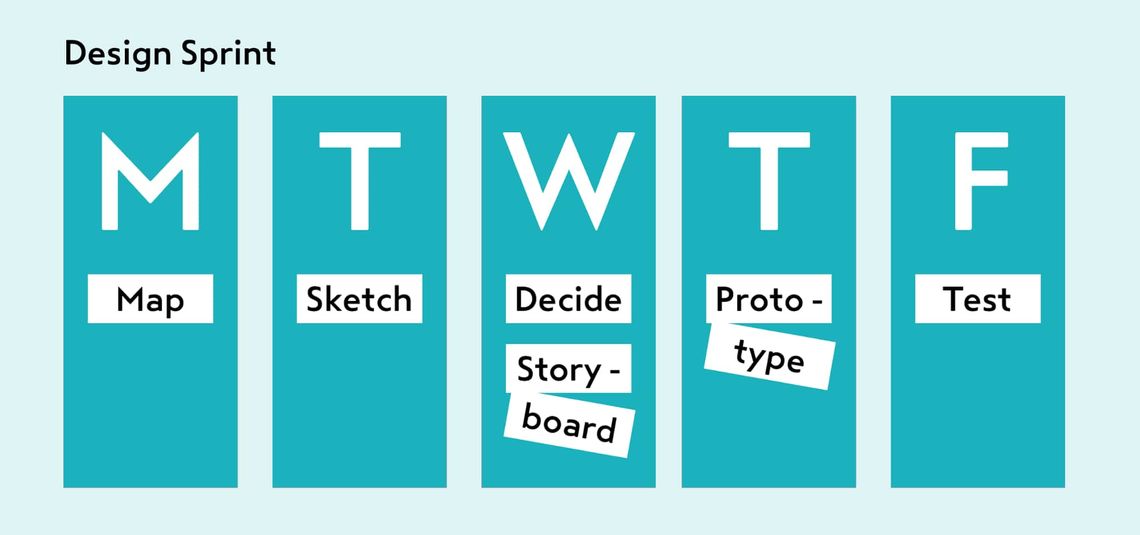 Design Sprint in short
This project seemed like the perfect fit to try out Design Sprint method.
And so I proposed the idea to Darren and Mark, and they very happily jumped on board. That meant the following Monday we would start working on our project using the Design Sprint method. That gave us 2 days to prep including getting up to speed on what’s in the book, and print out the handy checklists. We were all excited about the concept as we had not had a chance to work together before in this manner. We were all quite curious about what Design Sprint entailed.
Since the Design Sprint method is designed to last 5 days, I will try to describe each day, activities that we did that day and provide a little reflection on the effectiveness and difficulty of doing them the first time round.
Day 1 - Map
We kicked off the first day by listing our ambitions for this project in the form of long-term goals. Then to unwrap how we might achieve those goals, we listed questions we would like to answer in our first sprint. This gave us a general direction for the project and for the sprint. We then proceeded to mapping. What we were aiming to achieve with this exercise is a simple map of the end to end experience for a given service. To accomplish that, everyone in the group separately maps a timeline of events between start and end of a given experience. At the start of the sprint, the team agrees who the actors are in this experience, how they get to the service and where the experience ends. Then everyone fills in the blanks using post it notes. Once everyone shares their timeline, you create a single map that incorporates everyone’s findings.
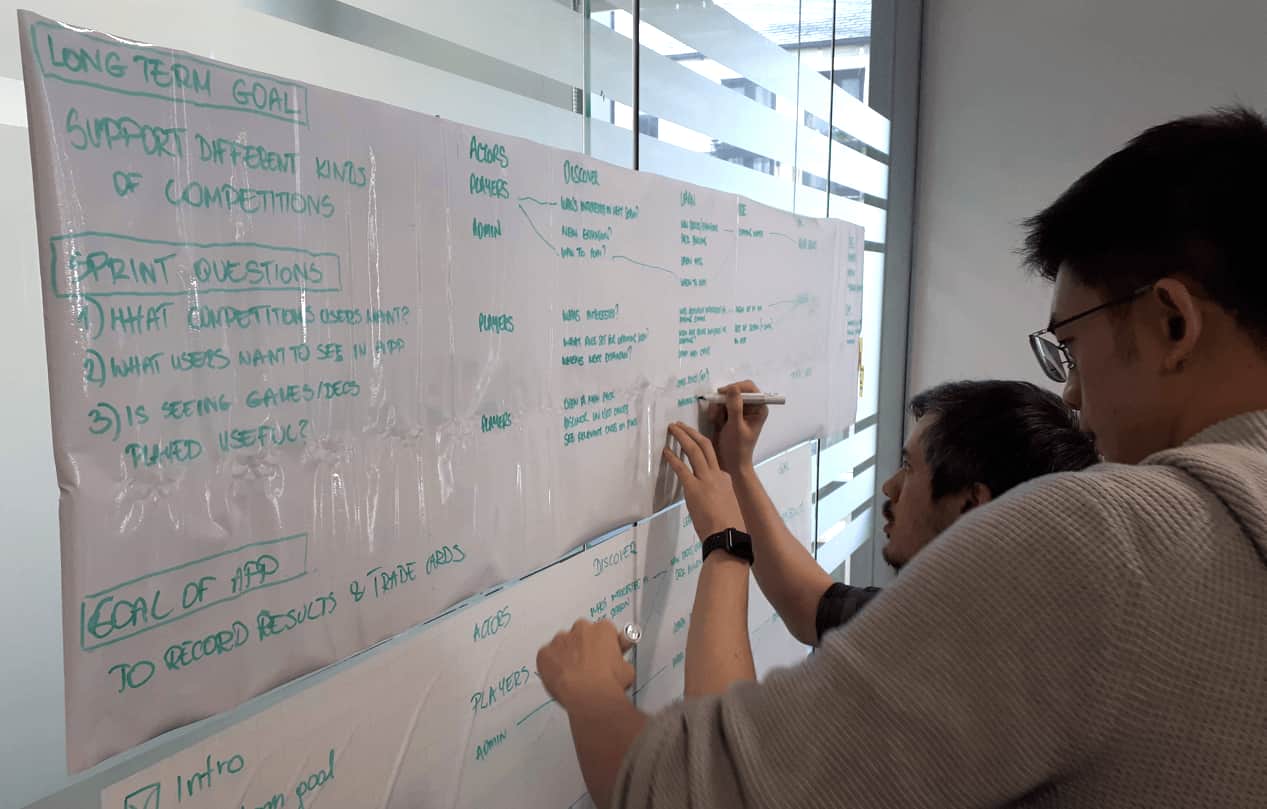 Our first mapping exercise in Design Sprint 1.0.
In the afternoon of the day 1 we had organised four 30-minute slots for interviews with experts. In our case experts were the users of the application - MtG office players. According to the Design Sprint method, this activity requires notes to be taken in a very specific format: the How Might We (HMW) format. We encouraged experts to express pain points they faced in the existing application and captured user needs in the HMW format. It is quite a specific but not too narrow kind of question e.g. “ How might we ensure the application is low maintenance”. Once we captured all the goals, problems and requirements into HMW’s, we found it very easy to read them - they were all written in the same way and we captured them on post-it notes so they were short and succinct.
We found the process to be awkward at first because we had not done it before. It was quite taxing to keep rephrasing the requirements into HMW’s. After the first interview we decided one of us would take HMW’s notes while the two others lead the interview. We wrote down a short list of questions for our experts - it made it efficient to take turns asking questions and capturing notes. Upon finishing the interviews, we organised our notes and voted on the ones we thought were worth tackling in the first sprint. Since we could not have our Product Owner’s take part in all activities throughout the week we tried to get him involved in only strategic decision points e.g. confirming what we should be working on in the first sprint.
Day 1 of the sprint was long and by the end of it, we were all exhausted. However, ticking off the items from our to-do list for that day was very satisfying. A wall we had to ourselves started filling with post-its and posters from the activities. We could feel the momentum building. The next day was all about getting into the creative mode and sketching.
Day 2 - Sketching
Day two started with an exercise called Lightning Demos. It required a bit of online research looking for inspiration on how competitors tackled similar issues. We all thought this was the least useful activity we did in the whole sprint as it felt a little bit too early to look for solutions. At the time, we kept going through the exercises outlined in the book as closely as we could and left our opinions for a discussion later.
The ‘Divide or Swarm’ exercises from the Design Sprint Methodology didn’t feel necessary either. Its goals were to help decide which parts of the map we would each focus on in the sketching phase. Since the scope of our sprint was narrow, we all agreed to sketch the same part of the map and pick the best elements. We spent about 20 minutes making notes that would help our sketching exercise, and another 20 minutes jotting down the ideas that emerged from note taking.
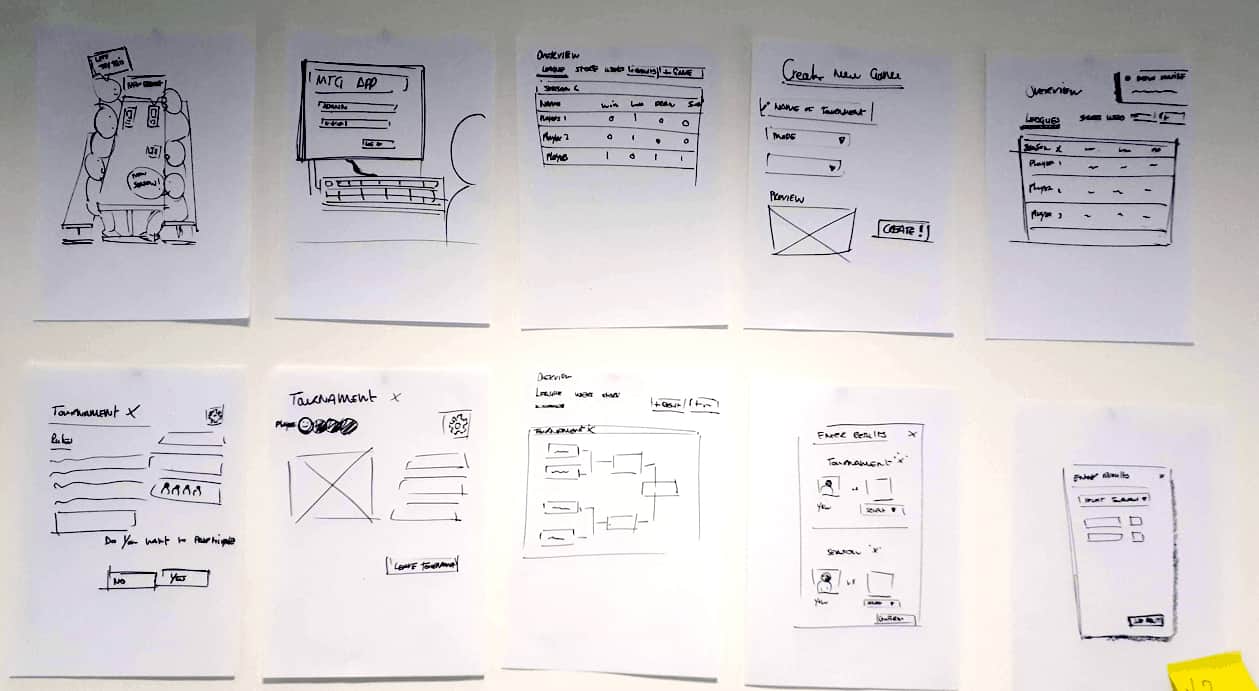
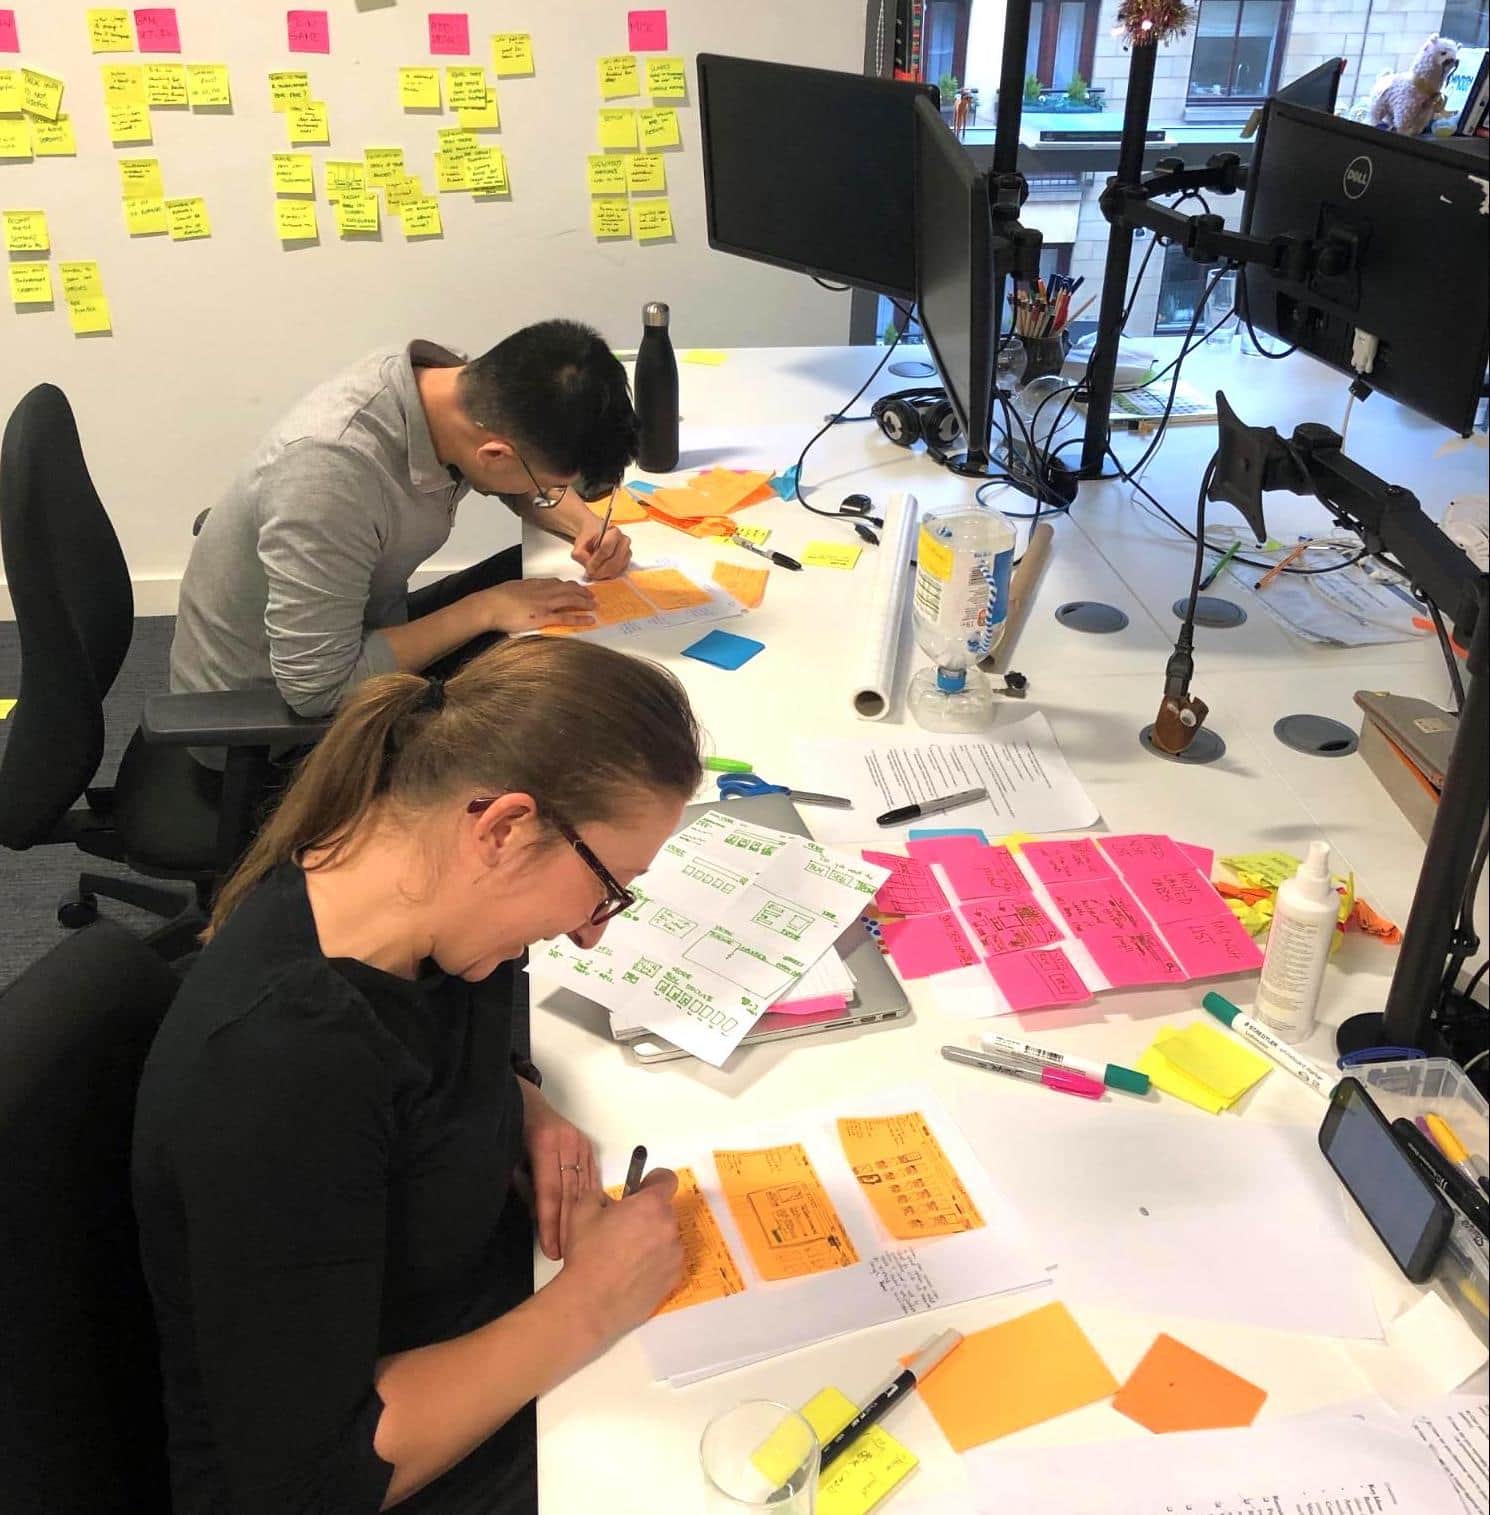 Detailed sketching - Day 2
Equipped with organised notes and ideas, we sat down to do some ‘Crazy 8s’ sketching. The idea is to work quickly through 8 different ideas for the solutions to the problem. Each sketch should take a maximum of 1 minute, and the whole activity no more than 8 minutes! Crazy, right? That’s what we thought as well. Yet, once we were over with this exercise, it turned out to be not as difficult as we all feared. Note taking and ideas scoping earlier made this exercise easier. We stretched our creative muscles over 8 minutes, and we were all ready for more activities. This time, we had to make a detailed sketch. Using 3 large post-it notes (double the normal size) we were to draw a detailed sketch that captured the main activity of the design sprint for the week. Again, we were to do it individually, and we had 45-90 minutes for that activity. The sketch had to be self - explanatory, and we could optionally add notes to the sides of the post-it notes to better describe the process. That activity was fun. Having done the ‘Crazy 8’ right before primed us with good ideas and made the detailed sketch easier to go through.
That concluded the day. We had not talked to each other all afternoon that day. We collaborated to achieve the same goal but worked individually. We managed to do some good deep work that day.
Day 3 - Decide
On the Day 3 we shifted toward decision making. We did that partly through discussions. Design Sprint activities are thoughtfully designed to make these discussions meaningful. The morning started with a handful of those activities.
First, we hung all the detailed sketches and spent some time looking over them and reading through the side notes. Once everyone had a chance to make sense of these, we all voted on the elements of these sketches that we thought were interesting. Then, we got to do a quick critique (3min long) of each sketch. The format of that activity was again totally new to us and we had to do it with the book in one hand carefully checking if we were doing it right. It became easier by the time we were critiquing the third sketch. Once we had critiqued all our designs, we voted again on the personal favourite sketch. Since we had unanimously voted for the same thing (red dots on the photo) we did not have to ask our Product Owner to help with the Super Vote (the final decider).
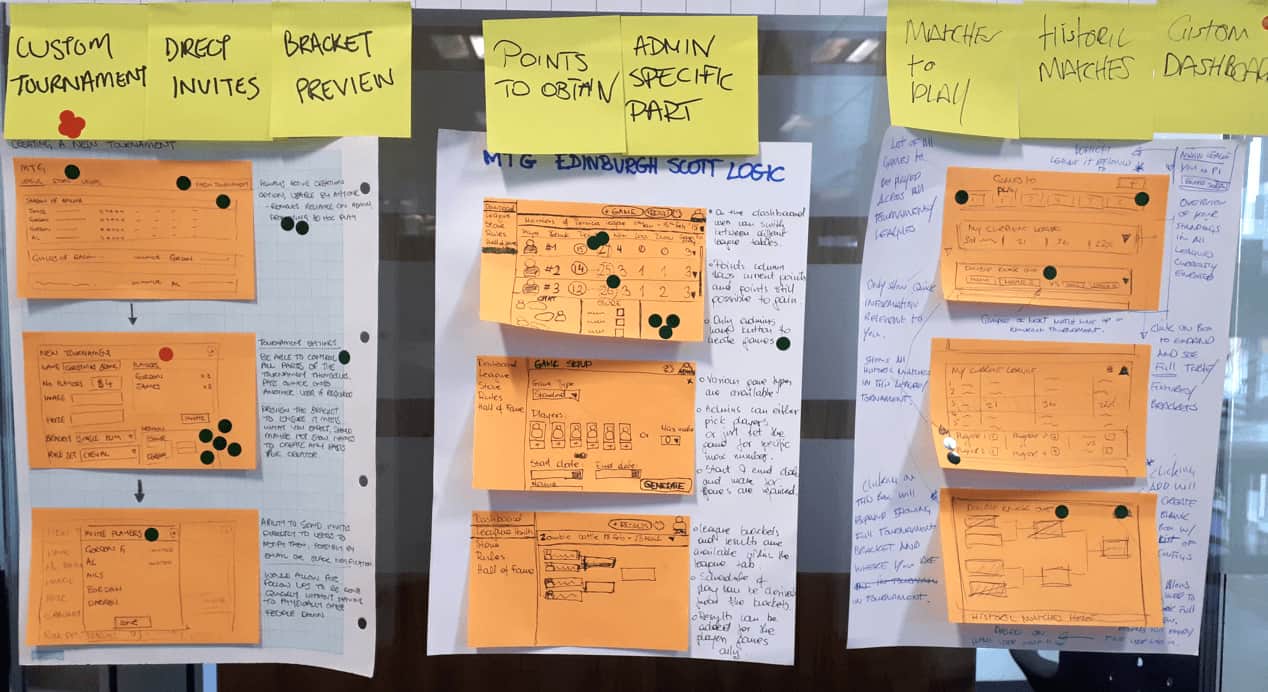 Detailed sketching and dot voting - Days 2 & 3
Next several activities authors propose are to help decide which ideas should go through and which should not. We did not feel the need to use them as we were all quite aligned already on what we were targetting. Without a doubt there would be more designs and solutions to choose from had we worked in a bigger group of 5-7 people as authors suggest. And these activities are specifically for that - to help with the art of decision making.
Storyboarding was the only thing left to do on Day 3. We started off by drawing a grid with 15 quadrants. In the first one we put the entry point for the application. We then created a 10-step storyboard. Darren was in charge of sketching, while we all discussed thoroughly each quadrant of the storyboard. The process was very time consuming. However, these discussions meant that we were ready for day 4.
 Storyboard - Day 3
Day 4 - Prototype
Day 4 is when ideas begin to take shape. We started the day by creating an early prototype in Sketch. It consisted of a wireframe with a navigation menu.
 Early prototype - Day 4
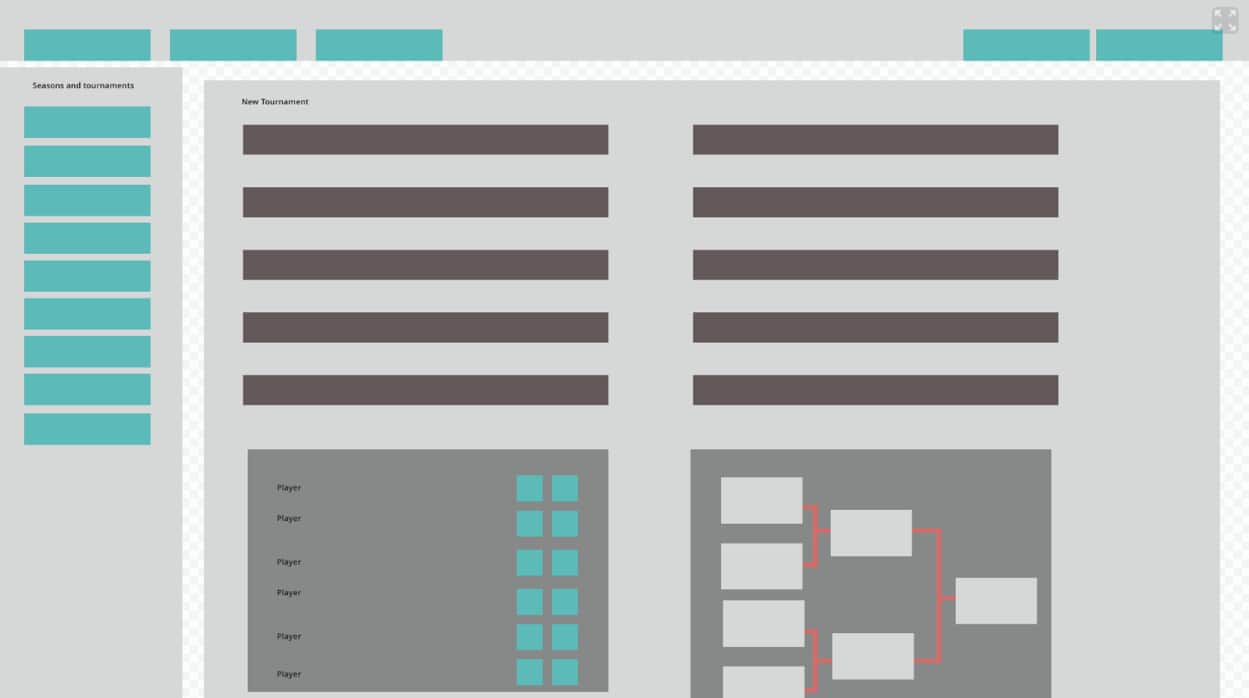
We then worked individually on specific elements of the application. It was very time effective. We were co-located so it was easy to review designs collaboratively. By the end of the day, we had managed to design a mockup of the application. We used InVision to create an interactive prototype.
 Prototype - Day 4
Day 5 - Testing
Day 5 was allocated for testing. We tested the prototype with 5 MtG players using two rooms. One room was used for testing and had the prototype on a large PC screen. We used a screen sharing software to observe users in the second room. Throughout the sessions we observed users and took notes.
A tip to speed up the note taking required drawing a grid with columns for key elements of the prototype and rows for each participant. Observers took notes as the testing was ongoing. That meant that not only were the notes taken in context but also organised and grouped for easy analysis at the end of the day.
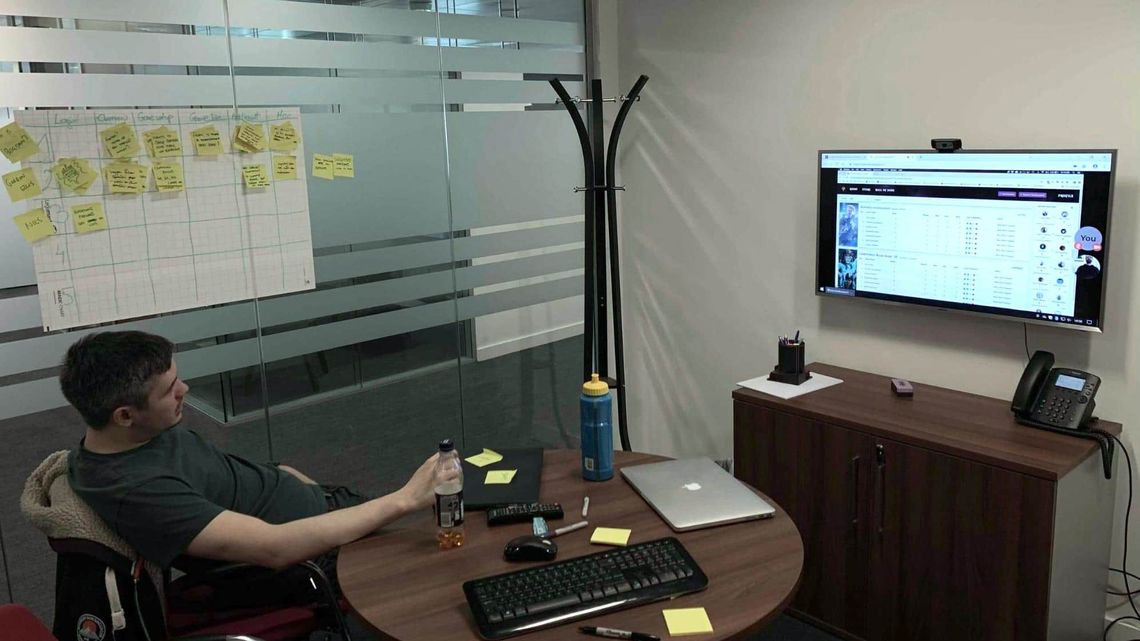 User testing observation and note taking - Day 5
We spent half the day refining the prototype & the testing script and the other half user testing. Testing sessions lasted 20 minutes. Once we had finished all the sessions we discussed the changes we would need to make to our prototype. The feedback we got from users was very positive, and the design tweaks we needed to make were trivial.
We all had another week to spend on the MTG application and we decided to work through it using the Design Sprint 2.0. So, what are they key differences between 1.0 and 2.0?
Design Sprint 2.0
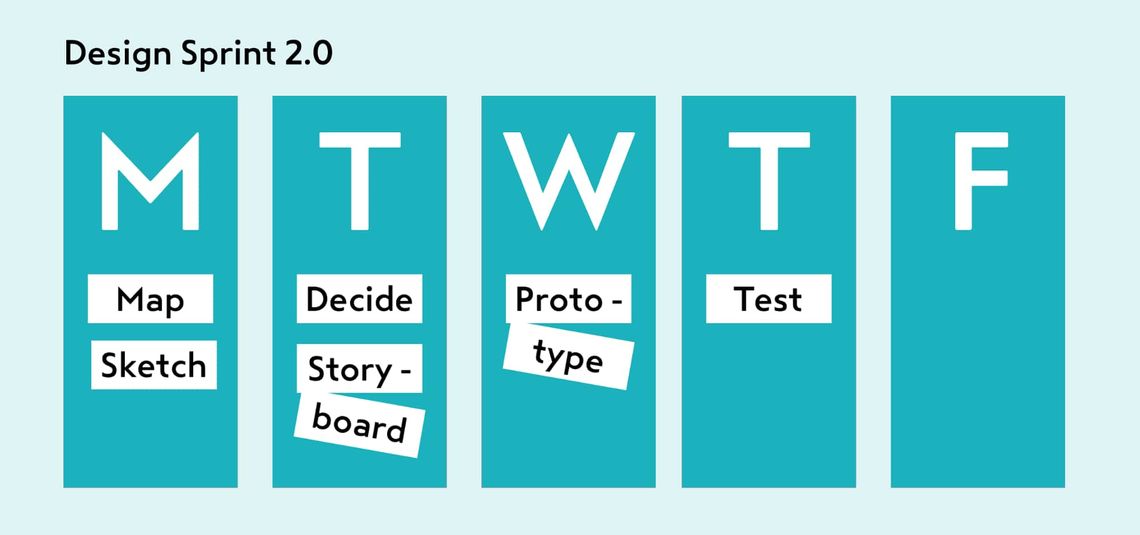 Design Sprint 2.0 in short
Sprint 2.0 is a shorter 4-day sprint which has a few hacks that save time spent on activities. One example of such hack being ‘Flow exercise’: by working out the flows individually and then combining flows together, the time taken to do storyboard can easily be halved. The Lightning Demos activity I described on Day 2 is shortened in Design Sprint 2.0. All these tweaks add up and make a big difference as the process becomes more efficient, focused and make it a method that, when adapted, could be used in versatile project set-ups.
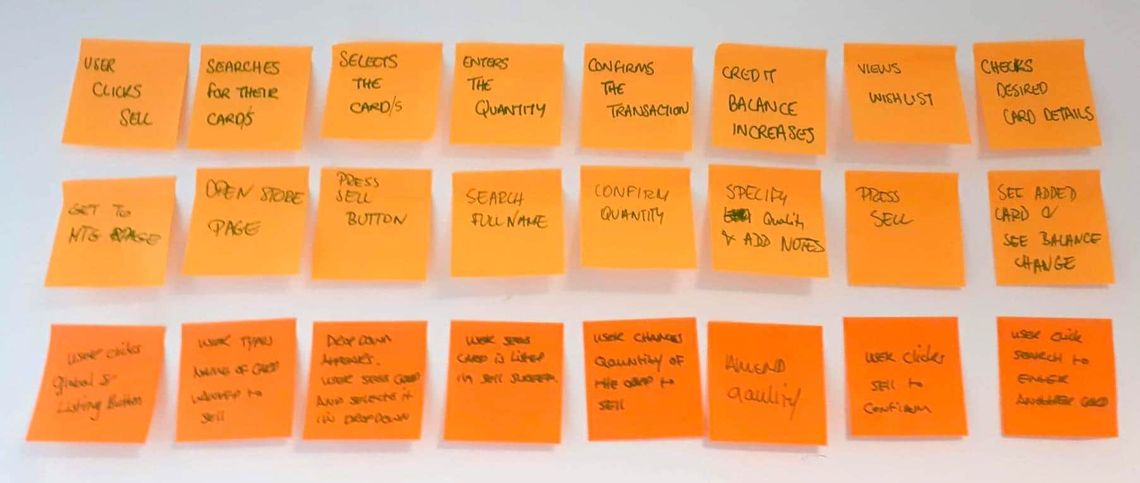 Flow exercise right before the Storyboard exercise
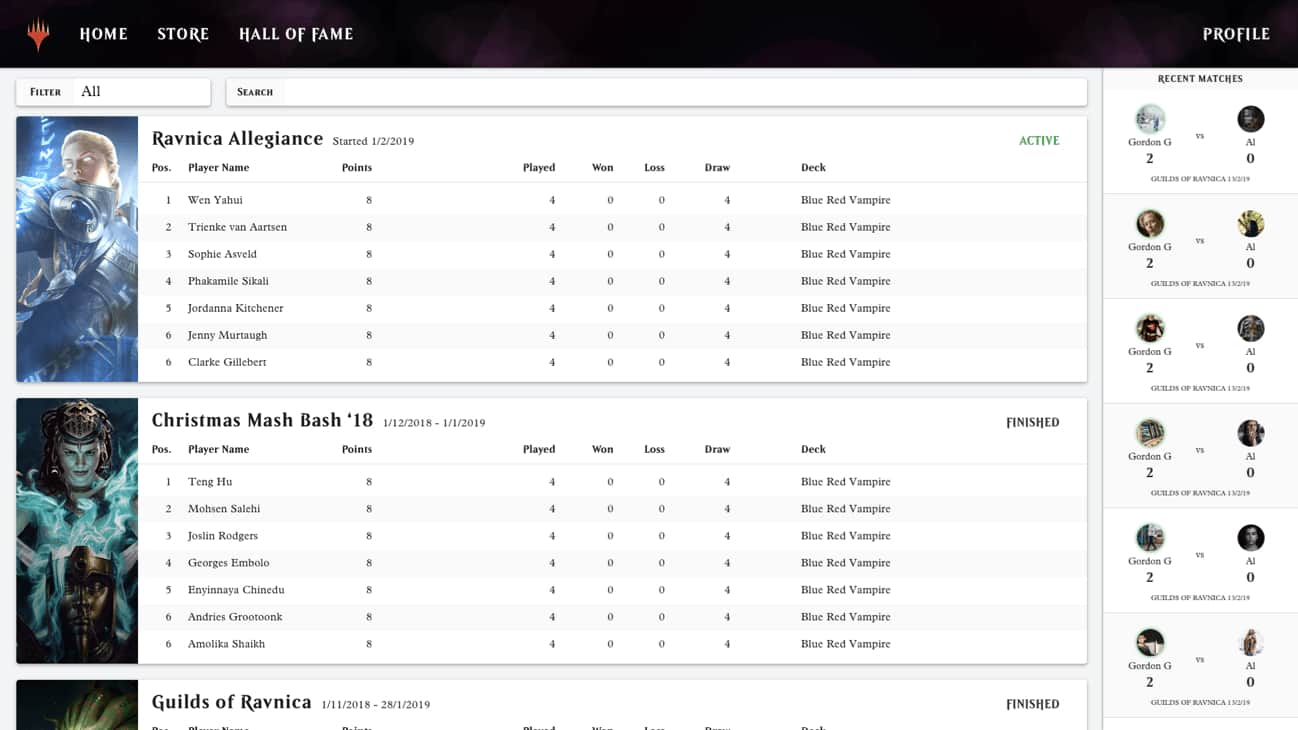
To summarise the second week of Design Sprint: we conceptualised, designed and tested another functional slice of application (MtG Card Shop). Overall, as expected, it seemed much easier and more natural to go through the activities for the second time and that contributed to time savings along the way. We had accomplished the main objective of the whole project: we created initial designs for a new MtG application. Similar to the first week, through testing we were able to confirm our assumptions that we have made based on expert interviews and interactions with the Product Owner.
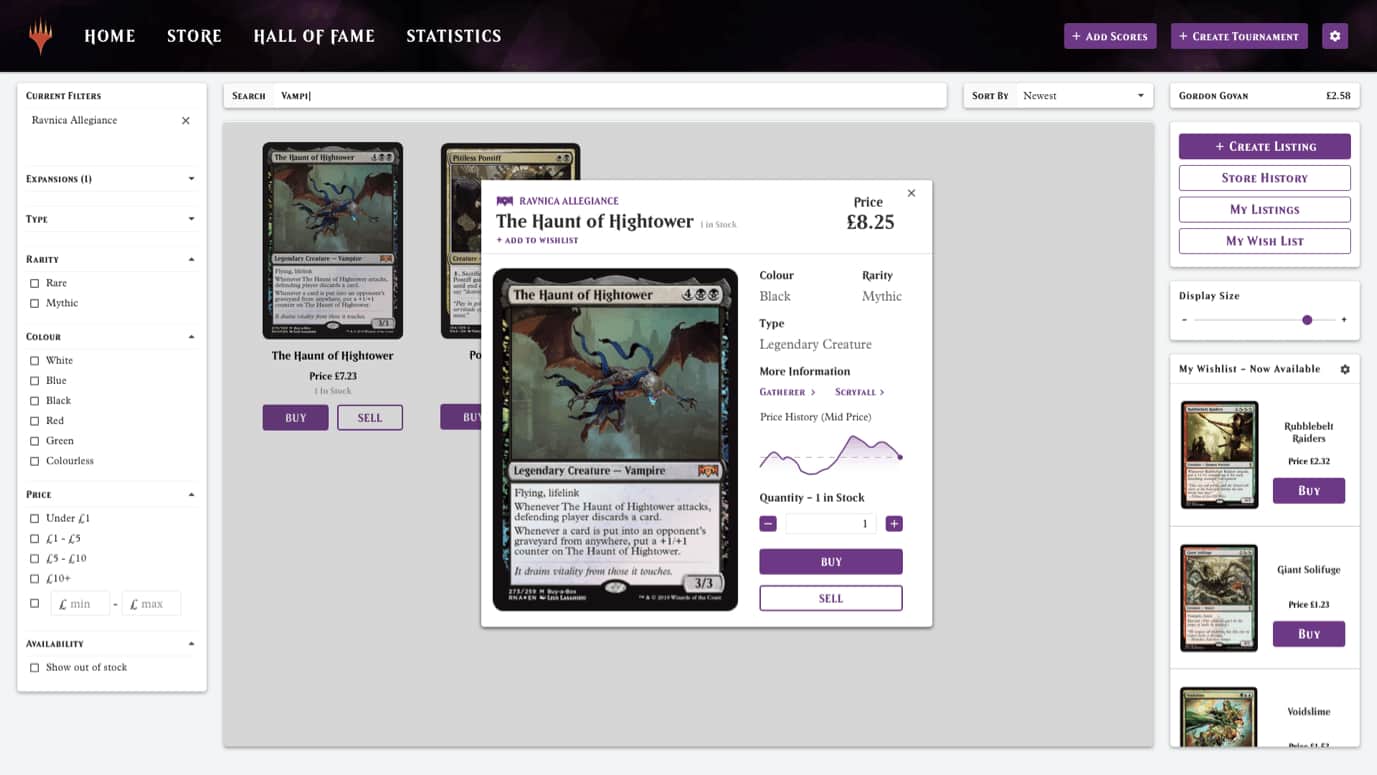 The MTG Shop Prototype - Day 5 (Sprint 2.0.)
Furthermore, on Friday we introduced some tweaks to the design. We also used that day to reflect on how the past two weeks went and we turned our thoughts into a couple of learnings sessions with our UX team.

