Getting started with WebGL at a low-level is hard and in many cases you’d be better off with a high-level library. However, I’ve found that having an understanding of the low-level API can be useful when trying to understand the trade-offs these libraries make and how to optimise your usage of them.
This post introduces a quick reference guide to picking the right low-level draw call for those trying to decipher the difference between drawArrays, drawElements and their oddly-ANGLE‘d instanced equivalents. It will not cover the detail of how to use these calls (e.g. setting up attributes, writing shaders, etc.), just an overview of the method calls themselves, what they’re good for and how to go about picking between them.

Introduction
The WebGL specification defines 5 methods for writing to the drawing buffer. However, only 3 of these methods are useful. Let’s start with the most basic call -
void clear(GLbitfield mask)
As expected, it is used to clear the various buffers associated with rendering. However, clearing the canvas doesn’t let you draw anything meaningful so there are only 2 “real” calls we need to be aware of - drawArrays and drawElements.
For the curious, the 2 useless calls are finish() which is commonly an alias for the other and flush() which is unnecessary if you’re using requestAnimationFrame (which you should be).
drawArrays
First up, let’s start with the simplest call -
void drawArrays(GLenum mode, GLint first, GLsizei count)
We’ll use it to draw a cluster of triangles. I know triangles aren’t very original but I’m all out of cubes and teapots. Also, as it’s WebGL we should probably apply a gradient and make them jiggle about -

For this case, drawArrays works well. Notice how the triangles are disjoint (they do not share any vertices with each other) and don’t share any other common attributes.
drawElements
Next up, a slightly more involved call -
void drawElements(GLenum mode, GLsizei count, GLenum type, GLintptr offset)
The additional type argument refers to the element indices buffer which allows you to inform the GPU which vertices are shared. Which in turn, allows it to optimise its processing. We’ll use it to draw an approximation of a circle out of triangles -

drawElements works well in this case. Notice how the triangles share vertices with their adjacent neighbours and have one globally common vertex in the center. However, they don’t share any other common attributes.
In this post, we’re intentionally ignoring the different modes e.g. POINTS, LINE_STRIP, TRIANGLE_FAN, etc. and sticking to TRIANGLES to keep it simple. Choosing the right mode is itself a post-worthy topic. However, if you were drawing shapes like these using TRIANGLE_FAN is probably more appropriate.
ANGLE_instanced_arrays
At this stage, we’re out of calls as defined in the WebGL specification but there are 2 further calls defined in the ANGLE_instanced_arrays extension. These both allow render multiple instances, where as drawArrays and drawElements only allow you to render a single instance.
Attributes can then be configured to be per-vertex or per-instance. In the case of rendering multiple instances of a cube, using a per-vertex attribute to control the colour of a vertex would allow each vertex of the cube to be different colours but all of the cubes would be identical. However, using a per-instance attribute would cause all the vertices on a cube to be the same colour but each cube could be a different colour.
This can make a big difference to attribute buffer sizes when drawing non-trivial vertex counts. For example, if there were 100 vertices per instance and 500 instances, a per-vertex attribute buffer would contain 100 entries and a per-instance attribute buffer would contain 500 entries. Rendering the same thing with the non-instanced calls would require an attribute buffer containing 50,000 entries.
drawArraysInstancedANGLE
The first call in the extension is the instanced equivalent of drawArrays -
void drawArraysInstancedANGLE(GLenum mode, GLint first, GLsizei count, GLsizei primcount);
The additional primcount argument refers to the number of instances that will be drawn. Instead of drawing a single cluster of triangles, let’s draw multiple instances of the cluster, each translated to a different spot -

drawArraysInstancedANGLE works well in this case. Notice how the triangles are all disjoint but the triangles within each cluster do share common attributes.
drawElementsInstancedANGLE
Unsurprisingly, the other call is the instanced equivalent of drawElements -
void drawElementsInstancedANGLE(GLenum mode, GLsizei count, GLenum type, GLintptr offset, GLsizei primcount);
There’s nothing new to introduce here, just the combination of the arguments from the previous two calls. So let’s use it to draw multiple circle instances -

drawElementsInstancedANGLE works well in this case. Notice how the triangles within an instance share vertices with their adjacent neighbours, have one globally common vertex in the center and share other common attributes.
Whilst the rendered output has 3D-like qualities, it is just a 2D image. The combination of the high instance count, the stacked output with significant overlap and the colour scheme are combining to trick your eyes. Notice the harsh break at the top of the middle loop where the whole of the instance is visible.
How to choose?
Let’s combine all of the calls into one image -
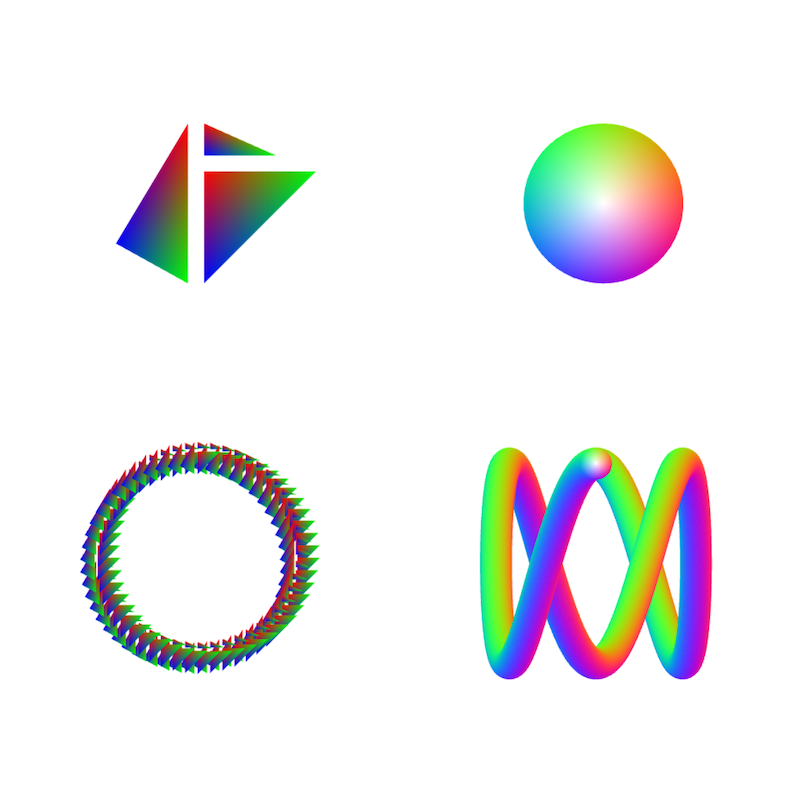
On the vertical axis we’re looking at how many instances of a thing are we rendering. If it just a single instance, we want the top row. However, if we’re rendering significant numbers of instances, we want the bottom row.
On the horizontal axis we’re looking at how many vertices (within an instance) are shared. If there are none, we want the left column. However, if there are significant numbers, we want the right column.
Whilst the above rules hold in general, it’s important to note that the decision can sometimes be a bit more nuanced. As we move from the top-left towards the bottom-right, we’re increasing the complexity of the GPU pipeline for each shader invocation. This will impact performance.
Conversely as we move from the bottom-right towards the top-left, we’re also increasing the size of the buffers that have to be calculated on the CPU, transferred down to the GPU and retained in GPU memory. Again, this will impact performance.
In some cases, the choice is clear i.e. when you are rendering entirely disjoint vertices or a single instance. It’s also worth noting that you can render anything using any mode (and enough code) as long as performance isn’t a concern! However, deciding on what significant means for a given use-case is something that is best answered with performance testing.
Conclusion
Spending a little bit of time to understand the options and picking the right drawing call can have a significant impact on the performance of your code. Most significantly, as the one writing the code, it can also vastly reduce the amount of code required! However, there’s nothing better than a bit of performance testing to prove you’ve made the best choice for your situation.
View the demo and the source on GitHub.