
Most native application development tends to focus on the main device families such as phones and tablets. Apple are introducing technologies that lower the complexity of supporting their additional platforms such as watchOS and tvOS.
One such technology is SwiftUI - Apple state that “SwiftUI is an innovative, exceptionally simple way to build user interfaces across all Apple platforms”. It is a declarative framework that attempts to abstract away many of the differences between the Apple platforms. This allows a developer to focus on what their application should look and behave like rather than how it should achieve this.
This blog will take a look at a basic setup for a multi-platform SwiftUI app.
Dependencies
The dependencies used to produce this blog, screenshots and code are:
- macOS 11.2.1
- Xcode 12.4
Code accompanying this blog post can be found on Github.
Project Setup
Right out of the box Xcode provides a project type called “Multiplatform”. To create a project of this type navigate to File > New > Project > Multiplatform > App.
When you set this up you should see the following targets have automatically been setup for you along with three top level directories called Shared, iOS and macOS:
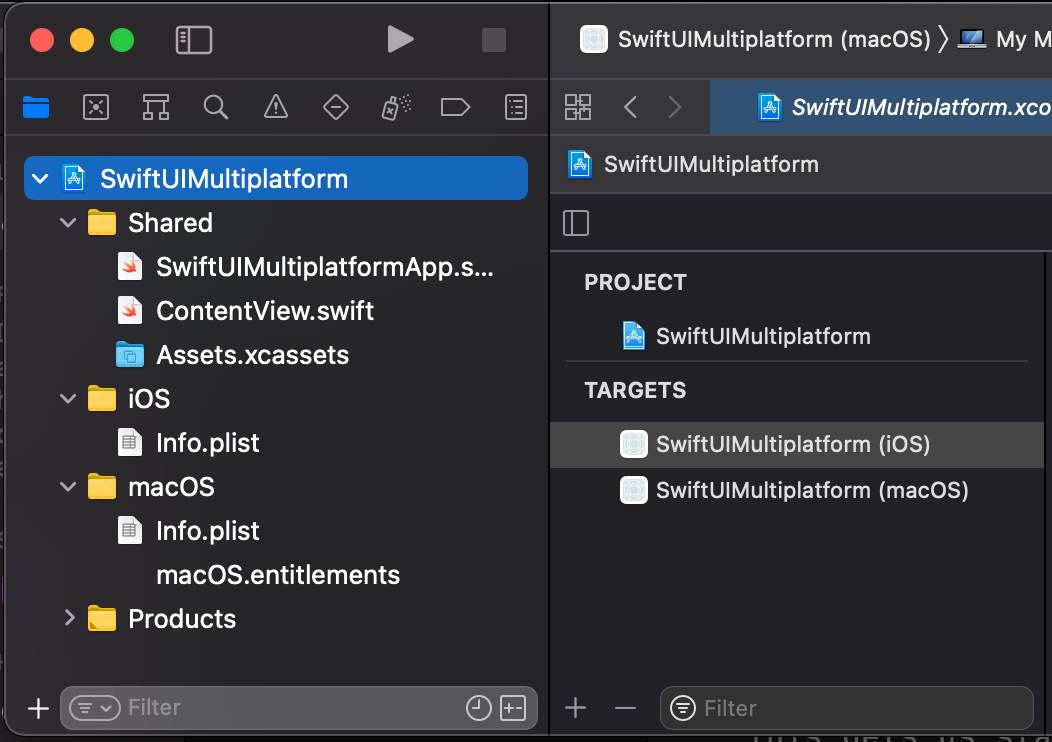
This gets us started but only covers two of Apple’s platforms. We would like our project to be truly multi (Apple) platform and run on:
- macOS
- iOS
- watchOS
- tvOS
Adding Platforms
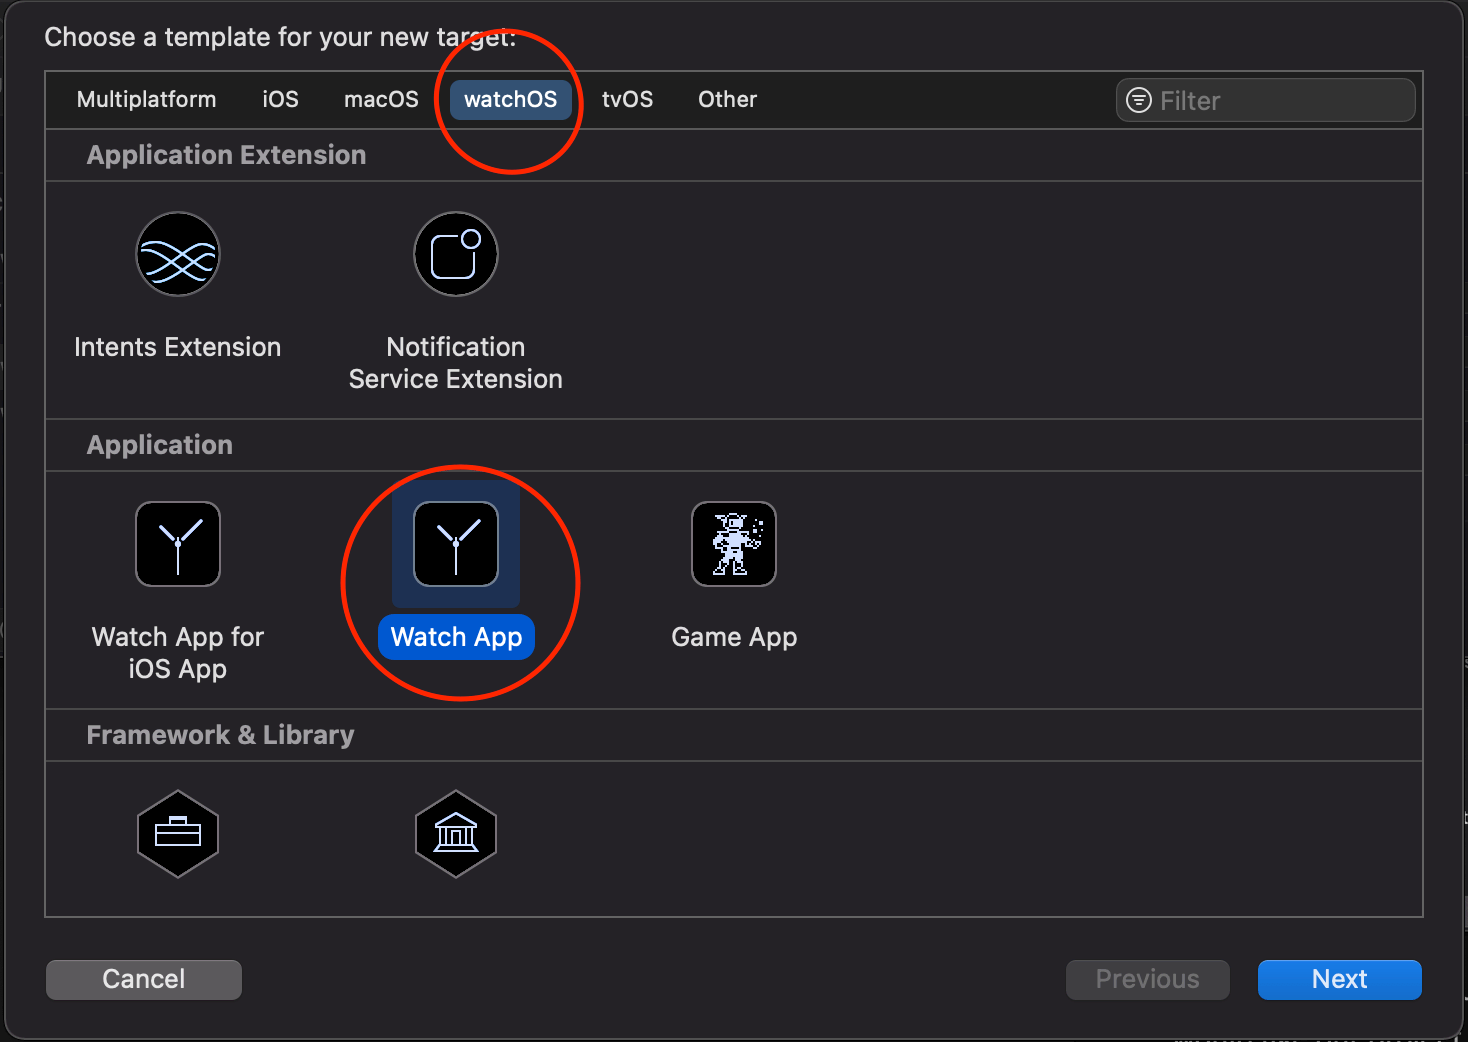
Therefore we will need to add watchOS and tvOS as targets. To do this click on the ‘+’ symbol at the bottom of the targets list (see above screenshot). Select the “watchOS” tab and then the “Watch App” target:
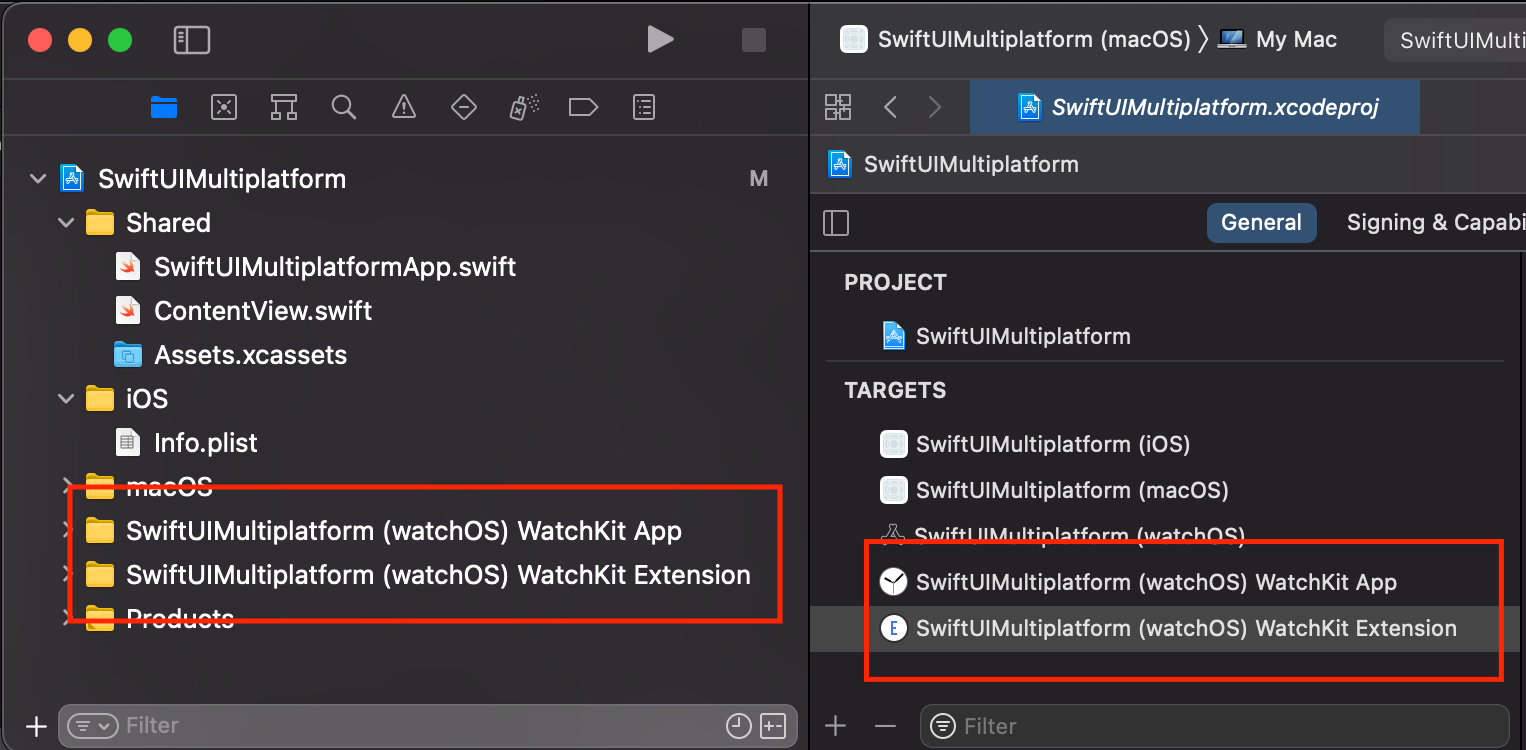
Once this has been added you will see new directories and targets that relate to watchOS. The “WatchKit Extension” target/directory are where the majority of our changes will take place.
We can do the same to add a tvOS platform. The steps are the same as above and you can check the git history of the repo to see this being added.
Platform Scoped Files
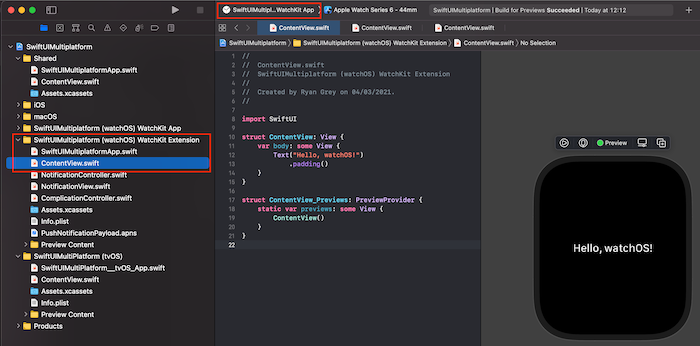
Expand the “SwiftUIMultiplatform (watchOS) WatchKit Extension” directory to see the files that have been automatically added. The main ones of interest are:
SwiftUIMultiplatformApp.swiftContentView.swift
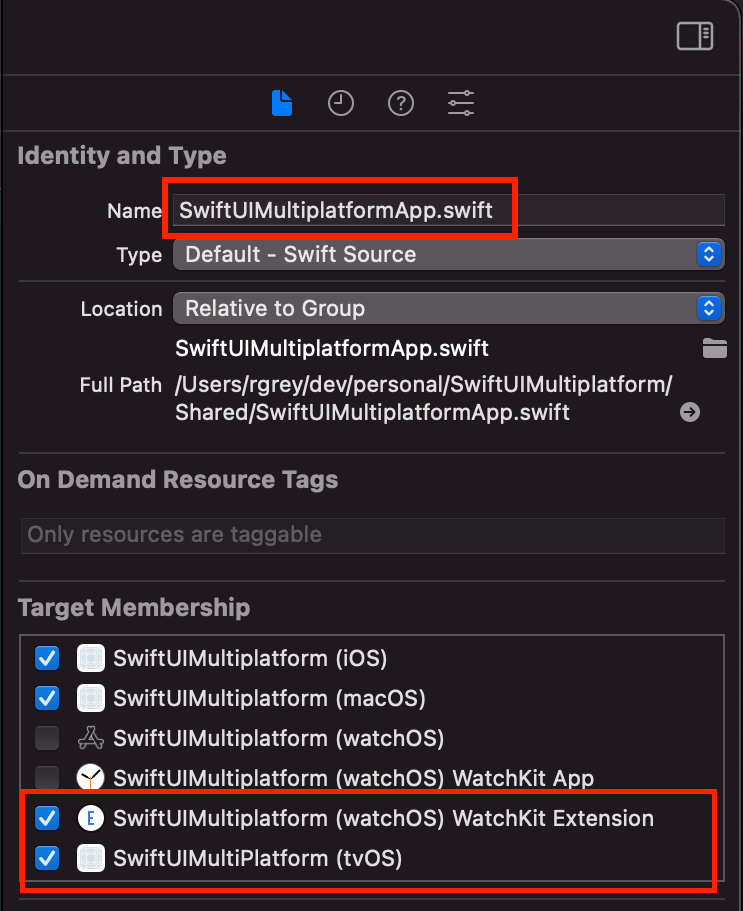
You will notice that the same files appear in the Shared directory. Xcode knows which files to use for any given platform based on the target(s) that the file is added to. To see this expand the right Xcode panel click on the File Inspector and take a look at the “Target Membership” section:
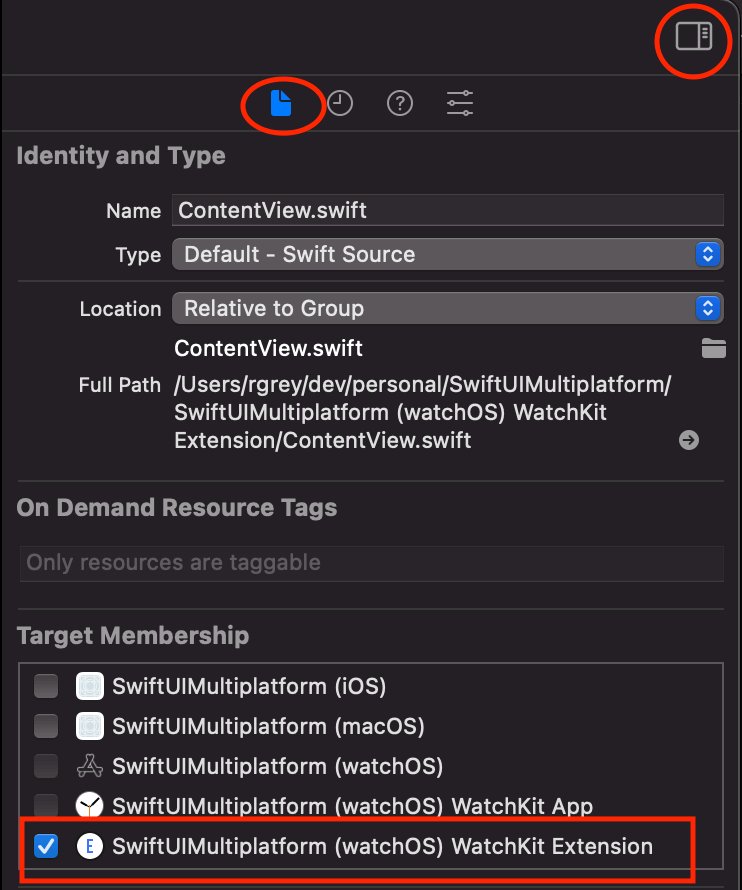
Looking at the SwiftUIMultiplatform (watchOS) WatchKit Extension/ContentView.swift file shows it is only included in the watchOS (extension) target. Taking a look at the Shared/ContentView.swift file shows that it is added to the iOS and macOS targets. This is how Xcode knows which files to include and build for which platforms.
To see this in action change the ContentView for each platform:
- Shared ->
Text("Hello, iOS/macOS!") - SwiftUIMultiplatform (watchOS) WatchKit Extension ->
Text("Hello, watchOS!") - SwiftUIMultiPlatform (tvOS) ->
Text("Hello, tvOS!")
For example the watchOS ContentView should now look like:
import SwiftUI

struct ContentView: View {
    var body: some View {
        Text("Hello, watchOS!")
            .padding()
    }
}

struct ContentView_Previews: PreviewProvider {
    static var previews: some View {
        ContentView()
    }
}
We won’t be going into the details of SwiftUI view hierarchies and structures in this post, but for more information on this take a look at Benedict’s blog post.
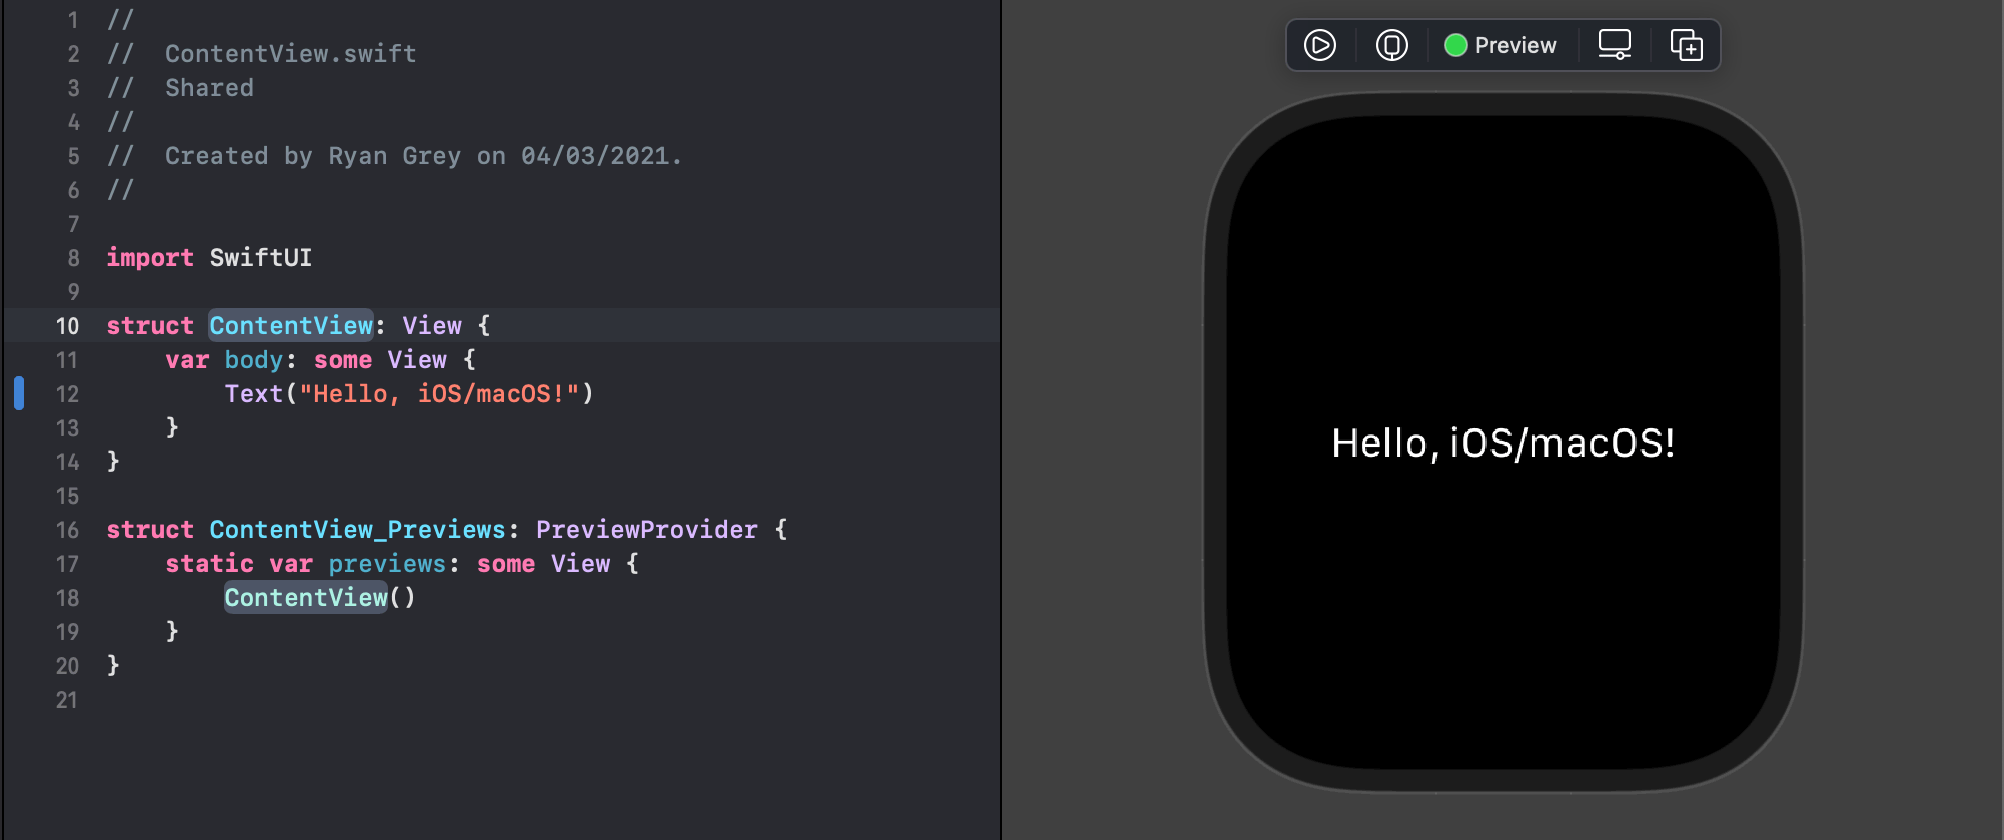
Now for each platform select the platform specific ContentView.swift file along with the associated Scheme. This should allow you to see a preview of the app built for that particular platform. Below we can see this for the watchOS platform:
It is important to note that this will only work if you attempt to preview each file for the correct platform/scheme. For example if you attempt to preview the SwiftUIMultiplatform (watchOS) WatchKit Extension/ContentView.swift file whilst the “SwiftUIMultiPlatform (tvOS)” scheme is selected you will see compilation errors. This is quite cumbersome and can be error prone. We will explore a way to improve things below.
Sharing Common Files
What we have so far is one Xcode project that contains multiple codebases for each platform. This isn’t much better than a separate Xcode project for each platform, but there is a way to start improving things. It would be nicer if we could share files that are identical across the platforms and only maintain multiple versions of the files that differ.
To begin we will attempt to create a common entry point to the app that works for all platforms. At the moment we have multiple entry points (the naming will depend on how you named things during the addition of the extra platforms):
Shared/SwiftUIMultiplatformApp.swiftSwiftUIMultiplatform (watchOS) WatchKit Extension/SwiftUIMultiplatformApp.swiftSwiftUIMultiPlatform (tvOS)/SwiftUIMultiPlatform__tvOS_App.swift
To achieve one entry point for the application:
- Delete all except the
Shared/version of the file. - Select the
Shared/SwiftUIMultiplatformApp.swiftfile and add it to the tvOS and watchOS targets.
This means that the structure of the app is now as follows:
- SwiftUIMultiplatformApp (shared)
- ContentView (macOS/iOS)
- ContentView (watchOS)
- ContentView (tvOS)
The ContentView is really just a wrapper for the initial screen of the application, so we can further improve things by repeating the process for ContentView:
- Delete all except the
Shared/version of the file. - Select the
Shared/ContentView.swiftfile and add it to the tvOS and watchOS targets
The structure of the app is now:
- SwiftUIMultiplatformApp (shared)
- ContentView (shared)
We can see this in action by selecting Shared/ContentView.swift and the Scheme of the platform we want to preview. We can switch platforms by switching Schemes while keeping Shared/ContentView.swift selected:
Shared Files and Platform Specific Files
You might have noticed that the text is the same for all platforms now - we’ve gone from all files being platform specific to no files being platform specific. In a real app we will come across cases where things can be displayed identically across all platforms and cases where we need to be platform specific. This means we would ideally like a mixture of the two things.
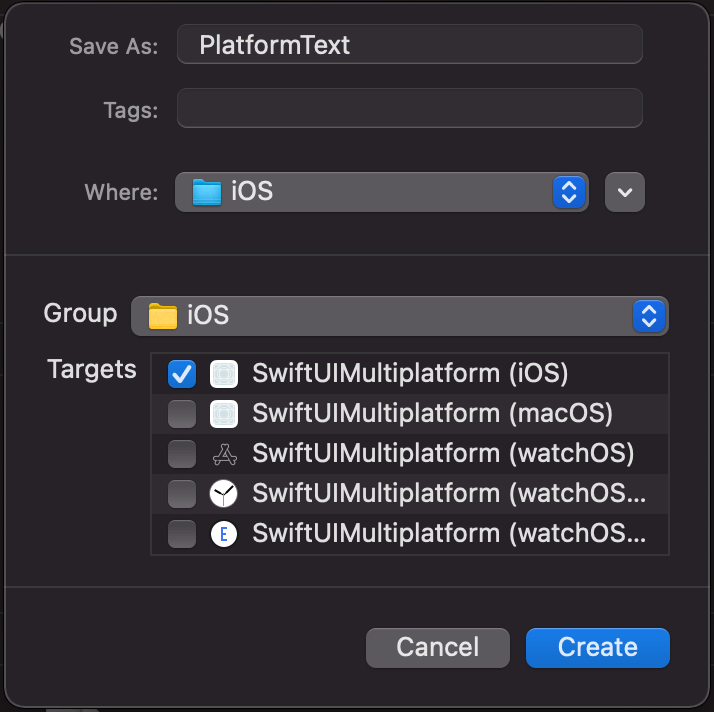
To achieve this add a file called PlatformText.swift to each platform directory. Ensure it is added to the correct directory and target each time you add the file. For example here we are adding to the iOS directory and the iOS target:
Add the following contents to each of these files and replace “[PLATFORM]” with the name of the platform that the file is intended for:
import SwiftUI

struct PlatformText: View {
    var body: some View {
        Text("Hello, [PLATFORM]!")
    }
}

struct PlatformText_Previews: PreviewProvider {
    static var previews: some View {
        PlatformText()
    }
}
We can now use this PlatformText struct by replacing the contents of our shared ContentView with:
import SwiftUI

struct ContentView: View {
    var body: some View {
        PlatformText()
    }
}

struct ContentView_Previews: PreviewProvider {
    static var previews: some View {
        ContentView()
    }
}
Now select the Shared/ContentView.swift file and change Schemes to preview the file for each platform. Note that the text shown is now platform dependent even though we are previewing a shared file:
The structure of the application is now:
- SwiftUIMultiplatformApp (shared)
- ContentView (shared)
- PlatformText (iOS)
- PlatformText (macOS)
- PlatformText (watchOS)
- PlatformText (tvOS)
- ContentView (shared)
A key observation here is that we can refer to a platform specific view (PlatformText) in a shared view (ContentView). The way this works is that Xcode is using each file’s target membership(s) to compile a complete app for any given platform. This allows us to have shared or platform specific files.
Conditional Compilation Blocks
The above shows how to scope files to particular platforms. This works well if each platform differs significantly for a particular view or even if just one platform differs significantly. However there may be cases where this is heavy handed for one minor difference. In this type of case conditional compilation blocks might be more appropriate.
For example if we wanted a different font colour only for tvOS only we could change the ContentView.swift file to the following:
import SwiftUI

struct ContentView: View {
    var body: some View {
        let platformText = PlatformText()
        #if os(tvOS)
            platformText
                .foregroundColor(.green)
        #else
            platformText
        #endif
    }
}

struct ContentView_Previews: PreviewProvider {
    static var previews: some View {
        ContentView()
    }
}
Note that this is a contrived example used for its simplicity and unlikely to reflect use in a real app. More realistic examples are likely to be adding support for platform specific features such as adding notification support on watchOS.
Summary
The example developed above is a very basic demonstration of how SwiftUI can be used to share code between Apple platforms. Platform scoped files are very easy to setup, easily identifiable by directory structure and play very nicely with Xcode’s live previews. They are therefore an essential mechanism for sharing code between platforms.
It’s probably worth noting that target membership for files is nothing new for Xcode or Apple platform development. However in the past the separation of UIKit (iOS), AppKit (macOS) and WatchKit have meant this approach would only be feasible for application logic. It is SwiftUI’s availability on all platforms that now makes this approach feasible for the view layer of an application.
One thing this blog did not explore is what this might look like in a more complex or full featured application. In practice the declarative nature of SwiftUI means that many of the UI controls handle platform specifics themselves in a way that abstracts differences away or makes them easy to deal with without conditional block statements or platform specific files. However there are cases where screen size, hardware availability or other factors will likely mean that platform specific code and files will be needed.
.jpg)