
Podman is an open-source daemonless alternative to Docker, capable of building and running Open Container Initiative (OCI) containers on Unix. Thanks to Docker open sourcing both their image specification and Docker Engine back in 2015, technologies like Podman have been able to containerise applications in a consistent yet compatible manner without too many troubles. For those of you reading this, you are all probably familiar with Docker’s recent licensing changes to Docker Desktop. If not, please do read more about it here. While the Docker CLI is still free for everyone to use, this may be more troublesome to set-up on a windows environment without Docker Desktop. I found Podman to be a relatively simple replacement for Docker and thought a simple step by step procedure was worth documenting. This article will discuss how to set-up Podman as a drop-in replacement for Docker Desktop without having to remember a single new command in the command line.
Benefits of Podman
Here are some of the key benefits of using Podman over Docker:
- Podman is daemonless. This allows Podman to run containers in a more secure fashion without root or escalated privileges. I can run a container all self-contained within my user namespace
- Podman is an even lighter tool compared to Docker by nature due to being daemonless
- There are no licensing costs associated to using Podman. For many using Podman just for development purposes can be a good fit
- Not really a benefit compared to Docker Desktop but using Podman with the WSL seems much easier than setting up the Docker CLI alongside Windows
- Podman works directly with DockerFiles. Podman is OCI compliant and so images built and shared between Docker and Podman are fully compatible
What do I lose out on in Podman?
Podman may not solve all of your problems compared to Docker without a bit of work. Furthermore, there are few, if any products, like Docker Desktop out there that provide such simple and seamless integration into many Developer tools. For most, paying the licensing fee is more than likely worth it. However, I am quick to realise that not all businesses will wish to make this investment. So here is a list of some of the known disadvantages I could think of if you go down the Podman route:
- Podman on Windows requires a Unix kernel. This is facilitated by the Windows Subsystem for Linux or WSL. This means you will need to manually manage and patch the OS yourself
- Not a big issue for Developers but there is no UI
- Podman is not fully compatible with Docker Swarm
- Podman being daemonless adds additional security but it means containers will not automatically get restarted when the host machine restarts. There is a small amount of configuration and overhead required to do this but won’t be covered here
- Podman will prompt you asking which repository you would like to pull an image from. Docker assumes docker.io as the default source but Podman does not. This difference in behaviour can mislead people into thinking that Podman’s console is not a like for like replacement for Docker
Steps to migrating to Podman
Firstly you need the Windows Subsystem for Linux (WSL) version 2. You likely already have this installed, but if not open up a command line as an Administrator and run the command below. If you do not have version 2 of the WSL, you will likely run into some errors in the next step when installing Ubuntu. You can find the version 2 update here. You will also need to set the WSL version accordingly in the console if you have an older version.
wsl --install
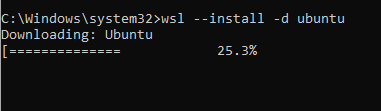
For the purpose of this post we will be using Ubuntu. To install Ubuntu with WSL and set this as your default distribution run wsl --install -d ubuntu. Once installed a new Unix shell should open up asking you to create a default Unix account. Note the unsuccessful install in the screenshot below when WSL version 2 is missing.
wsl --install -d ubuntu

Run the following commands to ensure the DNS server settings are correct each time you open up the Ubuntu Unix shell. Otherwise you will encounter networking issues. This will simply remove the existing soft link from /etc/resolv.conf and create a new /etc/wsl.conf file with some new defaults.
sudo rm /etc/resolv.conf
sudo bash -c "echo 'nameserver 8.8.8.8' > /etc/resolv.conf"
sudo bash -c "echo '[network]' > /etc/wsl.conf"
sudo bash -c "echo 'generateResolvConf = false' >> /etc/wsl.conf"
sudo chattr +i /etc/resolv.conf
Time to install Podman. The commands below will create a couple of environment variables, add the libcontainers source location to the sources list in ubuntu, download and install Podman and then finally add docker.io and quay.io to the local container registry configuration.
. /etc/os-release
sudo bash -c "echo 'deb http://download.opensuse.org/repositories/devel:/kubic:/libcontainers:/stable/x${NAME}_${VERSION_ID}/ /' > /etc/apt/sources.list.d/devel:kubic:libcontainers:stable.list"
sudo wget -nv https://download.opensuse.org/repositories/devel:kubic:libcontainers:stable/x${NAME}_${VERSION_ID}/Release.key -O Release.key
sudo apt-key add - < Release.key
sudo apt-get update -qq
sudo apt-get -qq -y install podman
sudo mkdir -p /etc/containers
echo -e "[registries.search]\nregistries = ['docker.io', 'quay.io']" | sudo tee /etc/containers/registries.conf
Create a soft link back to your development workspace mount so you can continue to work on your favourite IDE in windows and run docker-like commands in Ubuntu. WSL with Ubuntu should already have a mount mapped in /mnt/c/
sudo ln -s /mnt/c/Users/mjrichards/workspace ~/podman_workspace
Add an alias to your .bashrc config so that we can use the “docker” command in place of “podman”.
echo "alias docker='podman'" >> ~/.bashrc
bash
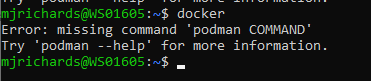
Type docker and you should see a prompt like the one shown below.
docker
We now need to initialise Podman.
podman info
Podman also requires two configurations to be tweaked for WSL. It is not particularly clear why these need to be set aside from systemd on Unix being compatible with the WSL, but these are required.
mkdir ~/.config/containers
echo "[engine]" >> ~/.config/containers/containers.conf
echo "cgroup_manager = 'cgroupfs'" >> ~/.config/containers/containers.conf
echo "events_logger = 'file'" >> ~/.config/containers/containers.conf
Now we are good to go!
Running Containers
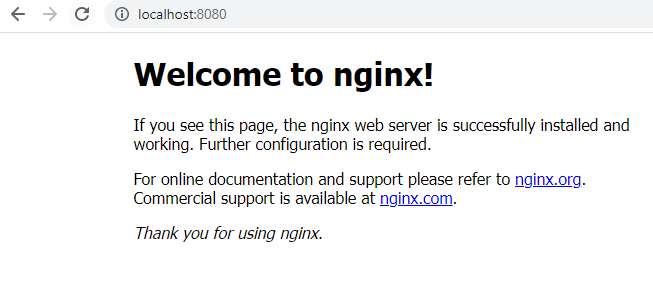
To test we can run an nginx http server by pulling an image from Docker Hub, run it through Podman and then access the page on our browser in Windows. Almost all if not all of the the existing Docker commands should be the same.
docker run -it --rm -d -p 8080:80 --name web nginx
Visit localhost:8080 in your browser. You should see the default landing page for nginx http server
If you run ps -ef | grep "nginx" in your console you will notice that the nginx container has your own user id/uid assigned to it. This is pretty neat, we can run containers without needing root privileges and thus preventing some security concerns compared to Docker where the root/most privileged user was needed to run a container.

If we use podman unshare ps -ef | grep "nginx" to see what uid is being used within the container you will notice that the user is shown as “root”.

We can stop our container similar to Docker by running docker stop
docker stop web
docker stop web
Building Containers
Under the hood Podman uses another tool to build images called Buildah. Podman does a fairly good job to make this seem opaque to the user and we can just run the normal Docker build commands to create images.
To build containers, first change your directory to the workspace mount we created a soft link for above or cd into your project folder where your DockerFile is located. In my case, my windows file mount was mapped to ~/podman_workspace.
cd ~/podman_workspace
docker image build . -t sample-image-name
docker ls
What about Docker Hub?
Many of the base images that we build from are sourced from Docker Hub directly. This led me to wonder whether we can still pull images at all under the license changes. The FAQS clear this up a little. Docker answers this question with “You can continue to access and use the content from Docker Hub under the Personal Subscription for commercial use. If you are doing this from Docker Desktop for commercial use, you will need to have a subscription for the use of Docker Desktop.”. So we are free to use Personal Accounts for pulling Docker Images as long as we are not using Docker Desktop. If you are pushing images to a public repository for commercial reasons then unfortunately it looks like this will require a subscription. That being said, there are multiple registries available to us not just Docker Hub including the Amazon Elastic Container Registry.
Conclusion
Podman offers a good alternative to Docker Desktop and I think its Docker compatible CLI lends itself towards a nice drop-in replacement. There is no denying that Docker Desktop provides excellent value for money, but it is good to know of some other options available to us. If for whatever reason Docker Desktop is not available to you, Podman could be a handy alternative. If you a SysOps or DevOps engineer equally you may be very concerned about security, Podman may offer that additional assurance in those cases. Hopefully you found this post helpful in order to get started.